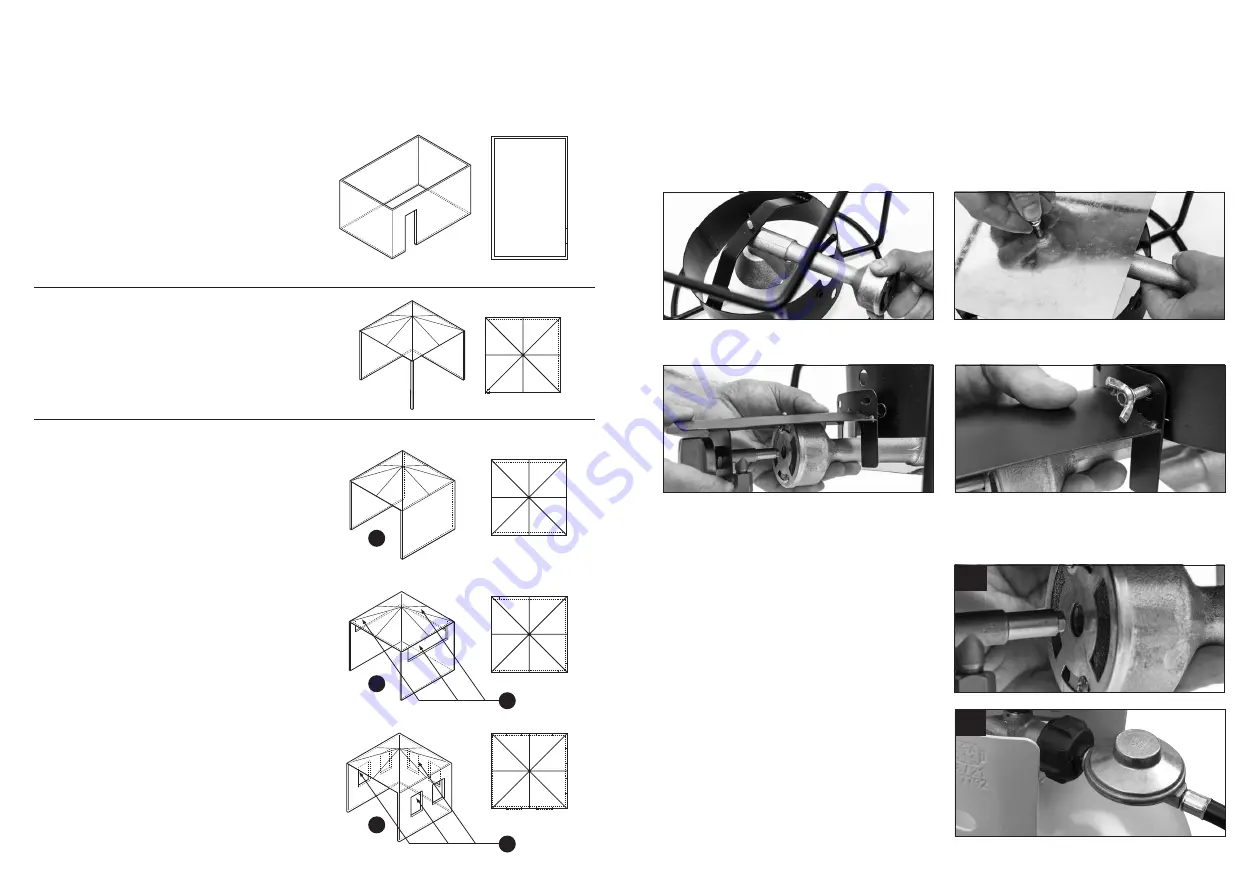
SAFETY INSTRUCTIONS
This appliance shall only be used in an above ground
open air situation with natural ventilation without
stagnant areas where gas leakage is rapidly dispersed
by wind and natural convection.
Any enclosure in which appliance is used should comply
with one of the following:
A. An enclosure with walls on all sides, but with no
overhead cover.
B. Within a partial enclosure that includes an overhead
cover and no more than two walls.
C. Within a partial enclosure that includes an overhead
cover and more than two walls, the following must
apply:
1. At least 25% of the total wall area is completely
open.
2. 30% or more in total of the remaining wall side,
back and front wall areas is open and
unrestricted.
3. In the case of balconies, 20% or more of
the total wall area must remain open and
unrestricted.
The figures shown are diagrammatic representations
of outdoor areas. Rectangular areas have been used in
these figures - the same principles apply to any other
shaped areas.
1
1
1
2
2
GENERAL ASSEMBLY
Connecting & Disconnecting to the Gas Source
Familiarise yourself with the general information and safety guidelines located in this manual. Note: Remove any transit
protection material.
ASSEMBLY
Review the contents of the package. Make sure all listed components are included.
1. Install the burner and heat reflector into the steel frame, using the wing nut.
CONNECTION
1. Check that the cylinder is filled, a sloshing sound
will be heard when shaken.
2. Check for any damage to either the cylinder
connection or the hose before using. NEVER
attempt to use damaged equipment.
3. Connect hose to gas control and tighten with a
spanner - take care not to overtighten (See Pic. A).
4. Connect the LCC27 regulator to the cylinder valve
and tighten (See Pic. B)
5. Before using turn the gas cylinder valve on and
spray soapy water on all connections to check
for leaks. If a leak is detected turn the valve off,
retighten all connections and retest.
4
5
2. Align the Burner Tube Cover with the gas control assembly positioned at the end of the burner and then secure with
the Wing Nuts.
3. Attach the LP Gas hose to the Gas Valve Assembly using a spanner – Do Not Over Tighten.
B
A


