background image

25

24

Add the marble top 
with 4 screws.

SINK MODULE - BQ1091BL

Attach the infill panel 
with 3 screws.

Summary of Contents for GALAXY BLACK BQ1090BLBHB

Page 1: ...090BLBHBNG BQ1090BLBHBSL IMPORTANT RETAIN THESE INSTRUCTIONS FOR FUTURE USE LCC27 REGULATOR SUPPLIED THIS LCC27 REGULATOR CAN ONLY BE USED WITH THE NEW SAFER INDUSTRY STANDARD LCC27 GAS CYLINDER CONNECTION Gasmate is a registered trademark of Sitro Group Australia Pty Ltd www gasmate com au Aber Living N Z www gasmate co nz FRIDGES AND FRIDGE TOPS ALSO AVAILABLE TO INTEGRATE AND COMPLETE YOUR OUTD...

Page 2: ...lution to the gas line and each join in the gas line including the gas connection at the inlet of the BBQ all gas hose connections the gas connection at the gas cylinder If bubbles appear there is a gas leak If the leak is at the hose connection re tighten and re seal If the leak is anywhere else or you cannot resolve the leak by tightening the connection DO NOT PROCEED Turn the gas cylinder off c...

Page 3: ...ct the hose prior to each use for cracks excessive wear or other damage Replace the hose if necessary GENERAL INFORMATION Never test for gas leaks with a lit match or open flame Never light barbecue with hood closed or before checking to ensure the burner tubes are fully seated over gas valve orifices Never lean over cooking surface when lighting Never alter or modify the regulator or gas supply a...

Page 4: ...he flexible hose After the assembly has been secured turn on the gas and check for leaks by brushing a soap and water solution over all connections If you are unable to correct the leak by tightening the connections turn off the gas and contact the supplier immediately Always ensure the barbecue is kept away from flammable materials and the gas cylinder clear of any heat source When changing over ...

Page 5: ... for other than its intended use as described in these instructions This Product is intended for Normal Domestic Household Use only The use of accessory attachments other than those recommended by the manufacturer may cause safety hazards The power supply must be supplied through a residual device RCD having a tripping current not exceeding 30mA Only connect this product to a socket outlet having ...

Page 6: ...t the cylinder only DO NOT disconnect hose from appliance NEW LCC27 GAS CYLINDER AND APPLIANCE CONNECTION This appliance has been supplied with the new safer gas cylinder connection Safe Lok LCC27 Type 27 regulator and hose connection This connection will only connect to a 4kg or 9kg gas cylinder with an LCC27 Type 27 cylinder valve This connection will NOT connect screw to the old type 21 POL gas...

Page 7: ...le Reason Solution Valve on cylinder is closed Open valve on cylinder Control knob is off Turn knob to high when lighting Igniter is faulty Use a long barbecue match Ignition system check IMPORTANT NOTE If for some reason ignitor fails to produce a spark at the electrode barbecue can be lit by a long barbecue match With hood open insert lighted match into match lighting hole positioned on the side...

Page 8: ...ng very lean cuts such as fish These temperatures vary with outside temperature and the amount of wind Roasting For best results when roasting remove the hotplate and centre the grill The outer two burners should be used on the low to medium setting Adjust the control knob to maintain the temperature around the medium mark Approximate Cooking Time The table below shows approximate cooking times wi...

Page 9: ... hood down or no food on the cooking surface Cleaning the Drip Tray To avoid fat or grease dripping from the barbecue remove and empty the drip tray after each use Wait until the drip tray is cool to touch before disposing of contents The drip tray should be washed periodically in a mild detergent and warm water solution Rust and Discolouration Minimization It is a common misconception that stainl...

Page 10: ...aning of the burner tubes is necessary If fire occurs in and around the burner immediately turn off gas at its source and turn the burner control to OFF wait until the barbecue has cooled then clean the burner tubes and burner ports CLEANING THE BURNER Follow these instructions to clean and or replace burners 1 Turn gas off at control knobs and gas cylinder 2 Remove cooking grates and grease tray ...

Page 11: ... 7 Fat tray 1 8 Trolley right panel 1 9 Right door 1 10 Trolley rear panel 1 11 Trolley top panel 1 Key Description Quantity 12 Trolley bottom panel 1 13 Gas bottle holder 1 14 Trolley right inner panel 1 15 Trolley left inner panel 1 16 Drawer 2 17 Shelf inside cabinet 1 18 Left door 1 19 Trolley left panel 1 20 Castor with brake 2 21 Castor without brake 2 22 Rear infill panel 1 ...

Page 12: ...holder Note This is chained to the inside of right hand door STEP 2 Plug the power cord into a power outlet and turn ON To avoid damage to the power cord make sure it is kept away from the product when in use STEP 3 Turn the light power switch on The blue lights above the control knob will illuminate along with the lights in the hood STEP 4 Attach infill panel to back of BBQ body in 3 places both ...

Page 13: ...3 Warming rack 1 4 Cooking plate 1 5 Cooking grid 2 Key Description Quantity 1 Main body 1 2 Flame tamer 4 3 Warming rack 1 4 Cooking plate 1 5 Cooking grid 2 Key Description Quantity 6 Side burner grid 1 7 Side bracket 2 8 Fat tray 1 9 Transformer 1 10 Adjustable feet 4 Key Description Quantity 6 Side bracket 2 7 Fat tray 1 8 Transformer 1 9 Adjustable feet 4 ...

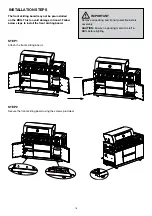
Page 14: ...SEMBLY INSTRUCTIONS STEP 1 Assemble the side bracket and adjustable feet IMPORTANT Remove all packing and transit protection before assembly CAUTION Ensure no packing material is left in BBQ before lighting ...

Page 15: ...BINET ISLAND MUST NOT BE COMBUSTIBLE GALAXY BLACK 6 BURNER BUILT IN BBQ Model No BQ1090BLBHB BQ1090BLBHBNG BQ1090BLBHBSL GALAXY BLACK 6 BURNER CLASSIC BUILT IN BBQ Model No BQ1190BLB BQ1190BLBNG BQ1190BLBSL 1000mm 145mm 585mm 270mm 110mm Ø hole for hose wiring access 110mm 110mm 1000mm 150mm 585mm 270mm 110mm Ø hole for hose wiring access 110mm 110mm 1470mm 1105mm ...

Page 16: ...ng the screws provided The front skirting board may not be pre installed on the BBQ This to avoid damage in transit Follow below steps to install the front skirting board IMPORTANT Remove all packing and transit protection before assembly CAUTION Ensure no packing material is left in BBQ before lighting ...

Page 17: ...17 STEP 3 Insert the spacer plugs ...

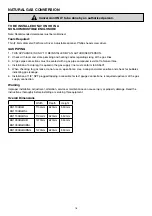
Page 18: ... the gas supply line must conform to AS5601 5 When checking for gas leaks do not use an open flame Use a soap and water solution and check for bubbles indicating gas leakage 6 Installation of 1 8 NPT plugged tapping accessible for test gauge connections is required upstream of the gas supply connection Warning Improper installation adjustment alteration service or maintenance can cause injury or p...

Page 19: ... and rear burner control knobs using a long thin blade screwdriver to access the LOW adjustment screw down the centre of the valve spindle turn the screw fully clockwise until it stops then anti clockwise 1 8 of a turn TEST OPERATION OF APPLIANCE BEFORE LEAVING PROVIDE A CERTIFICATE OF COMPLIANCE WARNING Improper installation adjustment alteration service or maintenance can cause injury or propert...

Page 20: ... that includes an overhead cover and no more than two walls Within a partial enclosure that includes an overhead cover and more than two walls the following will apply at least 25 of the total wall area is completely open and at least 30 of the remaining wall area is open and unrestricted In the case of balconies at least 20 of the total wall area shall be and remain open and unrestricted SAFE APP...

Page 21: ...ips head screw driver To join your kitchen together use 2 wing screws and nuts as shown Note Does not include fridge this is free standing IMPORTANT Remove all packing and transit protection before assembly CAUTION Ensure no packing material is left in BBQ before lighting ...

Page 22: ...22 SINK MODULE BQ1091BL The sink module is flexible follow the below steps to interchange it Note Marble not fitted ...

Page 23: ...e cabinet locating the rear pins through the back panel and securing with the clips then loosen the screws at each of the front corners see diagram below Finally secure by tightening the screws SINK MODULE BQ1091BL Bin support interchange ...

Page 24: ...ure with the nut from underneath inside the cabinet See diagram below Fittings required will depend on the situation and location of the BBQ contact your local hardware store Note A plumber will be required to connect tap and drain to mains household connections ...

Page 25: ...25 Add the marble top with 4 screws SINK MODULE BQ1091BL Attach the infill panel with 3 screws ...

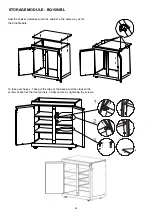
Page 26: ...s into the cabinet in the same way as for the Sink Module STORAGE MODULE BQ1092BL To take out shelves Take out the clips at the back panel then loosen the screws at each of the front corners Finally secure by tightening the screws ...

Page 27: ...27 DRAWER MODULE BQ1093BL To take out drawers push one tab up one tab down to release the drawer as shown ...

Page 28: ...e call Customer Service Australia Only 1300 174 876 Hours of operation Monday to Friday 8am 5pm EST Do not return to place of purchase Keep your purchase receipt this will be required to make any claims under the 12 month warranty ...

Reviews: