background image

7

6

GENERAL ASSEMBLY

CONNECTING & DISCONNECTING TO THE 

GAS SOURCE 

Familiarise yourself with the general information and 
safety guidelines located at the front of this manual.
DO NOT USE AN ADAPTOR AT THE CYLINDER 
CONNECTION

Check

1.  The cylinder is filled. A sloshing sound will be heard 

when shaken.

2.   The burner controls are in the ‘OFF’ position.

Connecting

1.   Ensure cylinder valve is in its full off position.
2.   Check for any damage to either the cylinder 

connection or the hose. NEVER attempt to use 
damaged equipment.

3.   When connecting the hose to the cylinder tighten the 

nut to a positive stop by hand or spanner.

4.   Open cylinder valve fully. If a leak can be heard at 

either end of the hose turn cylinder off and tighten 
joint. Wait 5 minutes before re-testing and use a 
soapy water solution to check the joint. If bubbles 
appear, the connection will need to be re-tightened.

Disconnecting

1.   Ensure the burner control is in the ‘OFF’ position.
2.   Ensure cylinder valve is in the full off position.

For storage and cylinder exchange, disconnect hose 
at the cylinder only, DO NOT disconnect hose from 
appliance. 

NEW LCC27 GAS CYLINDER AND  
APPLIANCE CONNECTION

This appliance has been supplied with the new safer gas 
cylinder connection Safe Lok LCC27 Type 27 regulator 
and hose connection. 

This connection will only connect to a 4kg or 9kg gas 
cylinder with an LCC27 Type 27 cylinder valve. This 
connection will NOT connect (screw) to the old type 21 
POL gas cylinder valve. 

ELECTRICAL DATA 

IMPORTANT

This product is fitted with a sealed electrical connection 
plug that is compatible with the product, the mains 
supply for Australia and meets the requirements of 
international standards. This product must be connected 
to a supply voltage that is equal to that stated on the 
rating label. If the mains connection plug or power cord 
becomes damaged it must be replaced with a complete 
assembly that is identical to the original, and this must be 
replaced by an authorised service centre. Always follow 
the Australian requirements for connection to the mains 
supply. If in doubt always consult a qualified electrician.

Technical Specification

Model No

YOSAA12002000A

Voltage Input

220-240V AC 50Hz

Voltage Output

12V - 2000mA

LIGHT GLOBES

For replacement light globes please contact 
Sitro Group Australia.

Summary of Contents for GALAXY BLACK BQ3039

Page 1: ...TANT RETAIN THESE INSTRUCTIONS FOR FUTURE USE LCC27 REGULATOR SUPPLIED THIS LCC27 REGULATOR CAN ONLY BE USED WITH THE NEW SAFER INDUSTRY STANDARD LCC27 GAS CYLINDER CONNECTION 04629 07 23 GALAXY BLACK...

Page 2: ...ution to the gas line and each join in the gas line including the gas connection at the inlet of the BBQ all gas hose connections the gas connection at the gas cylinder If bubbles appear there is a ga...

Page 3: ...AEROSOLS IN THE VICINITY OF THIS APPLIANCE WHILE IT IS IN OPERATION DO NOT USE OR STORE FLAMMABLE MATERIALS IN OR NEAR THIS APPLIANCE DO NOT PLACE ARTICLES ON OR AGAINST THIS APPLIANCE DO NOT MODIFY T...

Page 4: ...e flexible hose After the assembly has been secured turn on the gas and check for leaks by brushing a soap and water solution over all connections If you are unable to correct the leak by tightening t...

Page 5: ...for other than its intended use as described in these instructions This Product is intended for Normal Domestic Household Use only The use of accessory attachments other than those recommended by the...

Page 6: ...the cylinder only DO NOT disconnect hose from appliance NEW LCC27 GAS CYLINDER AND APPLIANCE CONNECTION This appliance has been supplied with the new safer gas cylinder connection Safe Lok LCC27 Type...

Page 7: ...valve on cylinder Control knob is off Turn knob to high when lighting Igniter is faulty Use a long barbecue match Ignition system check IMPORTANT NOTE If for some reason ignitor fails to produce a spa...

Page 8: ...r cooking hamburgers and vegetables LOW setting Use this setting when cooking very lean cuts such as fish These temperatures vary with outside temperature and the amount of wind Roasting For best resu...

Page 9: ...After cleaning and when it is dry spray some canola oil over the whole BBQ surface and wipe off the excess with microfiber cloth to enhance the surface protection Then cover the BBQ with a BBQ cover a...

Page 10: ...d the directions carefully Flash Back Spiders and small insects occasionally spin webs or make nests in the burner tubes during warehousing and transit These webs can lead to a gas flow obstruction wh...

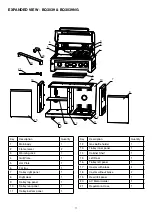
Page 11: ...t door 1 9 Trolley top panel 1 10 Trolley rear panel 1 11 Trolley bottom panel 1 Key Description Quantity 12 Gas bottle holder 1 13 Trolley inner panel 1 14 Cabinet Shelf 1 15 Left Door 1 16 Trolley l...

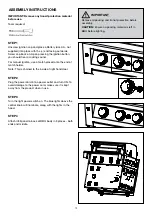
Page 12: ...ch holder Note This is chained to the inside of right hand door STEP 2 Plug the power cord into a power outlet and turn ON To avoid damage to the power cord make sure it is kept away from the product...

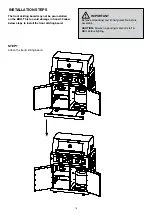
Page 13: ...skirting board may not be pre installed on the BBQ This to avoid damage in transit Follow below steps to install the front skirting board IMPORTANT Remove all packing and transit protection before ass...

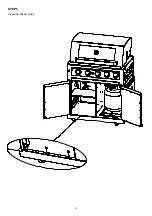
Page 14: ...14 STEP 2 Secure the front skirting board using the screws provided...

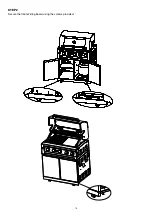
Page 15: ...15 STEP 3 Insert the spacer plugs...

Page 16: ...APPLIANCE IS ONLY TO BE INSTALLED BY AN AUTHORISED PERSON 2 Check with local and state plumbing and heating codes regarding sizing of the gas lines 3 All gas pipe connections must be sealed with a gas...

Page 17: ...blade screwdriver to access the LOW adjustment screw down the centre of the valve spindle or beside the spindle depends on the valve model turn the screw fully anti clockwise until it stops then clock...

Page 18: ...Standard Phillips head screw driver To join your kitchen together use 4 wing screws and nuts as shown Note Does not include fridge this is free standing IMPORTANT Remove all packing and transit protec...

Page 19: ...Health and safety risks may arise if silica dust is generated during any modification repair or removal work It is important that you do not undertake DIY work with engineered stone You should contac...

Page 20: ...y open and at least 30 of the remaining wall area is open and unrestricted In the case of balconies at least 20 of the total wall area shall be and remain open and unrestricted SAFE APPLIANCE LOCATION...

Reviews: