background image

2

3


READ ME FIRST


GAS LEAK TESTING

It is important that you leak test the BBQ before first use and every time the gas 
cylinder is refilled and reconnected to the BBQ.

To Complete Leak Test

•  Make sure all the control knobs are OFF.
•  In a small container, mix up a solution of water and detergent/soap.
•  Mix the solution well (about the same concentrate as washing up water).
•  Turn the cylinder ON by rotating the knob to open position.
•  Using a brush or spray bottle apply the soap solution to the gas line and each 
  join in the gas line including:
  - the gas connection at the inlet of the BBQ
  - all gas hose connections
  - the gas connection at the gas cylinder
•  If bubbles appear, there is a gas leak.
•  If the leak is at the connection, re-tighten and re-seal.
•  If the leak is anywhere else or you cannot resolve the leak by tightening the 
  connection DO NOT PROCEED.
•  Replace gas hose and regulator.
•  Replacement hose and regulators can be purchased from your local BBQ 
  retail specialist.

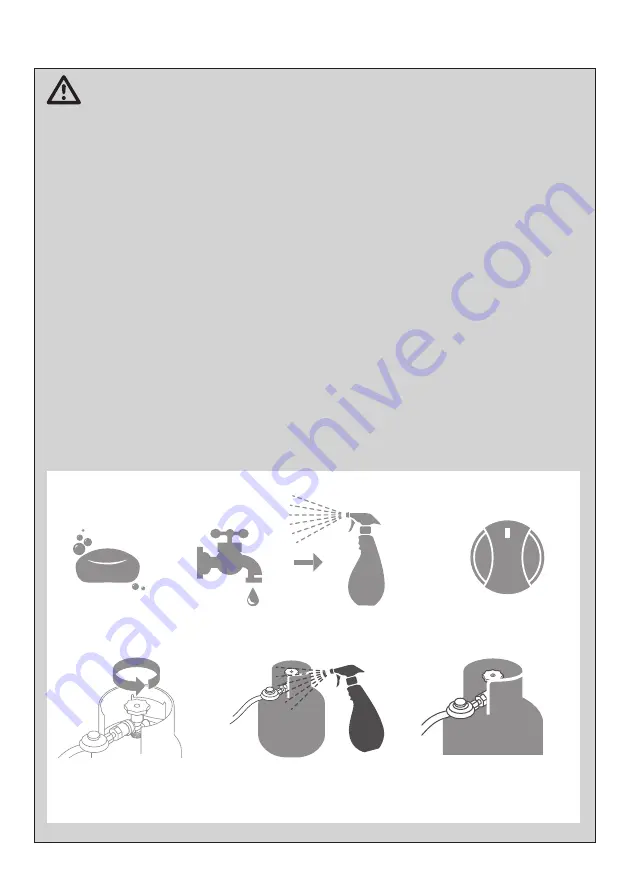
1. Add soap and water to spray bottle or soapy water with brush.

2. Turn off gas valves.

3. Turn gas cylinder on.

4. Spray or apply soapy water 
on gas connections.

5. If leak is present, 
bubbles will appear.

+

OFF

HIGH

LOW

SOAP

WATER

Summary of Contents for MARINER

Page 1: ...3050 LCC27 REGULATOR SUPPLIED This LCC27 Regulator can only be used with the new safer industry standard LCC27 Gas Cylinder Connection Powerful 22MJ h stainless steel burner for true BBQ performance Rotary ignition for easy lighting Generous cooking area of 1785cm2 Stainless steel grill cooking surface Integrated temperature gauge Includes LCC27 hose and regulator Gas certified to Australian and N...

Page 2: ...line and each join in the gas line including the gas connection at the inlet of the BBQ all gas hose connections the gas connection at the gas cylinder If bubbles appear there is a gas leak If the leak is at the connection re tighten and re seal If the leak is anywhere else or you cannot resolve the leak by tightening the connection DO NOT PROCEED Replace gas hose and regulator Replacement hose an...

Page 3: ...When connecting the hose and regulator assembly to the gas cylinder take care to avoid unnecessary twisting of the flexible hose After the assembly has been secured turn on the gas and check for leaks by brushing a soap and water solution over all connections If you are unable to correct the leak by tightening the connections turn off the gas and contact the supplier immediately Always ensure the ...

Page 4: ...cylinder DO NOT USE ADAPTERS Maximum hose length 1200mm After use turn the gas cylinder valve off wait for the flame to go out then turn the appliance control valve off GENERAL INFORMATION Avoid twisting or kinking the flexible hose Do not store or use petrol or other flammable liquids in the vicinity of this or any other appliance Do not store empty or full spare gas cylinders under or near this ...

Page 5: ...reas Your barbecue is to be used OUTDOORS The barbecue is not intended to be installed in or on recreational vehicles and or boats and should not be placed under any surface that will burn Do not obstruct the flow of combustion and ventilation air around the barbecue housing Protect Children Keep children away from barbecue during use and until barbecue has cooled after you have finished Do not al...

Page 6: ...ore using WARNING Only use BBQ when fully assembled 1 Slide the grease tray under the BBQ firebox as shown below WARNING Never use BBQ with out the grease tray fitted 2 Position the 2 flame tamers into place and locate above each burner in the BBQ firebox as shown below 3 Position the grill WARNING Never use BBQ with out the flame tamers and grill fitted 4 Connect the hose to the BBQ tighten and l...

Page 7: ...4 9 Main Firebox 1 10 Manifold with valve 1 11 Regulator and Hose 1 12 Control Panel 1 No Description Qty 13 Knob Bezel 2 14 Knob 4 15 Nut Foot Stand Leg 1 16 Screw Foot Stand Leg 4 17 Grease Tray 1 18 Lighting Rod 1 19 Burner Supporter 2 20 Fixed Plate for Flame Tamer 2 21 Main Burner 2 22 Flame Tamer 2 23 Cooking Grid 1 24 Temperature Gauge 1 PARTS LIST ...

Page 8: ...hood open insert the match into a hole on the underside of the barbecue and turn gas control to high Check performance of burner prior to installing barbecue plates Do not smoke when attempting to ignite barbecue Never use volcanic rock heat beads or other material Always use protective gloves when handling hot components LIGHTING PROCEDURE Burner Operation Ignition System Check 1 With cylinder va...

Page 9: ...oking or is taking too long Burner has gone out Check that the gas bottle is not empty and re ignite the burner Cooking surface was not given enough time to warm up before the food was applied Remove the food and give the burner time to warm the cooking surface 5 10 mins There is too much food on the cooking surface Cook smaller portions OPERATING PROCEDURE Cooking The control knob can be turned f...

Page 10: ... clean the burner tubes and burner ports Cleaning the Cooking Surface After cooking turn burner control to OFF and let barbecue cool before attempting to clean the grill plate or grate Before first use and periodically it is suggested that you wash the grill plate and grate in a mild soap and warm water solution Care of Cooking Surface Use and care of the cooking surface is important Do not use pa...

Page 11: ...that includes an overhead cover and no more than two walls Within a partial enclosure that includes an overhead cover and more than two walls the following will apply at least 25 of the total wall area is completely open and at least 30 of the remaining wall area is open and unrestricted In the case of balconies at least 20 of the total wall area shall be and remain open and unrestricted SAFE APPL...

Page 12: ...ce call Customer Service Australia Only 1300 174 876 Hours of operation Monday to Friday 8am 5pm EST Do not return to place of purchase Keep your purchase receipt this will be required to make any claims under the 1 year warranty ...

Reviews: