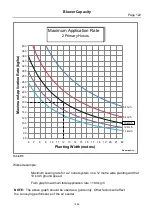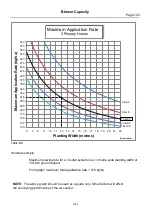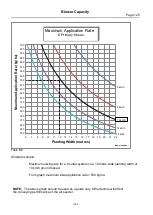
Blower Capacity
Page
126
10/09
Introduction
Regular maintenance will ensure
trouble free operation for the life of the
seeder. It is recommended that when
replacing
parts
you
use
genuine
components and fasteners of the same
grade and quality as the ones used on the
original machine.
DO NOT COMPROMISE SAFETY WITH
FAULTY COMPONENTS.
Daily Checklist
1.
Chain drives
Check chain tension (Fig. GM1).
1089
Fig. GM1 Chain Tension
Check for worn sprockets.
Check sprocket alignment.
2.
Distribution hoses
Check for wear on external
components.
Check hoses do not sag or bend
sharply.
Check all hoses are fitted
correctly.
Inspect secondary manifolds for
product build-up.
3.
Wheelnuts
Check tension of all wheelnuts when
first working the air seeder after
assembly or if a wheel has been
fitted. This need only be done for
the first couple of days of operating.
4.
Hydraulic system
Check all breakaway fittings have
their safety ring engaged (refer page
116).
Weekly Checklist
1.
Drive system
Lubricate
drive
chains
if
necessary.
Grease all drive shaft bearings.
Check sprockets are tight.
Check clutch bolt is tight.
2.
Meterbox bearings
Grease bearings (3 places per
meterbox).
NOTE:
It is recommended that the external
meterbox bearings are overgreased rather
than undergreased. Excess grease from
the bearings will help lubricate the
mechanical seal that prevents product from
reaching the bearing. If metering fine dusty
material through the meterbox it is
recommended to grease more frequently.
3.
Distribution system
Check all hoses for internal wear.
Rotate hoses if necessary.
Check gasket at primary hose
connection mounted on the hitch
assembly.
Check primary hoses for external
wear on the drawbar and seeder
trailer.


