background image


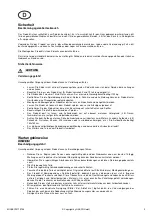
Safety 

Intended Use 


The product has been designed exclusively for playing. It is intended for use in the domestic private sector and  not for 
commercial use, for example for use in kindergardens or similar. 
 
Use the product only as described in these mounting instructions. Any other use is considered to be improper and may 
result in property damage or even in personal injury.  
 
Adult assembly, installation and operation required! 
 
Manufacturer nor dealer won’t accept any liability for damage caused by improper or incorrect use of this product. 


Safety Instructions 
 

 ATTENTION 
 

Injury Risk! 


Improper use of the product may result in injury. 


Do not let children play with packaging film. Children can get entangled and suffocate while playing. 


Note that the product is suitable only for children from 2 to 12 years old. 


Max. 1 child may take place per bench. The max. payload is 100 kg. 


Check  the  children’s  clothing.  Cords,  strings  and  loose  clothing  may  lead  to  strangulation  under  certain 
circumstances. 


Assembly and movement of the product may only be done by an adult. 


Only allow children play with the product when it is fully assembled. 


Check the product before the first use to be free of sharp edges and splinters. 


Supervise children while playing! 


The  product  may  be  set  up  and  used  both  indoor  and  outdoor,  only  on  level  soft  underground  (e.g.  lawn, 
rubber mats, etc.) 


When  installing  the  product  make  sure  to  keep  a  safe  distance  of  at  least  two  meters  to  other  units  (e.g. 
swings, slides, fences, clotheslines or overhanging branches, etc.) The construction area is about 140x140 cm. 


Do not make any changes in the installation. Any further extensions are prohibited! 


Climbing and gymnastics on the product is prohibited  


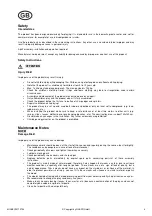
Maintenance Notes 

NOTE! 
Damage Risk! 


Improper use of the product may cause damage. 


Maintenance work should be done at the start of the season and regularly during the season, best fortnightly. 
The sandbox can be dangerous in case of lack of maintenance! 


Check periodically all screws and tighten them when necessary. 


Lubricate moving parts. 


Check periodically screws covers and sharp edges. 


Replace  defective  parts  immediately  by  original  spare  parts  concerning  parts-list  of  these  assembly 
instructions. 


This  product  is  mainly  made  of  natural  wood,  therefore  it  may  happen  that  cracks  can  form  due  to  extreme 
weather  conditions,  especially  after  long  hot  periods.  These  cracks  are  not  a  sign  of  lack  of  quality,  but  a 
natural appearance. These cracks do not have any impact on the sturdiness or resilience of the material. In 
order to prevent possible risk of injury, you can fill in these cracks with silicone or a similar material or polish 
the wood. 


The wood should be treated with a wood preserving paint from your colour specialty shop at least once a year. 


We recommend to change the play sand every five years. 


Make a daily manual cleaning (leaves, feces, waster, etc.) because a contamination of the play-sand can not 
completely be avoided in spite of a tarpaulin. 


Clean the tarpaulin with a damp cloth only. 


MICKEY20170706

© Copyright by GASPO GmbH

4

Summary of Contents for 31001-6

Page 1: ...consultation ult rieure Important Read before assembling Retain for future reference Attentione Leggere prima di assemblare Conservare per riferimento futuro Sandkasten mit Dachlift MICKEY D Aufbauanleitung GB Assembly Instructions F Instructions de montage I Istruzioni per il montaggio MICKEY20170706 Copyright by GASPO GmbH 1 ...

Page 2: ...nd z B Rasen Gummimatten etc aufgestellt und betrieben werden Achten Sie beim Aufbau auf einen Sicherheitsabstand von mindestens zwei Metern zu andern Aufbauten z B Schaukeln Rutschen Zäunen Wäscheleinen oder ausladenden Zweigen etc Die Aufbaufläche beträgt 140x140 cm Es sind keine selbständigen Abänderungen der Montage und keine weiteren Anbauten erlaubt Das Klettern und Turnen am Produkt ist ver...

Page 3: ... Sie ausschließlich die in der Montageanleitung angegebenen Zubehörteile Technische Daten Typ Sandkasten mit Dachlift Mickey Gewicht 21 kg Abmessungen Größe LxBxH 140x140x130 cm Artikelnummer 31001 6 10 2016 Konformitätserklärung Die EU Konformitätserklärung kann an der angeführten Serviceadresse angefordert werden Entsorgung Verpackung entsorgen Entsorgen Sie die Verpackung sortenrein Geben Sie P...

Page 4: ...f at least two meters to other units e g swings slides fences clotheslines or overhanging branches etc The construction area is about 140x140 cm Do not make any changes in the installation Any further extensions are prohibited Climbing and gymnastics on the product is prohibited Maintenance Notes NOTE Damage Risk Improper use of the product may cause damage Maintenance work should be done at the s...

Page 5: ... assembly instructions Technical Specifications Type Sandbox with roof lift Mickey Weight 21 kg Dimensions Size LxWxH 140x140x130 cm Ref Nr 31001 6 10 2016 Declaration of Conformity The EU declaration of conformity can be requested at the service address Diposal Dispose of packaging Dispose the packaging unmixed Give cardboards and cartons to waste paper foils to recyclable collection Dispose of p...

Page 6: ...térieur Lors du montage respectez un écart de sécurité d au moins deux mètres vers d autres installations par ex balançoires toboggans clôtures fils à linge ou branches etc La surface de montage du produit est de 140x140 cm Les modifications autonomes du montage et d autres installations sont interdites Il est interdit de grimper ou sauter sur le produit Consignes d entretien AVIS Risque d endomma...

Page 7: ...lusivement les accessoires indiqués dans la notice de montage Données techniques Type Bac à sable avec lève toit Mickey Poids 21 kg Dimensions lxpxh 140x140x130 cm No d article 31001 6 10 2016 Déclaration de conformité La déclaration de conformité CE peut être demandée à l adresse de service Élimination Élimination de l emballage Éliminez l emballage selon les sortes Mettez le carton dans la colle...

Page 8: ...Durante la costruzione rispettare una distanza di sicurezza di almeno due metri dalle altre strutture per es altalene scivoli recinzioni fili per stendere il bucato o rami sporgenti ecc La superficie di montaggio del prodotto è da 140x140 cm È assolutamente vietato apportare modifiche di propria iniziativa in fase di montaggio o montare component aggiuntivi È vietato arrampicarsi e fare ginnastica...

Page 9: ...solo gli accessori specificati nelle istruzioni di montaggio Dati tecnici Tipo Cassetta di sabbia con tettoia Mickey Peso 21 kg Dimensioni Lxlxa 140x140x130 cm No articolo 31001 6 10 2016 Dichiarazione di conformità Richiedere la dichiarazione di conformità CE all indirizzo indicato del servizio assistenza clienti Smaltimento Smaltimento dell imballaggio Smaltire l imballaggio differenziandolo Con...

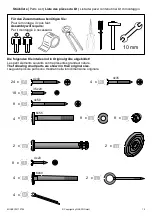
Page 10: ...e The following small parts are shown in their original size I seguenti piccole parti sono mostrati nella loro dimensione originale F r den Zusammenbau ben tigen Sie Pour le montage il vous faut Assembly will require Per il montaggio necessario 10 mm A B x 24 x 18 4x40 3 5x20 C D E F H G I K L M x 2 x 8 x 4 x 8 x 8 x 2 x 2 x 8 x 4 x 4 4x50 6x55 4x20 6x60 N x 4 4x35 MICKEY20170706 Copyright by GASP...

Page 11: ...pi ces du kit Lista dei pezzi contenuti nel kit di montaggio 1 x 4 2 x 2 3 4 5 6 7 10 8 9 11 12 13 14 20 15 17 18 19 16 x 4 x 2 x 2 x 2 x 4 x 2 x 2 x 2 x 2 x 2 x 2 x 1 x 2 x 1 x 2 x 2 x 2 x 2 MICKEY20170706 Copyright by GASPO GmbH 11 ...

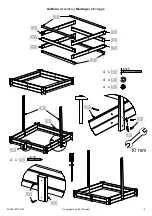
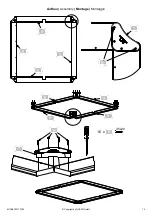
Page 12: ...Aufbau Assembly Montage Montaggio 3 1 3 1 1 2 2 1 8 4 4 A F E D 4 10 mm D x 4 6x55 E x 4 F x 4 A x 4 4x40 MICKEY20170706 Copyright by GASPO GmbH 12 ...

Page 13: ...Aufbau Assembly Montage Montaggio 6 5 6 5 7 B 6 6 5 5 7 B B x 16 3 5x20 MICKEY20170706 Copyright by GASPO GmbH 13 ...

Page 14: ...Aufbau Assembly Montage Montaggio A A A x 16 4x40 MICKEY20170706 Copyright by GASPO GmbH 14 ...

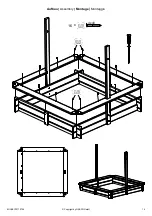
Page 15: ...Aufbau Assembly Montage Montaggio G H 9 9 G H 2x 9 9 10 10 10 I H x 2 G x 2 I x 8 4x20 2x MICKEY20170706 Copyright by GASPO GmbH 15 ...

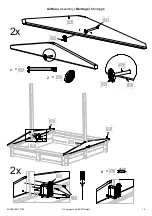
Page 16: ...Aufbau Assembly Montage Montaggio 50mm 299mm 299mm 11 11 12 12 11 N N 11 C C C x 8 4x50 4x35 x 4 N MICKEY20170706 Copyright by GASPO GmbH 16 ...

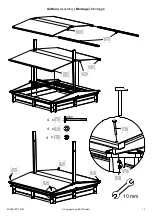
Page 17: ...Aufbau Assembly Montage Montaggio 14 13 13 13 14 K K K K K E F 10 mm K x 4 6x60 F x 4 E x 4 MICKEY20170706 Copyright by GASPO GmbH 17 ...

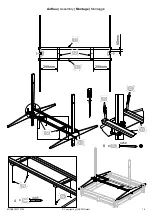
Page 18: ...Aufbau Assembly Montage Montaggio 16 17 18 19 M M M x 4 M MICKEY20170706 Copyright by GASPO GmbH 18 ...

Page 19: ...Aufbau Assembly Montage Montaggio L L 15 8 B A B x 2 3 5x20 A x 4 4x40 L x 2 A MICKEY20170706 Copyright by GASPO GmbH 19 ...

Page 20: ...Aufbau Assembly Montage Montaggio 40mm 50mm 20 x 2 20 50mm MICKEY20170706 Copyright by GASPO GmbH 20 ...

Reviews: