background image

Operating

Before First Use

Remove all promotional materials and packing as well as any foreign objects, but do not
remove the model label. Before first use and after a long period of storage, clean the
processing tools in warm soapy water (see ´Care and Cleaning`).

Using the Design Stand Mixer Advanced

WARNING:

Always switch ´Off` the appliance, wait until the motor stops completely and

unplug the appliance before rising the motor head or assembling/disassembling the processing
tool. To turn the appliance ´Off` you have to turn the speed control anticlockwise into the
´Off`-position.

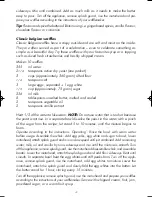
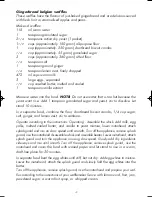
Push the head release lever with your right hand upwards (picture A).
Grab hold to the motor head in front of the processing tool with your
left hand and rise the motor head until locked into position.

NOTE:

Release the head release lever as soon as it is possible to rise

the motor head. The head release lever will lock in the lower position
as soon as the motor head is risen all the way up.
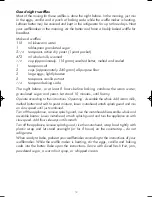
To attach the bowl

Take the bowl and place it on the bowl fitting. There are guiding pins
on the base of the bowl and matching cannelure on the bowl fitting.
With your right hand grab hold to the handle of the bowl and turn
the bowl clockwise until it fits tight to the bowl fitting and is locked
in position (picture B).    

NOTE:

Use the provided bowl only. 

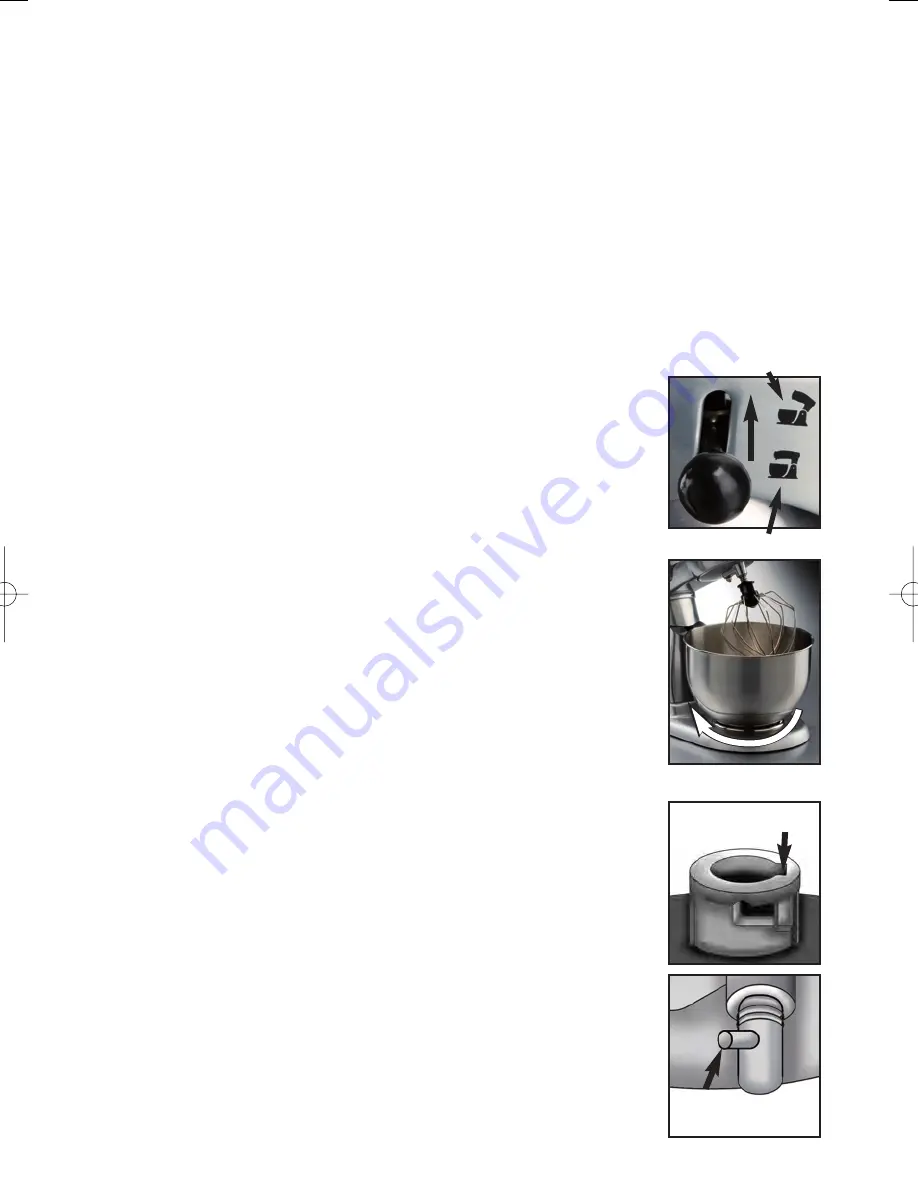
Assemble the processing tool

Take the processing tool you want to use into your right hand. On
the top of the attachment of the processing tool is a cannelure
(picture C). 

The motor head drive has a matching guiding pin (picture D).

36

tighten

B

release

lock

A

Cannelure of the
processing tool

C

D

Guiding pin of the
motor head drive

40969_designkuechenmaschineadvanced_manual.qxp  01.11.2007  08:59  Seite 36

Summary of Contents for 40969

Page 1: ...Instructions for use DESIGN STAND MIXER ADVANCED Art Nr 40969 GASTROBACK Read all provided instructions before first usage Model and attachments are subject to change...

Page 2: ...utes to avoid overheating If processing large quantities of food regularly interrupt operation and unplug the appliance for a few minutes to let the motor cool down ATTENTION Never switch on the appli...

Page 3: ...ding cocktail sauces cream crepe batter and kneading pastry i e shortcrust pastry or bread dough or folding in ingredients i e egg white The Design Stand Mixer Advanced is straightforward in use and c...

Page 4: ...s likely to be damaged to avoid risk of overheating fire electric shock or any other damage or injuries to persons Do not attempt to open the motor housing or to repair the power cord Check the entire...

Page 5: ...s are on or in the motor head With the appliance connected to the power supply do not touch the appliance with wet hands or when the appliance is damp or wet or is touching wet surfaces In this case i...

Page 6: ...mbling or cleaning the appliance and when not in use ATTENTION Keep hands and other utensils out of bowl while blending food to reduce the risk of severe injury to persons or damage to the unit Always...

Page 7: ...r sponge mixture medium speed 6 7 whisking and beating dough fast speed 8 10 for making fluffy light dough to froth up eggs making whipped cream egg white sponge or other airy dough ATTENTION Do not u...

Page 8: ...fully folded into the dough For adding heavy ingredients the dough should be heavy otherwise the ingredients will settle on the base of the cake pan Flour sticky fruit before adding them to the dough...

Page 9: ...d and rise the motor head until locked into position NOTE Release the head release lever as soon as it is possible to rise the motor head The head release lever will lock in the lower position as soon...

Page 10: ...uld get damaged if the motor head falls down with active force Attach the splash guard to the top of the bowl connect the power cord to the outlet and turn the appliance On Select a slow speed to star...

Page 11: ...ith your left hand and rise the motor head Rise the motor head until locked into position NOTE Release the head release lever as soon as you are possible to rise the motor head The head release lever...

Page 12: ...regarding the instructions Disassemble the processing tools 3 Clean the processing tool with a soft nylon washing brush and warm dish water Rinse the processing tool thoroughly under running water ATT...

Page 13: ...splash guard to the bowl and process shortly on low speed to blend Add vegetable oil to hot water With motor running on low speed slowly add water oil mixture sideways should take about 30 seconds Con...

Page 14: ...ize about 1 to 1 1 2 hours Turn the dough once and let rest for another 15 minutes Shape to fit 3 x 23 x 8 cm greased bread pan Cover and let rise again in warm place until dough has risen about 1 inc...

Page 15: ...tage but will come back together when mixed with dry ingredients Turn the appliance off remove the splash guard rise the motorhead disassemble the whisk and assemble the dough hook Lower the motorhead...

Page 16: ...approximately 50 minutes or until firm Cool in oven with door ajar Refrigerate for several hours before serving Chocolate Cake 1 cups self raising flour cup cocoa 1 cups caster sugar pinch of salt 150...

Page 17: ...aching medium speed level Add eggs sideways and beat on high speed until creamy Turn off the appliance remove splash guard rise the motorhead Disassemble the whisk and assemble the beater Lower the mo...

Page 18: ...tween two sheets of bak ing paper large enough to line tin Lift pastry into tin and press into sides trim edges Cover and refrigerate for 40 minutes Preheat oven to 200 c Place tin on oven tray line t...

Page 19: ...s Turn off the appliance remove splash guard rise the motorhead disassemble whisk and assemble beater Add chocolate mixture to egg whites lower the motorhead attach splash guard and slowly fold mixtur...

Page 20: ...semble the whisk Add butter eggs sugar and vanilla to bowl lower motorhead attach splash guard and mix until creamy Slowly rise speed until reaching high speed Turn off the appliance remove splash gua...

Page 21: ...o not use water that is too hot because the yeast wont rise In a separate bowl dissolve the yeast in the water with a pinch of the sugar from the recipe let stand 5 to 10 minutes until the mixture beg...

Page 22: ...iscuit crumbs 1 4 cup sugar salt ginger and lemon zest stir to combine Operate according to the instructions Operating Assemble the whisk Add milk egg yolks melted cooled butter and vanilla to yeast m...

Page 23: ...g combine the warm water granulated sugar and yeast Let stand 10 minutes until foamy Operate according to the instructions Operating Assemble the whisk Add warm milk melted butter and salt to yeast mi...

Page 24: ...of charge repaired or substituted There is no Warranty claim of the purchaser if the damage or defect of the appli ance is caused by inappropriate treatment over loading or installation mistakes The W...

Page 25: ...GASTROBACK GmbH Gewerbestra e 20 D 21279 Hollenstedt Germany http www gastroback de E Mail info gastroback de...

Reviews: