background image

We attach a certain importance to your safety. Thus, we ask you to read all 

provided instructions and information in this booklet carefully and complete-

ly, before you start running the appliance. This will help you to know all 

functions and properties of your new appliance. We especially ask you to 

adhere strictly to the safety information mentioned in these instructions.

TABLE OF CONTENTS

Knowing Your ›Design BBQ Pro‹ .................................................................... 36
Important Safeguards ................................................................................... 37
 

General Safety Instructions ....................................................................... 37


Important Safeguards for Electrical Appliances ............................................ 40


High Temperatures – Risk of Burns ............................................................ 42


Non-Stick Coating  ................................................................................ 42

Technical Specifications ................................................................................ 43
Properties of Your New ›Design BBQ Pro‹ ....................................................... 44
 

Height Control Feature ............................................................................ 44


Positioning the Lid .................................................................................. 44


  Closed Position ................................................................................... 45


  Open Position .................................................................................... 45


  Flat Position ........................................................................................ 45


Grilling Timer ........................................................................................ 45

Tips for Best Results ...................................................................................... 46
 

Grilling Meat and Fish ............................................................................ 46


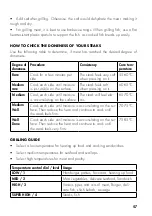
How to Check the Doneness of Your Steaks ............................................... 47


Grilling Guide ....................................................................................... 47


Tips for Grilling Sandwiches .................................................................... 48

Before First Use ........................................................................................... 48
Operation .................................................................................................. 49
 

Cooking Your Food ................................................................................ 50

Solving Problems ......................................................................................... 53
Care and Cleaning ..................................................................................... 54
 

Cleaning the Appliance .......................................................................... 54


Assembling the Appliance ....................................................................... 56

Storage ..................................................................................................... 57
Notes for Disposal ....................................................................................... 58
Information and Service ................................................................................ 58
Warranty ................................................................................................... 59

Summary of Contents for DESIGN BBQ PRO

Page 1: ...Bedienungsanleitung vor Gebrauch unbedingt lesen Modell und Zubeh r nderungen vorbehalten Nur f r den Hausgebrauch BEDIENUNGSANLEITUNG DESIGN BBQ PRO Art Nr 42537 Design BBQ Pro...

Page 2: ...Temperaturen Verbrennungsgefahr 10 Antihaftbeschichtung 11 Technische Daten 12 Eigenschaften Ihres neuen Grills 13 H henverstellung 13 Drei m gliche Positionen des Deckels 13 Geschlossener Deckel 14...

Page 3: ...halten kann die erforderliche Grilltemperatur stufenlos geregelt werden Auch wenn Sie gr ere Mengen Grillgut zubereiten wollen oder die Aromen unterschiedlicher Lebensmittel getrennt bleiben sollen mu...

Page 4: ...m 6 M helos abnehmbare Grillplatten auf Boden und Deckel mit strapazierf higer Antihaft beschichtung sp lmaschinenfest 6 Entriegelung der Grillplatten dr cken Sie hier um die Grillplatten von Deckel u...

Page 5: ...wortet Gastroback GmbH Gewerbe str 20 D 21279 Hollenstedt Telefon 04165 22250 oder per E Mail info gastroback de ALLGEMEINE HINWEISE ZUR SICHERHEIT Nur f r den Betrieb in Innenr umen und f r den Gebra...

Page 6: ...t auch nicht auf Unterlagen die durch lokale berhitzung platzen k nnen Beispiel Glas Legen Sie w h rend des Betriebes keine wertvollen oder empfindlichen Gegenst nde in die N he des Ger tes um Sch de...

Page 7: ...urch berhitzung Feuer und Elektrizit t zu vermeiden Niemals das Ger t einschalten ohne beide Grillplatten und die Tropfschale richtig installiert zu haben Wenden Sie bei der Arbeit mit dem Ger t niema...

Page 8: ...ren kann und schwere Personen und Sach sch den verursachen kann NIEMALS hochprozentige alkoholische Getr nke Beispiel Gl hwein Grog oder alkoholhaltige Lebensmittel mit dem Ger t erhitzen oder auf das...

Page 9: ...ergewissern Sie sich bitte zuerst dass ein gefahr loser Betrieb dort m glich ist Verwenden Sie keine Zeitschaltuhren Fernbedienungen oder Tischs teckdosen Vermeiden Sie die Verwendung eines Verl ngeru...

Page 10: ...etzkabel ausgelaufen sind dann fassen Sie das Ger t nicht an sondern ziehen Sie sofort den Netz stecker aus der Steckdose Reinigen Sie das Ger t danach und lassen Sie es mindestens 1 Tag trocknen sieh...

Page 11: ...h haften die Lebensmittel nicht auf den Grillfl chen Durch die Lebensmittel k nnen eventuell leichte Verf rbungen auftreten die aber die Funktion der Beschichtung nicht beeintr chtigen Bitte beachten...

Page 12: ...die Grillfl chen mit einem weichen Sp ltuch oder einer weichen Sp lb rste und warmer Sp lmittell sung oder in der Sp lmaschine siehe Pflege und Reinigung TECHNISCHE DATEN Modell Art Nr 42537 Design BB...

Page 13: ...H henverstellung zuerst auf OPEN WARNUNG VERBRENNUNGSGEFAHR Fassen Sie das Ger t w hrend des Betriebs nur an den Bedienungselementen an Griff Temperaturregler Grillzeit Timer Schieber der H henverstel...

Page 14: ...ckel w hrend des Grillens aufrecht Nach dem Auf heizen fassen Sie den Deckel am Griff und klappen den Deckel vorsichtig hoch bis er in der oberen Position stehen bleibt Legen Sie die Lebensmittel auf...

Page 15: ...ner Eieruhr Jeder lange Teilstrich der Skala entspricht ca 5 Minuten Die eingestellte Zeit erscheint auf dem Drehknopf des Grillzeit Timers Drehen Sie den Grillzeit Timer einfach auf die gew nschte Gr...

Page 16: ...t cke mit dicken Knochen zu grillen Beispiel T Bone Steaks L sen Sie den Knochen vor dem Grillen heraus Sie k nnen auch festere St cke wie Rinderschulter Lammschulter oder Nacken steaks verwenden Dami...

Page 17: ...edium durch Auf jeder Seite garen bis sich Bra tensaft auf der Oberfl che sammelt Bei geringerer Hitze etwas wei ter garen bis sich das Fleisch fest anf hlt 70 75 C Gut durch Auf jeder Seite garen bis...

Page 18: ...e Antihaftbeschichtung auf den Grillplatten brauchen Sie keine Butter oder Margarine f r die Au enseiten Ihrer gegrillten Snacks VOR DER ERSTEN VERWENDUNG WARNUNG Niemals kleine Kinder mit dem Ger t o...

Page 19: ...tr chtigungen zu sch tzen sollten Sie das Ger t vor der ersten Verwendung ohne Lebensmittel bei maximaler Temperatureinstellung SUPER HIGH ausheizen Sollte der Brandgeruch bei sp terer Verwendung wie...

Page 20: ...t frei um ungehindert arbeiten zu k nnen Betreiben Sie das Ger t nicht unter H ngelampen oder H ngeschr nken und Regalen Vergewissern Sie sich immer vor dem Betrieb dass die Bauteile des Ger tes unbe...

Page 21: ...immer zuerst auf die Position OPEN bevor Sie das Ger t verwenden Versuchen Sie niemals den Grill gewaltsam zu ffnen 3 Stellen Sie den Schieber der H henverstellung rechts am Metallb gel des Deckels au...

Page 22: ...einem K chentuch trocken tupfen 9 Achten Sie darauf den Rahmen des Deckels nicht mit Ihrem Arm zu ber hren w hrend Sie den Deckel am Griff fassen und den Deckel ffnen Klappen Sie den Deckel in die ge...

Page 23: ...llung Tipp Besonders bei weichen Lebensmitteln Hamburger Fisch empfindliches Gem se sollte der Deckel nur leicht und ohne Druck aufliegen 12 Garen Sie die Lebensmittel bis zur gew nschten Konsistenz u...

Page 24: ...lzeit Timers erklingt Die Heizelemente oder Grill platten sind verschmutzt Schalten Sie das Ger t AUS und ziehen Sie den Netzstecker aus der Steckdose Lassen Sie das Ger t abk hlen nehmen Sie die Gril...

Page 25: ...t zu besch digen Verwenden Sie zur Reinigung der Oberfl chen niemals scharfkantige oder harte Gegenst nde Niemals Fl ssigkeiten ber oder in das Geh use oder das Netzkabel gie en oder diese Bauteile in...

Page 26: ...n Sie den bersch ssigen Bratensaft in ein dicht schlie endes Gef und entsorgen Sie das Gef im Hausm ll Gie en Sie Bratensaft und Fett NICHT in den Ausguss um das Abflussrohr nicht zu verstopfen Sie k...

Page 27: ...e Heizelemente und die Heizkammern vollst ndig sauber sind Auch die Unterseiten der Grillplatten m ssen vollst ndig sauber sein R ckst nde an den Grillplatten oder in den Heizkammern w rden w hrend de...

Page 28: ...er in das Ger t oder seine Bauteile Bewegen oder kippen Sie das Ger t erst nachdem Sie alle R ckst nde Beispiel Bratensaft von den Grillplatten und aus der Tropfschale entfernt haben Das Ger t kann NI...

Page 29: ...er Gemeinde Fragen Sie ihre Gemeindeverwaltung nach den Standorten der Sammel stellen Wenn elektrische Ger te unkontrolliert entsorgt werden k nnen w hrend der M llverbrennung oder Verwitterung gef hr...

Page 30: ...ollenstedt Kunden anderer L nder Bitte kontaktieren Sie Ihren H ndler Bitte haben Sie daf r Verst ndnis dass unfreie Sendungen nicht angenommen wer den k nnen Einsendung von Ger ten Bitte verpacken Si...

Page 31: ......

Page 32: ......

Page 33: ...Read all provided instructions before first usage Model and attachments are subject to change For household use only OPERATING INSTRUCTIONS DESIGN BBQ PRO Art No 42537 Design BBQ Pro...

Page 34: ...ons 37 Important Safeguards for Electrical Appliances 40 High Temperatures Risk of Burns 42 Non Stick Coating 42 Technical Specifications 43 Properties of Your New Design BBQ Pro 44 Height Control Fea...

Page 35: ...guettes are simply prepared For always getting the best results the cooking temperature is continuously variable Even for preparing larger amounts or keeping the flavours of different types of food se...

Page 36: ...nium 6 Plate release buttons press these buttons to disassemble the grilling plates of the lid and base for cleaning Effortless removable grilling plates on base and lid with durable high quality non...

Page 37: ...only be performed at an authorised service centre Please contact your vendor GENERAL SAFETY INSTRUCTIONS This appliance is for household use only and NOT intended for use in moving vehicles Do not ope...

Page 38: ...or tis sue or other foreign objects under or on the appliance during operation to avoid risk of fire electric shock and overheating Do not place the appliance over a power cord or on any surfaces sen...

Page 39: ...tances when exposed to heat Fresh moistened food will splash when placed on the hot grilling area and hot steam will escape During operation do not hold any part of your body or delicate objects over...

Page 40: ...hemicals e g bleach for cleaning Do not place the housing or the power cord in an automatic dishwasher Do not leave any food dry on the appliance Always clean the appli ance after each use to prevent...

Page 41: ...ys connect the appliance to the extension cord first To disconnect Always unplug the extension cord from the power supply first Always handle power cords with care The pins of the power plug must be s...

Page 42: ...hot grilling surfaces e g grilling shovels barbecue utensils Do not move or disassemble the appliance when it is still hot Always leave the appliance and all its parts cool down before moving the appl...

Page 43: ...ning Do not use abra sive scourers or abrasive cleaners for cleaning Even stubborn residues can be removed via a soft cloth or soft nylon brush and warm dishwater For this remove the grilling plates f...

Page 44: ...Risk of Burns During operation and when the appliance is still hot only touch the appliance at the operating elements handle temperature control dial timer dial height control clip The exterior of th...

Page 45: ...The lid is folded back and lies level with the base creating a second grilling sur face To fold the lid back to the flat position hold the lid by the handle in the open position and press the hinge re...

Page 46: ...e Height Control Feature Cooking temperatures and cooking times depend on your individual liking as well as on thickness type and consistency of your food The following sections give some recommendati...

Page 47: ...on it 60 65 C M edium Cook each side until moisture is accumulating on the surface The steak will feel ela stic 65 70 C Medium Well Cook each side until moisture is accumulating on the sur face Then...

Page 48: ...housing or power cord in an automatic dishwasher Even the exterior of the housing lid and base may get hot during operation Only touch the appliance at the operating elements during operation and whe...

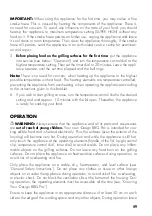
Page 49: ...ntrol dial to the desired setting and wait approx 10 minutes with the lid open Thereafter the appliance is ready for cooking your food OPERATION WARNING Always ensure that the appliance and all its pa...

Page 50: ...or heat resistant plastics During the initial use the appliance may give off some light smoke or burning smell This is normal and will subside with further use see Before First Use COOKING YOUR FOOD...

Page 51: ...o not tip over the appliance when opening the lid 6 Insert the power plug in a suitable wall power outlet see Important Safeguards for Electrical Appliances The power indicator illuminates Then turn t...

Page 52: ...squashed you should adjust the height control feature to the thickness of our food For this hold the lid in the correct position while pushing the height control clip back to the hinge until it stops...

Page 53: ...he timer set to 20 minutes and leave the appliance operate until the bell of the timer rings see Before First Use The heating elements or grilling plates are pol luted Switch off and unplug the applia...

Page 54: ...or any parts of it to avoid damage to the surfaces Do not use any hard or sharp edged objects for cleaning any surface of the appliance Do not immerse the housing or power cord in water or any other...

Page 55: ...not dispose fat and juices in the sink to avoid clogging the outlet pipe 6 Pull the drip tray out from under the base of the appliance Doing so ensure not to spill the juices Pour out fat and juices f...

Page 56: ...illing plates would burn to charcoal during operation If required clean the heating chambers and grilling plates see above Cleaning the Appliance IMPORTANT The grilling plates cannot be exchanged by e...

Page 57: ...residues still on the grilling plates or in the drip tray to avoid damage by spilling juices The appliance cannot be stored in an upright standing position as it would fall over 1 Always clean the ap...

Page 58: ...landfills dumps or refuse incineration hazardous substances can leak into the groundwater or can be emitted into air thus getting into the food chain and damaging your health and well being as well a...

Page 59: ...countries Please contact your dealer Please agree that we cannot bear the charge of receipt Submission of appliances Please ensure packing the appliance ready for shipment without accessories Add the...

Page 60: ...GASTROBACK GmbH Gewerbestra e 20 21279 Hollenstedt Germany Telefon 49 0 4165 2225 0 Telefax 49 0 4165 2225 29 info gastroback de www gastroback de 20170915...

Reviews: