background image

69

WARRANTY

We guarantee that all our products are free of defects at the time of purchase. Any 

demonstrable manufacturing or material defects will be to the exclusion of any fur-

ther claim and within 2 years after purchasing the appliance free of charge repaired 

or substituted. There is no Warranty claim of the purchaser if the damage or defect 

of the appliance is caused by inappropriate treatment, over loading or installation 

mistakes. The Warranty claim expires if there is any technical interference of a third 

party without a written agreement. The purchaser has to present the sales slip in asser-

tion-of-claim and has to bear all charges of costs and risk of the transport. 

Note:

Customers from Germany and Austria: For repair and service, please send Gas-

troback products to the following address: Gastroback GmbH, Gewerbestr. 20, 

D-21279 Hollenstedt, Germany.
Customers from other countries: Please contact your dealer.

Please agree that we cannot bear the charge of receipt. Submission of appliances: 

Please ensure packing the appliance ready for shipment without accessories. Add the 

sales slip and a short fault description. The processing time after receipt of the defec-

tive appliance will be approx. 2 weeks; we will inform you automatically. After the 

warranty period, please send defective appliances to the given address. You will get 

a free quotation and, thereafter, can decide, whether we shall repair the appliance 

to the costs possibly accrued, send back the defective appliance for free of charge, 

or dispose of the appliance for free of charge.

The appliance is intended for household use only and NOT suited for commercial usa-

ge. Do not attempt to use this appliance in any other way or for any other purpose 

than the intended use, described in these instructions. Any other use is regarded as 

unintended use or misuse, and can cause severe injuries or damage. There is no war-

ranty claim of the purchaser if any injuries or damages are caused by unintended use.

Summary of Contents for DESIGN FOOD PROCESSOR ADVANCED

Page 1: ...nungsanleitung vor Gebrauch unbedingt lesen Modell und Zubeh r nderungen vorbehalten Nur f r den Hausgebrauch BEDIENUNGSANLEITUNG DESIGN FOOD PROCESSOR ADVANCED Art Nr 40965 Design Food Processor Adva...

Page 2: ...heit 6 Wichtige Sicherheitshinweise Elektrizit t 8 Ihren neuen Design Food Processor Advanced kennenlernen 10 Bedienung 12 Vor der ersten Verwendung 12 Mit dem regul ren Arbeitsbeh lter arbeiten 13 An...

Page 3: ...mitteln gelingt Ihnen hiermit mit Leichtigkeit im Handumdrehen Sie k nnen mit dem Design Food Processor Advanced Obst und Gem se schnei den und raspeln Hackfleisch herstellen Kr uter und hnliches mahl...

Page 4: ...niversal Edelstahlmesser arbeiten betreiben Sie das Ger t niemals ohne den Stopfer Dr cken Sie die Nahrungsmittel ausschlie lich mit dem Stopfer nach unten Wenden Sie dabei keine Gewalt an Sicherung D...

Page 5: ...nststoffteile k nnen in der Sp lmaschine eventuell anlaufen Damit der Dichtungsring im Deckel nicht br chig wird nehmen Sie den Dichtungsring nach mehrfacher Verwendung des Ger ts heraus und pinseln i...

Page 6: ...as Ger t und oder Teile des Ger ts zu ffnen Niemals das Ger t am Netzkabel anheben bewegen oder tragen Fassen Sie das Ger t immer am Motorsockel an wenn Sie das Ger t bewegen oder verwenden wollen Das...

Page 7: ...enn der Netzstecker in der Steck dose steckt Niemals das Ger t oder Netzkabel in Wasser oder andere Fl ssig keiten tauchen oder stellen oder Fl ssigkeiten dar ber gie en Trock nen Sie bergelaufene Fl...

Page 8: ...e einer passenden Wandsteckdose und schlie en Sie das Ger t dort direkt an Das Ger t darf nur an die ordnungsgem abgesicherte Schukosteck dose einer geeigneten Stromversorgung Wechselstrom 220 230V 50...

Page 9: ...se steckt Verwen den Sie immer nur den Stopfer um die Nahrungsmittel im F llschacht nach unten zu schieben Schalten Sie das Ger t immer zuerst AUS Ein Aus Schalter dr cken Das Ger t ist AUSgeschaltet...

Page 10: ...beitsbeh lter mit Auswurfschacht alle Arbeitsbeh lter sind wasserdicht Auffangbeh lter Griff Ein Aus Schalter Pulse Schalter Kabelaufnahme Motorblock mit 1 100 Watt Induktions Motor Rutschfeste Gummif...

Page 11: ...f r feine und grobe Gem sestifte E Halterungsstift zum Aufstecken der unterschied lichen Scheiben und Edelstahlmesser auf die Beh lter kupplung F gro es Universal Edelstahlmesser zum Schneiden von Gem...

Page 12: ...s Ger t wieder einschalten Wenn Sie mit der Schneide und Raspelscheibe arbeiten Entfernen Sie Faserstoffe von den Messern Dr cken Sie bei der Arbeit nicht zu fest auf den Stopfer Wenn Sie mit dem Univ...

Page 13: ...rsockel Der Griff sollte beim Aufsetzen nach rechts zeigen Drehen Sie den Arbeitsbeh lter ohne Gewaltanwendung im Uhrzeigersinn bis der Arbeitsbeh lter fest auf dem Motorsockel einrastet und verriegel...

Page 14: ...e Ihre Nahrungsmittel in Julienne schneiden wollen dann setzen Sie die Juliennescheibe auf den Halterungsstift Die Seite mit den gew lbten Schneiden muss dabei nach oben weisen 2 mm 7 mm Schneideschei...

Page 15: ...feil und die Bezeichnung lock Achten Sie beim Auf setzen des Deckels darauf das beide Pfeilspitzen zueinander weisen und senken Sie den Deckel in Position Der Deckel besitzt vier F hrungszapfen die be...

Page 16: ...anwendung leicht nach unten Dr cken Sie nicht zu fest auf den Stopfer um den Motor nicht zu stark zu belasten Der Motor darf nicht merklich langsamer werden oder sogar stecken bleiben ACHTUNG Lassen S...

Page 17: ...Arbeitsbeh lter Sie k nnen dazu den Arbeitsbeh lter vom Ger t abnehmen wie in der Anleitung im Kapitel Pflege und Reinigung beschrieben 13 Reinigen Sie das Ger t nach der Anleitung im Kapitel Pflege...

Page 18: ...eits beh lter mit Auswurfschacht direkt in den Auffangbeh lter bef rdert F hren Sie alle Schritte der Anleitung Mit dem regul ren Arbeitsbeh lter arbeiten bis einschlie lich Punkt 2 durch Der Auswurfs...

Page 19: ...f dem Griff des Arbeitsbeh lters befindet sich ebenfalls ein Pfeil und die Bezeichnung lock Abb C Achten Sie beim Aufsetzen des Deckels darauf das beide Pfeilspitzen zuei nander weisen und senken Sie...

Page 20: ...en k nnen Wenn Sie weiche Lebensmittel wie z B K se Cheddar K se Mozzarella etc verarbeiten wollen sollten Sie die Nahrungsmittel vor der Verarbeitung gut k hlen Harte Nahrungsmittel wie z B Parmesank...

Page 21: ...kdose steckt Die Klingen der Scheiben und der Universal Edelstahlmesser sind sehr scharf Niemals auf die Klingen fassen Fassen Sie diese Werkzeuge immer nur an den Kunststoffteilen bzw Rand oder Schaf...

Page 22: ...ie den Arbeitsbeh lter dann nach oben vom Motorsockel herunter 4 Leeren Sie eventuell noch enthaltene Nahrungsmittel mit einem L ffel aus Holz oder Kunststoff oder dem mitgelieferten Gummischaber aus...

Page 23: ...der Sie die Schneide Reibe Raspel und Hobelscheibe sowie den Gummischaber aufbewahren k nnen 1 Fassen Sie mit der rechten Hand an den Griff der Zube h rkassette und ziehen Sie die Zubeh rkassette hera...

Page 24: ...sser richtig am Halterungsstift einrastet Das Universal Edelstahlmesser ist korrekt montiert wenn der Schaft nach oben weist mit dem breiteren Teil des Halterungsstiftes abschlie t und das Messer ein...

Page 25: ...l nutzen Sie die Sammelstellen der Gemeinde Fragen Sie ihre Gemeindeverwaltung nach den Standorten der Sammel stellen Wenn elektrische Ger te unkontrolliert entsorgt werden k nnen w hrend der M llverb...

Page 26: ...ollenstedt Kunden anderer L nder Bitte kontaktieren Sie Ihren H ndler Bitte haben Sie daf r Verst ndnis dass unfreie Sendungen nicht angenommen wer den k nnen Einsendung von Ger ten Bitte verpacken Si...

Page 27: ...h lter benutzen darf dieser bis maximal 5cm unter dem Rand gef llt werden Verarbeiten Sie Ihre Nah rungsmittel lieber in kleineren Portionen ANREGUNGEN UND IDEEN UNIVERSAL EINSATZ Nahrungsmittel Ma Zu...

Page 28: ...e St cke Schalten Sie das Ger t ein und zerkleinern Sie den K se auf die gew nschte Gr e Frische Kr uter bis zu 2 Tassen Geben Sie die frischen Kr uter in den Arbeitsbeh lter und verar beiten Sie sie...

Page 29: ...t dem Stopfer nach unten Kartoffeln Schneiden Sie die Kartoffeln in so gro e St cke das sie durch den F llschacht passen Schalten Sie das Ger t ein und schieben Sie die Kartoffeln unter leichtem Druck...

Page 30: ...evor Sie das Ger t einschalten Schalten Sie das Ger t ein und schieben Sie die Fr chte unter leichtem Druck in den F llschacht Benutzen Sie den Stopfer dazu Paprika Halbieren Sie die Paprika und entfe...

Page 31: ...n Teel ffel Salz Bereiten Sie das Ger t wie in der Anleitung Mit dem regul ren Arbeitsbeh lter arbeiten Punkt 1 bis 4 vor und setzen Sie wie in der Anleitung beschrieben das Universal Edelstahlmesser...

Page 32: ...f ein St ck K chenpapier W r zen Sie die Chips mit Salz und Pfeffer MAYONNAISE MIT GANZEN EIERN 2 Eier 2 Essl ffel Zitronensaft 1 Essl ffel Dijonsenf Prise Meersalz 2 Tassen Pflanzen l oder leichtes O...

Page 33: ...nleitung beschrieben das Universal Edelstahlmes ser ein P rieren Sie die Suppe P rieren Sie nicht die ganze Suppe auf einmal sondern in mehreren Portionen um den Arbeitsbeh lter nicht zu berla den Geb...

Page 34: ...4 vor Setzen Sie wie in der Anleitung beschrieben das Universal Edelstahlmesser ein Verarbeiten Sie den Fisch Fisch Sauce und Curry Paste bis alle Zutaten cremig sind Hinweis Verarbeiten Sie die Zutat...

Page 35: ...ie die Zucchini mit dem Stopfer leicht nach unten um die Zuchhini in Scheiben zu schneiden Nehmen Sie die Schneidescheibe aus dem Arbeitsbeh lter und geben Sie die Zuc chinischeiben in eine seperate S...

Page 36: ...das Ger t und nehmen Sie den Deckel vom Arbeits beh lter Mit einem Gummischaber kratzen Sie den Teig von den W nden und schieben ihn auf den Boden des Arbeitsbeh lters Verriegeln Sie den Deckel erneu...

Page 37: ...lebrig schalten Sie das Ger t erneut f r 15 bis 30 Sekunden ein Lassen Sie den Teig im Anschluss f r 10 Minuten ruhen Entfernen Sie das Universal Edelstahlmesser neh men Sie den Teig aus dem Arbeitsbe...

Page 38: ...en berziehen k nnen Lassen Sie f r die Lasur bei dem Karottenkuchen nur die Passi onsfrucht weg BANANENKUCHEN MIT FRISCHK SELA SUR 2 Tassen Mehl mit einem Teel ffel Back pulver gemischt Teel ffel Salz...

Page 39: ...Ofen bei leicht ge ffneter Ofent r abk hlen und stellen Sie ihn f r mehrere Stunden in den K hlschrank bevor Sie ihn Servieren SCHOKOLADENKUCHEN 1 Tassen Mehl mit einem Teel ffel Backpulver gemischt T...

Page 40: ...vor Setzen Sie wie in der Anleitung beschrieben das Universal Edelstahlmesser ein Geben Sie die Schokoladenst cke in den Arbeits beh lter und verarbeiten Sie die Schokolade bis sie grobe St cke haben...

Page 41: ...Bereiten Sie das Ger t wie in der Anleitung Mit dem regul ren Arbeitsbeh lter arbeiten Punkt 1 bis 4 vor Setzen Sie wie in der Anleitung beschrieben das Universal Edelstahlmesser ein Geben Sie alle Zu...

Page 42: ...gefettete hei e Pfanne und backen Sie die Pfannkuchen bis die se auf beiden Seiten goldgelb sind Servieren Sie die Pfannkuchen mit Butter ERDNUSSBUTTER KEKSE Tasse ungesalzene Erdn sse 1 Teel ffel ger...

Page 43: ...nkleben Backen Sie die Kekse f r ca 15 Minuten und lassen Sie die Kekse auf dem Backblech im Anschluss abk hlen NUSSIGE FRUCHTRIEGEL Boden Tasse Mehl Tasse Mehl mit einem Teel ffel Backpul ver gemisch...

Page 44: ...peratur bis sich der Zucker aufgel st hat Kochen Sie das Zucker wasser auf und kochen Sie es f r ca 1 Minute Nehmen Sie den Topf von der Herdplatte und lassen Sie das Zuckerwasser auf Raumtempe ratur...

Page 45: ...l provided instructions before first usage Model and attachments are subject to change For household use only OPERATING INSTRUCTIONS DESIGN FOOD PROCESSOR ADVANCED Art No 40965 Design Food Processor A...

Page 46: ...n 50 Important safeguards for all electrical appliances 52 Movable and sharp edged units risc of injury 53 Know your Gastroback Design Food Processor Advanced 54 Operating 56 Before first use 56 Opera...

Page 47: ...ensure that every processing task delivers professional results at the touch of a button The Design Food Processor Advanced is designed for chopping shredding and sli cing fruit vegetables meat herbs...

Page 48: ...k while the ON OFF button is pressed the motor starts running immediately While proceeding do not push the food pusher too hard down to avo id overloading the motor If the motor stalls or stucks durin...

Page 49: ...l or food collector Pos sibly take some food out using a wooden or plastic spoon before star ting the appliance again CAUTION DO NOT place the appliance in an automatic dishwasher or pour boiling wate...

Page 50: ...ury to persons Do not attempt to open the motor hou sing or to repair the power cord Check the entire appliance regular ly for proper operation The appliance is likely to be damaged if the appliance w...

Page 51: ...oreign objects Always use the food pusher provided While proceeding do not push the food pusher too hard down Do not immerse the motor housing or power cord in water or any other liquid Do not pour or...

Page 52: ...d recommended by the manufacturer Damaged or improper units may break in use damage the appliance or cause injury IMPORTANT SAFEGUARDS FOR ALL ELECTRICAL APPLIANCES Always operate the appliance near a...

Page 53: ...hute when the appliance is plugged into the power outlet Only use the provided food pusher to push food through the feed chu te Always turn the appliance off wait for the motor to stop moving and then...

Page 54: ...or Handle ON OFF button Pulse button Cord storage facility Motorblock with 1 100 Watt induction motor Non slip feet Storage drawer enables attachment to be stored within the appliance when in use Twin...

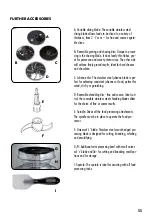
Page 55: ...t julienne cut food perfect for salad stir fry or garnishing D Reversible shredding disc fine and coarse Ideal con trol the reversible stainless steel shredding blades allow for the choice of fine or...

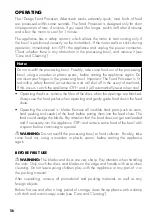
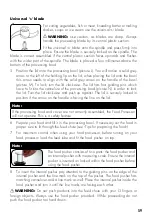
Page 56: ...nd it will automatically reset when cool Operating the discs remove the fibre of the discs when the openings are blocked Always use the food pusher when operating and gently guide food down the feed c...

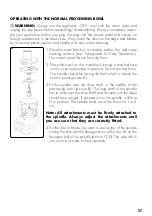
Page 57: ...nticlockwise until it is securely locked in position Do not use any force The handle should be facing the front which is above the control panel picture A 3 Fit the spindle onto the drive shaft in the...

Page 58: ...has to face upwards For fine shredding results the side with the smaller arched blades has to face upwards Julienne disc To cut food in consistent julienne perfect for salad stir fry or garnishing use...

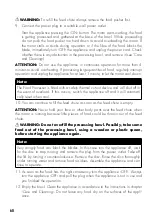
Page 59: ...e lid is securely locked in position if the arrow on the handle is facing the line on the lid Note If the processing bowl and cover are not correctly assembled the Food Processor will not operate This...

Page 60: ...his occurs switch the appliance off and it will automati cally reset when cool 10 You can continue to fill the feed chute as soon as the feed chute is empty ATTENTION Never hold your face or other bod...

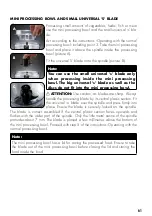
Page 61: ...ni processing bowl ATTENTION Use caution as blades are sharp Always handle the processing blade by its central plastic section Fit the universal s blade over the spindle and press firmly into place En...

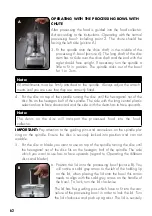
Page 62: ...central plastic selection has to face downward and the side with the dents has to face upwards Note The dents on the disc will transport the processed food into the food collector IMPORTANT Pay attent...

Page 63: ...lf full For the best most consistent results you should try to process pieces of food that are approximately equal in size Dry herbs before processing Otherwise the ingredients could go lumpy Use the...

Page 64: ...central plastic section CAUTION DO NOT place the appliance or any part of it in an automatic dish washer or pour boiling water over it Do not immerse the motor or power cord in any liquids or spill an...

Page 65: ...sing bowl in boiling liquids Always handle the processing bowl with care to avo id cracks 6 Clean the bowl blades discs and lid in warm dish water using a nylon brush or soft sponge The cleaning water...

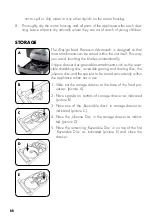
Page 66: ...ue drawer design enables attachments such as the rever sible shredding disc reversible grating and shaving disc the julienne disc and the spatula to be stored conveniently within the appliance when no...

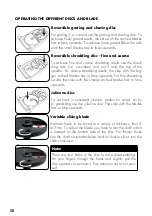
Page 67: ...e bottom of the processing bowl D Fit the variable slicing disc over the spindle The side with the blade has to face upwards E Take the lid and place it on top of the processing bowl according to the...

Page 68: ...landfills dumps or refuse incineration hazardous substances can leak into the groundwater or can be emitted into air thus getting into the food chain and damaging your health and well being as well a...

Page 69: ...countries Please contact your dealer Please agree that we cannot bear the charge of receipt Submission of appliances Please ensure packing the appliance ready for shipment without accessories Add the...

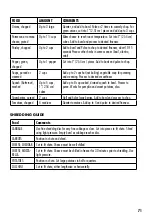
Page 70: ...processor TIPS OPERATING THE UNIVERSAL S BLADE FOOD AMOUNT COMMENTS Baby food Up to 4 cups Add up to 4 cups cooked vegetables and meat to bowl along with cup cooking liquid broth Process to reach desi...

Page 71: ...ss to desired smoothness Squash Butternut mashed Up to 5 cups 1 2 54cm cubes Add up to 8 cup cooked drained squash to bowl Process to puree Works for pumpkin and sweet potatoes also Strawberries puree...

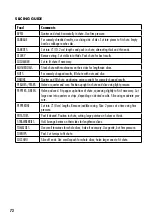
Page 72: ...right for coarsely chopped results PEACHES PEARS Halve or quarter and core Position upright in chute and slice using light pressure PEPPERS GREEN Halve and seed Fit pepper up bottom of chute squeezing...

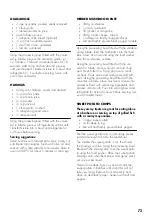
Page 73: ...reshly ground black pepper to taste Using the processing bowl fitted with the variable slicing blade feed the mushrooms into the feed tube a few at a time and using the food pusher slice the mushrooms...

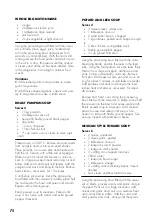
Page 74: ...oup to saucepan Reheat until soup is hot Serve with cream and extra ground pepper if desired POTATO AND LEEK SOUP Serves 4 3 medium leeks whites only 1 tablespoon olive oil 2 small rasher bacon choppe...

Page 75: ...with the univer sal s blade process the fish fish sauce and paste for 15 20 seconds or until the consistency is a smooth paste Note Be careful not to over process the seafood as this is will toughen...

Page 76: ...lt pepper and oil in the processing bowl Pulse 3 4 times Push down any ingredients that may have come up the sides of the bowl and add the nuts and cheese Process for a further 20 seconds or until a d...

Page 77: ...l mixture forms a dough approximately 10 15 seconds Remove processing blade Place dough onto a floured surface and knead lightly until smooth Place dough into a greased bowl cover and allow to rise in...

Page 78: ...eed and add passionfruit Spread over cooled cake BAKED LEMON CHEESECAKE 250g plain biscuit crumbs 2 teaspoons nutmeg 125g butter melted 250ml thickened cream 3 eggs cup caster sugar 2 teaspoon grated...

Page 79: ...pped Remove the processing blade and place chocolate into a clean dry heatproof glass bowl Heat the cream in a small saucepan and bring to the boil Pour the cream into the glass bowl over the cho cola...

Page 80: ...r and pulse again until smooth Pour mixture into a jug and refrigerate for 30 minutes Place tablespoon amounts of mixture into a lightly greased frying pan until golden on each side Serve with butter...

Page 81: ...en and bake for 15 minutes or until cooked Allow to cool on trays FRUIT AND NUT SLICE Base cup plain flour cup self raising flour 90g butter or margarine at room tempe rature 1 tablespoon sugar 1 egg...

Page 82: ...Remove mixture from freezer and spoon into the proces sing bowl fitted with the universal s blade Pro cess mixture until smooth Pour mixture into a loaf pan cover and freeze until firm FRESH PINEAPPL...

Page 83: ...83...
Page 84: ...GASTROBACK GmbH Gewerbestra e 20 21279 Hollenstedt Germany Telefon 49 0 41 65 22 25 0 Telefax 49 0 41 65 22 25 29 info gastroback de www gastroback de 20180924...

Reviews: