background image

disassembling your design Juicer

41

40

disassembling your design Juicer

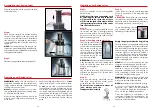
Step 5:

remove the filter bowl surround with the stainless 

steel filter basket still in place. To remove the 

filter bowl turn the spout to the left side. The filter 

bowl surround will automatically get loose 

(picture 5).

Step 6:

wARninG:

 The stainless steel filter basket 

contains small sharp blades to cut and process 

fruit and vegetables. 

Do not touch blades when handling the filter 

basket. Only touch the filter basket on the sides.
To remove the stainless steel filter basket from 

the filter bowl surround turn the filter bowl 

surround upside down (picture 6). For easy 

cleaning, it is recommended to remove the filter 

basket over the sink.

5

6

wARninG:

 Always turn the appliance ‘OFF’ 

and pull the plug when the appliance is not in 

use  or  when  disassembling,  moving  or  cleaning          

the appliance. 

never 

let water or other liquids 

run into the motor block. 

never 

clean the line 

cord or the motor block in the dishwasher, poor 

liquids over the appliance or douse or dip it in 

water or other liquids. 

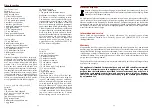
Step 1:


Push the ‘ON/OFF’ button on the juicer to ‘OFF’ 

and then switch ‘OFF’ at the power outlet and 

unplug. 

iMpORTAnT: 

Wait for the filter bas-

ket to stop spinning before continuing to step 

2 carefully remove the pulp container by tilt-

ing the pulp container slightly to the right and 

unlatch it from under the juicer cover and the 

container support extending from under the motor 

base (picture 1).

Step 2:

Pull the locking arm back over the grooves on 

either side of the juicer cover (picture 2/3). 

Move the locking arm down.

Step 3:

Lift the juicer cover off the juicer (picture 4).

1

4

3

2

filter basket      

WArNiNg:

 sharp blades

Summary of Contents for DESIGN JUICER BASIC

Page 1: ...rt Nr 40123 Design Juicer Bedienungsanleitung vor Gebrauch unbedingt lesen Modell und Zubeh r nderungen vorbehalten Nur f r den Hausgebrauch GASTROBACK Gebrauchsanweisung und Rezept ideen Design Juice...

Page 2: ...Interesse die hier aufgef hrten Sicherheitsma nahmen Wichtige Sicherheitsma nahmen Lesen Sie bitte alle Hinweise und Anleitungen die mit dem Ger t geliefert werden sorgf ltig und vollst ndig durch un...

Page 3: ...vor Sie mit dem Ger t arbeiten Niemals das Ger t oder die Kunststoffteile mit Scheuermitteln harten Scheuerhilfen Beispiel Topfreiniger oder scharfen Putzmitteln reinigen Niemals harte oder scharfkant...

Page 4: ...siehe Bild 1 1 Schritt 2 Setzen Sie den Edelstahlsiebkorb in die Saftschale ein siehe Bild 2 Wichtig Dr cken Sie den Edelstahlsiebkorb an den R ndern ganz nach unten bis der Siebkorb h r bar einraste...

Page 5: ...Aus Schalter ist an der Seite des Motorsockels neben dem Firmenschild Schalten Sie den Ein Aus Schalter auf OFF obere Schalterposition und stecken Sie danach den Netzstecker in eine geeignete 220 230...

Page 6: ...ter auf OFF obere Schalterposition und warten Sie bis der Motor steht Leeren Sie Saftbeh lter und Tresterbeh lter aus Kippen Sie den Tresterbeh lter beim Herausnehmen etwas und ziehen Sie ihn dann unt...

Page 7: ...als die Messer im Siebkorb mit der Hand ber hren Wichtig Sie k nnen den Edelstahlsiebkorb leichter reinigen wenn Sie dieses Bauteil sofort nach Gebrauch f r etwa 10 Minuten in hei e Sp lmittellauge ei...

Page 8: ...ox Siehe Seite 10 Schritt 4a Schalten Sie das Ger t sofort AUS und ziehen Sie den Netzstecker Die Saftt lle oder Saftschale ist verstopft Reinigen Sie das Ger t nach der Anleitung auf Seite 13 Pflege...

Page 9: ...lle von Vitaminen und Mineralien Die Inhaltsstoffe gehen rasch ins Blut und sind deshalb der schnellste Weg dem K rper neue N hrstoffe zuzuf hren Wenn Sie Ihre eigenen S fte herstellen dann entscheide...

Page 10: ...toffe 100 g Karotten 121 kJ 29 kcal Kiwis Winter Fr hling Gem sefach im K hlschrank Vitamin C und Kalium 100 g Kiwis 222 kJ 53 kcal Kohl Winter geputzt und eingepackt im K hlschrank Vitamin C Fols ure...

Page 11: ...en ohne Bl tter Zubereitung Verarbeiten Sie die Zutaten Apfel Birnen und Erdbeeren im Entsafter und servieren Sie sofort Melone Pfefferminz Mango Saft F r etwa 2 1 4 Tassen Zutaten 1 2 kleine Honig o...

Page 12: ...nuten leicht sieden 4 Geben Sie die Nudeln hinzu und kochen Sie die Suppe etwa 2 Minuten lang bis die Nudeln gar sind 5 Verteilen Sie die Suppe auf 4 Suppentassen Schmecken Sie mit schwarzem Pfeffer a...

Page 13: ...etr nk F r 4 Personen Zutaten 6 Tomaten 2 Nektarinen 1 2 Tasse frische Pfefferminz Bl tter Fruchtfleisch von 4 Passionsfr chten 1 Tasse zersto enes Eis Zubereitung Verarbeiten Sie Tomaten Nektarinen u...

Page 14: ...die Schichten 2 Heben Sie den Teig in eine 25 cm durchmes sende Kuchen oder Auflaufform und dr cken Sie ihn am Boden und den Seiten an Stutzen Sie die Teigr nder so dass sie etwa 1 5 cm ber die Seite...

Page 15: ...darauf dass die Schokola de dabei nicht stockt R hren Sie Gelatine und Eigelb unter die Schokolade und schlagen Sie die Masse bis sie hell und glasig wird 4 Heben Sie die geschlagene Sahne zusammen m...

Page 16: ...lligung erfolgte technische Eingriffe von Dritten f hren zum sofortigen Erl schen des Gew hrleistungsanspruchs Der K ufer muss zur Geltendmachung des Anspruchs den Original Kaufbeleg vorlegen und tr g...

Page 17: ...ehicles or boats Only use the appliance indoors Store and use the appliance in a clean frost free environment where it is protected from dampness moist and immoderate and extraordi nary burden such as...

Page 18: ...uards for all Electrical Appliances Always uncoil the line cord completely before installing the appliance Place the appliance close to a power point and connect it directly without using any exten si...

Page 19: ...inside the integrated pulp container and onto the motor base picture 2 Step 3 Place the juicer cover over the stainless steel filter on top of the filter bowl surround picture 3 The feed chute has to...

Page 20: ...er basket Slide the food pusher all the way down the feed chute picture 5a Step 6 Place the pulp container into position by tilting the motor base slightly to the right Insert the container under the...

Page 21: ...e appliance OFF and pull the plug when the appliance is not in use or when disassembling moving or cleaning the appliance Never let water or other liquids run into the motor block Never clean the line...

Page 22: ...ome vaseline onto the balls of the adjustment WARNING Please store the juicer in a frost free clean and dry location where it is out of reach of children and is protected against excessively loads suc...

Page 23: ...ieces of fruit or vegetables remaining These should be removed before using the pulp in any recipes The right technique When juicing a variety of ingredients with varying textures start with the softe...

Page 24: ...100 g stick 84 kj 20 kcals Cucumber Summer Crisper in refrigerator Vitamin C 100 g Cucumber 17 kj 4 kcals Fennel Winter Spring Crisper in refrigerator Vitamin C Dietary Fibre 100 g Fennel 100 kj 24 kc...

Page 25: ...ockmelon mint and mango through juicer Serve immediately Tomato Cucumber Parsley Carrot Juice Makes 3 cups 3 medium tomatoes 1 large cucumber 1 large bunch fresh parsley 3 medium carrots trimmed Proce...

Page 26: ...tural yogurt Process mango rockmelon and oranges through juicer Pour into a large bowl whisk in yogurt Serve immediately Energy fuel Grape kiwi fruit and berry booster Grapes contain potassium and iro...

Page 27: ...the sheets of pastry brushing between each sheet with butter Lift pastry into a 25cm flan tin press over base and side Trim pastry edge to about 1 5cm higher than side of tin Combine leek pumpkin carr...

Page 28: ...cups carrot pulp 1 2 cup oil 2 eggs lightly beaten 1 4 cup sour cream Grease and line a 25cm x 15cm loaf pan Sift flour and baking powder into a large mix ing bowl add nutmeg cinnamon cardamom peanut...

Page 29: ...GASTROBACK GmbH Gewerbestra e 20 21279 Hollenstedt Germany Telefon 49 0 41 65 22 25 0 Telefax 49 0 41 65 22 25 29 info gastroback de www gastroback de 20150617...

Reviews: