background image

other objects or walls and 50 cm to the edge of the working space. During operation leave 

at least 50 cm of free space above the appliance for unhindered access. 
Do not place the Design Mixer over any type of heat-producing appliance or any other heat 

source to avoid injuries and damage. 
For operation, always unwind the power cord completely to avoid risk of overheating and 

fire. 
6. Place the appliance on a working space that meets the requirements mentioned above. 
7. Place the jug on the power base. The jug must stand stable and may not wobble.
Insert the lid on top of the jug. Press the lid carefully down until it closes firmly. 

OPERATION

WARNING:


The appliance is intended for cutting and mixing food. For this, the appliance 

is equipped with sharp knives and other electrically driven moving parts. Do not operate the 

appliance before assembling the appliance completely and correctly. (See: Operating the 

Design Mixer) Always mount the jug correctly and stable on the power base before operation. 

DO NOT insert any parts of your body (e.g. hands, hair) or any foreign objects (e.g. cooking 

utensils, clothes) in the jug or drive shaft coupling in the power base, while the appliance is 

connected to the power supply to avoid risks of injuries and damage. Only use the provided 

accessories (citrus cone) and plastic cooking utensils with the appliance. 
Always switch OFF (press ON/OFF button, indicator goes out), then unplug the appliance, 

before assembling or disassembling any parts. Always turn the Design Mixer off and unplug 

before reaching inside the jug. Before operation, always ensure that you have assembled the 

appliance completely and correctly according to the instructions in this booklet and that there 

are no foreign objects in the jug. Carefully remove hard, inedible parts of your foods (e.g. 

bones, stalks, wooden shells) completely before processing. 
Do not place clothes, tissues or any other foreign objects under the appliance during opera-

tion. Do not place the appliance over a power cord. Do not use any hard or sharp-edged 

objects (e.g. forks, knives, cooking utensils) to avoid damage to the appliance. Do not use 

violence! 
Do not process hot food. Always leave hot ingredients cool down until at least lukewarm, 

before filling into the jug. 
If liquids come out from under the lid, run down the exterior of the appliance and/or accu-

mulate under the power base, immediately switch OFF (press ON/OFF button) and unplug 

the appliance to avoid injuries and damage by electric shock. Always wipe off spilled liquids 

immediately. Do not overfill the jug. Always observe the maximum amount of 1.5 litres. If 

liquids accumulate again under the appliance, possibly the jug is leaking.
Do not use the appliance, if the jug is leaking or damaged in any way to avoid hazard of 

overheating, fire, and electric shock. If the jug is damaged, replace the jug, before using the 

appliance again. Contact your authorized service centre. The ventilation slits in the power 

base must always be unobstructed. 
Do not switch on the appliance without any food or liquid in the jug to avoid damage to the 

motor. 

52

53

Summary of Contents for Design Mixer Advanced Electronic

Page 1: ...Bedienungsanleitung vor Gebrauch unbedingt lesen Modell und Zubeh r nderungen vorbehalten Nur f r den Hausgebrauch Art Nr 41004 Design Mixer Duo Advanced Bedienungsanleitung DESIGN MIXER DUO ADVANCED...

Page 2: ...dem Design Mixer Duo Advanced arbeiten 19 Hilfe bei Problemen 21 Pflege und Reinigung 22 Aufbewahrung 24 Entsorgungshinweise 25 Information und Service 25 Gew hrleistung Garantie 25 Rezepte 26 Getr nk...

Page 3: ...e zum Hacken von Fleisch Zwiebeln und hnlichem zum Mahlen von N ssen zum R hren von Eis und Dessertmischun gen zum Schlagen von Sahne und zum Mixen P rieren und Emulgieren Das Ger t ist ideal f r die...

Page 4: ...IHREN DESIGN MIXER DUO ADVANCED KENNEN LERNEN 4 A B C D E F G H I J...

Page 5: ...ideleistung und liefert beste Ergebnisse der Wellenschliff bricht auch harte Fasern erzeugt die spezielle Kinetix Str mung und vermeidet dadurch eine ungleichm ige Bearbeitung F berlastschutz OVERLOAD...

Page 6: ...Getr nke und erm glicht eine bequeme Reinigung von Schneidemesser und Beh lterboden P PULSE Taste erzeugt kurze St e mit hoher Leistung Bedienungselemente L N N N N O K P M Eastman Tritan Copolyester...

Page 7: ...der in feuchten oder nassen Bereichen Verwenden Sie das Ger t nicht in Booten oder fahrenden Fahrzeugen oder f r gewerbliche Zwecke Beispiel in L den B ros oder von Kunden in Hotels oder Pensionen Ver...

Page 8: ...tinuierlich arbeiten Schalten Sie das Ger t AUS Taste ON OFF dr cken dann Netzstecker ziehen wenn Sie das Ger t nicht benutzen Dieses Ger t ist NICHT geeignet f r die Verwendung durch Personen einschl...

Page 9: ...t t und Feuer f hren Wischen Sie bergelaufene Fl ssigkeiten immer sofort ab Sollten Fl ssigkeiten ber oder in den Motorblock gelaufen sein dann ziehen Sie sofort den Netzstecker aus der Steckdose F ll...

Page 10: ...Fernbedienungen unbeabsichtigt starten sobald sich der berlastschutz wieder automatisch ausschaltet Die Kontakte an den Steckern m ssen blank und glatt sein und d rfen keine Verf rbungen haben Behand...

Page 11: ...gung anschlie en Ziehen Sie den Netzstecker aus der Steckdose bevor Sie den Beh lter vom Motorblock herunter nehmen Andernfalls besteht die Gefahr sich an der Kupplung der Antriebswelle im Motorblock...

Page 12: ...Nur ein Beh lter und ein Messer f r alle Arten von Lebensmitteln egal ob trocken oder feucht Aufgrund des speziellen Kinetix Systems aus Beh lter und Schneidemesser kann bei trockenen und feuchten Le...

Page 13: ...trieben werden wenn der Beh lter richtig auf dem Motorblock steht und der Deckel fest geschlossen ist Schalten Sie das Ger t daher IMMER zuerst AUS ON OFF Taste dr cken und ziehen Sie den Netzstecker...

Page 14: ...mal aufgesch umt 2 Au erdem dient diese Funktion zur Vorreinigung der Schneidemesser und des Beh lters Die meisten Speisereste werden aus dem Beh lter und vom Schneidemesser entfernt Siehe Pflege und...

Page 15: ...der Steckdose bevor Sie den Deckel abnehmen um die Zutaten mit einem Kunststoff Schaber zur ck zum Schneidemesser zu schieben Achten Sie darauf den Deckel wieder fest zu schlie en bevor Sie das Ger t...

Page 16: ...s Ger t immer nur auf beiden Seiten unten am Motorblock an wenn Sie es bewegen wollen Niemals das Ger t am Netzkabel oder am Beh lter anfassen um es zu bewegen 1 Nehmen Sie das Ger t und alle Bauteile...

Page 17: ...nnen WARNUNG Niemals den Design Mixer ber einem K chenherd oder in der N he einer anderen W rmequelle Beispiel Heizung aufstellen um Sch den am Ger t und Verletzungen zu vermeiden Wickeln Sie das Net...

Page 18: ...dungen deutlich darunter liegen sollte Sollten sich erneut Fl ssigkeiten unter dem Ger t sammeln dann k nnte der Beh lter eventuell undicht sein Verwenden Sie das Ger t NICHT mehr wenn der Beh lter un...

Page 19: ...s Netzkabel immer fern von hei en Oberfl chen und scharfen Kanten und au erhalb der Reichweite von kleinen Kindern Legen Sie w hrend des Betriebes keine wertvollen oder empfindlichen Gegenst nde in di...

Page 20: ...richt alle laufenden Funktionen ab und schaltet sofort zur ck in den Bereitschaftsmodus Die Zitronenpresse des Design Mixers verwenden Mit der mitgelieferten Zitronenpresse k nnen Sie Zitrusfr chte di...

Page 21: ...cke sind zu gro Schneiden Sie die Zutaten kleiner Die St cke sollten nicht gr er als 2 cm sein Die Lebensmittel werden zu fein zerteilt oder zu w ssrig Die Lebensmittel wurden zu lange bearbeitet Die...

Page 22: ...oder aggressive Chemikalien Beispiel Bleiche zur Reinigung des Ger tes der Bauteile und Zubeh re verwenden um die Oberfl chen nicht zu besch digen Halten Sie das Ger t immer sauber Wischen Sie Spritze...

Page 23: ...eidemessers im Beh lter sind extrem scharf NIEMALS die H nde oder irgendwelche Fremdk rper Beispiel B rsten T cher in den Beh lter halten solange der Beh lter auf dem Motorblock steht Achten Sie auch...

Page 24: ...ile danach sorgf ltig mit klarem Wasser ab Trocknen Sie die Bauteile sorgf ltig 4 Bewahren Sie den Beh lter danach mit ge ffnetem Deckel auf AUFBEWAHRUNG WARNUNG Niemals kleine Kinder mit dem Ger t od...

Page 25: ...Kundenservice Tel 04165 2225 0 oder per E Mail info gastroback de Auf unserer Internetseite finden Sie auch diese Bedienungsanleitung im pdf Format GEW HRLEISTUNG GARANTIE Wir gew hrleisten f r alle...

Page 26: ...26 REZEPTIDEEN...

Page 27: ...n Sie den Deckel auf Lassen Sie die SMOOTHIE Funktion bis zum Ende arbeiten Mango Kokos Limetten Smoothie 4 Portionen Zutaten Limette 400 ml gek hlte fettarme Kokosmilch 130 g Vanillejoghurt 1 gro e 3...

Page 28: ...la 60 ml Cointreau Tasse 60 ml Zuckersirup 12 Eisw rfel Zubereitung 1 Pressen Sie die Limetten mit der Zitronenpresse des Ger tes direkt auf dem Deckel des Beh lters aus 2 Geben Sie die restlichen Zut...

Page 29: ...ererbsen Knoblauchzehen Tahini Wasser und K mmel dazu und setzen Sie den Deckel auf 3 Bearbeiten Sie die Zutaten mit der Geschwin digkeitsstufe 3 BLEND bis die Mischung glatt ist Falls n tig schalten...

Page 30: ...den Sie nach 25 Minuten Backzeit und backen Sie weitere 25 Minuten oder bis die Ka rotten weich sind Lassen Sie die Karotten 10 Minuten abk hlen und f llen Sie sie dann in den Beh lter des Design Mixe...

Page 31: ...nnaise in einen luftdicht schlie enden Beh lter Sie k nnen die Mayonnaise bis zu 1 Woche im K hlschrank aufbewahren MAYONNAISE VARIATIONEN C sar Dressing Zubereitung 1 Verwenden Sie eine ganze Zitrone...

Page 32: ...ttlerer Hitze unter gelegentlichem R hren bis die Suppe hei ist 4 Streuen Sie den Schnittlauch auf die Suppe und servieren Sie Tipp Falls die Suppe beim Kochen oder P rieren zu dickfl ssig wird dann g...

Page 33: ...ie dann einen Deckel auf den Topf und lassen Sie die Suppe bei geringer Hitze 25 Minuten lang zugedeckt kochen bis die S kartoffeln weich sind Nehmen Sie den Topf vom Herd und lassen Sie die Suppe abk...

Page 34: ...Design Mixers und setzen Sie den Deckel auf W hlen Sie die Einstellung LIQUIFY Ge schwindigkeitsstufe 4 und lassen Sie das Ger t 30 Sekunden arbeiten bis die Zutaten gut gemischt sind 5 Geben Sie die...

Page 35: ...t 5 18 Gew hrleistung 25 I Inbetriebnahme 17 K KinetixTM 12 Konsole 6 Beh lter 6 12 22 Kundendienst 25 Kupplung 8 9 10 11 L Lagerung 24 Leistungsaufnahme 12 M manuelle Bedienung 19 Menge 18 Messbecher...

Page 36: ...36...

Page 37: ...ead all provided instructions before first use Model and attachments are subject to change For household use only Art No 41004 Design Mixer Duo Advanced Operating Instructions DESIGN MIXER DUO ADVANCE...

Page 38: ...53 Operating the Design Mixer Duo Advanced 53 Solving Problems 56 Care and Cleaning 57 Storage 59 Notes for Disposal 60 Information and Service 60 Warranty 60 Recipes 62 Drinks 63 Dips 65 Dressings Sa...

Page 39: ...he Design Mixer is intended for cutting and grating of fruits and vegetables for mincing meat and chopping herbs onions and the like for beating cream and egg white and for grinding mixing and emulsif...

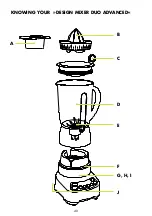
Page 40: ...KNOWING YOUR DESIGN MIXER DUO ADVANCED 40 A B C D E F G H I J...

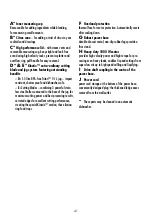
Page 41: ...o the base of the jug for maximum cutting power and best processing results serrated edges for excellent cutting performance creating the special Kinetix motion thus elimina ting food traps F Overload...

Page 42: ...es and drinks enables easy cleaning of the cutting blades and the bottom of the jug P PULSE button provides short bursts of high power Operating Elements L N N N N O K P M Eastman Tritan Copolyester T...

Page 43: ...damage by electric shock moving parts heat or fire There is no liability claim of the purchaser if any damage or defect is caused by inappropriate treatment over loading or installation mistakes Gener...

Page 44: ...of it in a range or on or near hot surfaces e g burner heater or oven Do not use the appliance or any parts or accessories of the appliance with any other device or for any other purpose than describ...

Page 45: ...andstill before moving or cleaning the appliance or assembling or disassembling any parts or when the appliance is not in use Always hold the power base at both sides near the bottom for moving the ap...

Page 46: ...fore use Do not place the appliance on a power cord Power cords may never be knotted twisted pulled strained or squeezed Do not let the plug or power cord hang over the edge of the table or counter Th...

Page 47: ...nes while preparing the foods DO NOT push the foods with your hands down in the jug or poke in the jug Always switch OFF press ON OFF button indicator in the ON OFF button goes out the appliance when...

Page 48: ...cast metal power base ensures a stable stand even with large amounts processed Safety Concept WARNING Do not operate the appliance with the power base jug lid and seal of the lid damaged The seal at t...

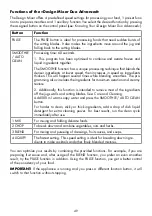
Page 49: ...n and creamy texture 2 Additionally this function is intended to remove most of the ingredients off the jugs walls and cutting blades See Care and Cleaning Add 500 ml warm soapy water and press the SM...

Page 50: ...the power supply Immediately remove the jug and wipe the power base dry with a dry cloth or paper towel Do not use the appliance again without having cleared up whether the jug is leaking and if so h...

Page 51: ...bels or the model label Especially ensure that there are no foreign objects e g packaging material in the jug and drive shaft coupling of the power base WARNING RISK OF ELECTRIC SHOCK Always switch OF...

Page 52: ...embling or disassembling any parts Always turn the Design Mixer off and unplug before reaching inside the jug Before operation always ensure that you have assembled the appliance completely and correc...

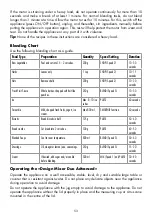
Page 53: ...Fresh Fruit Sauce Whole berries chopped soft fruit like peaches 250 g BLEND Speed 3 10 30 seconds Ice Max 8 10 ice cubes PULSE 60 seconds Smoothie Milk chopped fresh fruits yogurt ice cream Max 800 m...

Page 54: ...se and the lid is closed firmly The motor starts IMMEDIATELY when selecting a speed setting or function Do not insert any parts of your body fingers hair or foreign objects e g cooking utensils clothe...

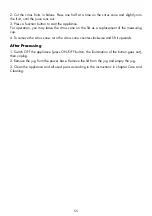
Page 55: ...lid as a replacement of the measuring cup 4 To remove the citrus cone turn the citrus cone counter clockwise and lift it upwards After Processing 1 Switch OFF the appliance press ON OFF button the ill...

Page 56: ...is in the jug Try a smaller amount and work in batches if necessary The ingredients may be too large Cut the ingredients into smaller pieces For best results the pieces should be no larger than 2 cm...

Page 57: ...chemicals e g bleach for cleaning the appliance or any parts of it to avoid damage to the surfaces Do not immerse the power base or power cord in water or any other liquid Always keep the appliance c...

Page 58: ...m soapy water with a soft cloth or bottle brush 6 Thereafter rinse with clear water again and immediately dry thoroughly Leave dry naturally for at least 1 2 h out of reach of young children Dishwashe...

Page 59: ...st direct sunlight and inadmissible strain mechanical or electric shock heat moisture and where it is out of reach of young children Do not place any hard or heavy objects on or in the appliance or an...

Page 60: ...im and within 2 years after purchasing the appliance free of charge repaired or substituted There is no Warranty claim of the purchaser if the damage or defect of the appliance is caused by inappropri...

Page 61: ...61...

Page 62: ...62 RECIPES...

Page 63: ...jug and secure the lid Use the SMOOTHIE function and process until the function finishes Mango Coconut Lime Smoothie Serves 4 Ingredients lime 400 ml chilled reduced fat coconut milk cup 130 g vanill...
Page 64: ...es halved 60 ml tequila 60 ml Cointreau cup 60 ml sugar syrup 12 ice cubes Method 1 Squeeze the limes directly into the Design Mixers jug using the citrus cone on the lid 2 Add remaining ingredients a...

Page 65: ...od 1 Use citrus cone on the lid of the jug to squeeze the lemon 2 Add chickpeas garlic tahini water and cumin into blender jug and secure lid 3 Process on BLEND Speed 3 until mixture is smooth If nece...

Page 66: ...prepared tray Drizzle with oil and toss to coat Season to taste with salt and pepper Bake for 50 minutes turning halfway or until tender Set aside for 10 minutes to cool Transfer into the Design Mixer...

Page 67: ...out 1 minute 5 Transfer to an airtight container and store in the fridge for up to 1 week Mayonnaise Variations Caesar dressing Method 1 Increase to a whole lemon 2 Omit the salt 3 Add 1 tablespoon Wo...

Page 68: ...heat on medium heat stirring occasionally until hot 4 Serve soup topped with chives Tip Add a little extra stock or water if soup becomes too thick when cooking or blending Pesto Sauce approx 1 cups...

Page 69: ...te is fragrant 2 Add sweet potatos and stock and bring to the boil Lower heat and simmer covered for 25 minutes or until sweet potatos are soft Remove from heat and allow soup to cool down to a warm s...

Page 70: ...ed glass to spread and press the biscuit mixture firmly over the base and side of pan Refrigerate 10 minutes 4 Add sour cream sugar and eggs into the Design Mixers jug and secure lid Process on LIQUIF...

Page 71: ...57 K Kinetix 48 L lid 58 M measuring cup 58 model 47 moving parts 46 O odours 59 operating elements 42 operation 51 53 overload protection 48 P parts 40 41 power base 41 59 power consumption 47 power...

Page 72: ...GASTROBACK GmbH Gewerbestra e 20 21279 Hollenstedt Germany Telefon 49 0 41 65 22 25 0 Telefax 49 0 41 65 22 25 29 info gastroback de www gastroback de 20150723...

Reviews: