background image


- 4 -

TRANSLATION FROM THE ORIGINAL 

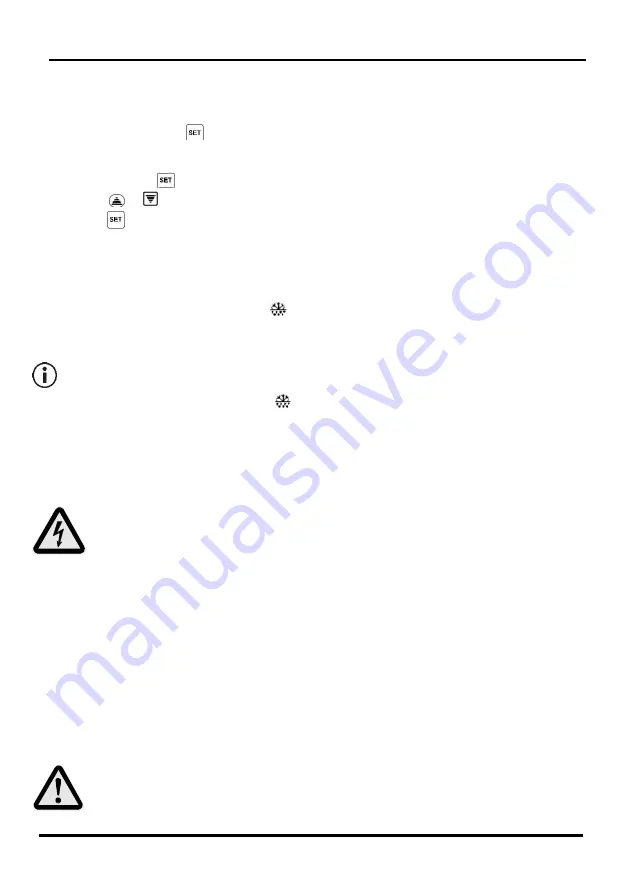
Change the Operating Temperature 

The default operating temperature is 2 °C. To display the operating temperature (set point), press 
and immediately release the 

 button. 

To change the operating temperature: 

1.


Press and Hold the


button for 2 seconds, the “°C” will start to flash.


2.


Press the 

  or

 buttons to change the temperature.


3. Press the

 button to store the temperature. 

Manual Defrost


The refrigerator feature an automatic defrost function. However, should the appliance require an 

additional defrost period press and hold the 

 (defrost) button for 2 seconds. 

Automatic defrost cycles are effectuated every 6 hours and last about 20 minutes (factory defaults). 

Note: Starting a manual defrost resets the automatic defrost timer. The next 
automatic defrost will start only 6 hours after the end of the last manual defrost. 

During defrost periods the Defrost light 

 on the display lights up. 

Cleaning, Care & Maintenance 

Switch off and disconnect the appliance from the power supply before cleaning.

Regularly clean the interior of the appliance.

Do not use abrasive cleaning agents. These can leave harmful residues and damage the appliance.

Use only a slightly humid sponge with neutral detergents only. Do not soak the appliance.

Always carefully dry the appliance after cleaning before switching it on.

Any  eventual  repair  operation  must  be  carried  out  only  by  a  qualified  technician  sent  by  the

authourized distributor that sold the appliance.

Cleaning the Condenser 

Periodically cleaning the condenser can extend the life of the appliance. The condenser is located at 
the bottom front of the appliance, accessible after opening the service panel that is closed with two 
plastic knobs. 

Note: Always turn off the appliance and disconnect the power plug before 
cleaning the condenser. Use a soft brush and a vacuum cleaner to clean the 
fins of the condenser, taking care not to damage the fins. 

Summary of Contents for GA200PR

Page 1: ...0PR GA410PR Installation operating and service instructions Manuale di installazione uso e manutenzione Handbuch zur Installation Bedienung und Wartung Manuel d installation utilisation et entretien Ed 04 2016 ...

Page 2: ...oor use Keep all packaging away from children Dispose of the packaging in accordance with the regulations of local authorities If the power cord is damaged it must be replaced by qualified service technician in order to avoid a hazard This appliance is not intended for use by persons including children with reduced physical sensory or mental capabilites or lack of experience or knowledge unless th...

Page 3: ...rce in the reference country Please do not unplug the equipment by pulling it from the cable Do not make the power cable touch any heat sources Do not spray water on the equipment and do not expose it to rain water or some other source of moisture An improperly installed appliance could lead to serious injuries Before installing the equipment please compare the local power grids with those of the ...

Page 4: ...rost periods the Defrost light on the display lights up Cleaning Care Maintenance Switch off and disconnect the appliance from the power supply before cleaning Regularly clean the interior of the appliance Do not use abrasive cleaning agents These can leave harmful residues and damage the appliance Use only a slightly humid sponge with neutral detergents only Do not soak the appliance Always caref...

Page 5: ...or the airflow to the condenser is being blocked Move the appliance to a more suitable location Ambient temperature is too high Increase the room s ventilation or move the appliance to a cooler location Insufficient airflow to the fans Remove any object that blocks the correct air circulation Appliance is overloaded Reduce the products amount stored in the appliance The factory default parameters ...

Page 6: ... Dispose the packaging material in accordance with the EU standards about environmental health and safety protection This symbol indicates that the device must not be treated as household waste and must be disposed in a separate collection of electrical and electronic equipment Spare parts request To order a spare part contact your distributor and ask for the part number listed in the spare part d...

Page 7: ...l uso all aperto anche se in luoghi riparati dalla pioggia Tenere tutti gli imballaggi fuori dalla portata dei bambini Smaltire l imballaggio in conformità con i regolamenti e le norme locali Se il cavo di alimentazione è danneggiato deve essere sostituito da un tecnico qualificato al fine di evitare qualunque pericolo Questo apparecchio non è destinato ad essere utilizzato da persone compresi i b...

Page 8: ...ura deve essere collegata soltanto ad una presa elettrica singolarmente protetta per i contatti indiretti nel rispetto delle norme in vigore nel paese di impiego La spina dell apparecchiatura non va estratta dalla presa tirandola per il cavo di alimentazione Il cavo di alimentazione non deve mai essere messo a contatto con oggetti caldi Non spruzzare acqua sull apparecchiatura e non esporre a piog...

Page 9: ...re come segue 1 Tenere premuto il pulsante per 2 secondi il simbolo C inizierà a lampeggiare 2 Premere i pulsanti o per aumentare o diminuire la temperatura 3 Premere una volta il pulsante per salvare il valore impostato Effettuare un ciclo di sbrinamento defrost manuale L apparecchiatura effettua lo sbrinamento automaticamente Se nonostante ciò l apparecchiatura dovesse necessitare di uno sbrinam...

Page 10: ...arecchiatura prima di riaccenderla Le eventuali operazioni di riparazione devono essere effettuate esclusivamente da un Tecnico qualificato inviato dal distributore da cui l apparecchiatura è stata acquistata Pulire il condensatore Pulire periodicamente il condensatore manterrà l apparecchiatura in buona efficienza per lungo tempo e ne estenderà la durata Il condensatore si trova nella parte infer...

Page 11: ...rettamente Controllare che la porta si chiuda bene e che la guarnizione non sia rovinata L apparecchiatura è situata vicino ad una fonte di calore o il flusso d aria che arriva al condensatore è bloccato Spostare l apparecchiatura in una posizione più adatta La temperatura dell ambiente è troppo elevata Aumentare la ventilazione del locale o spostare l apparecchiatura in un ambiente più adatto Flu...

Page 12: ...prescrive di conferire l apparecchiatura ai centri di raccolta autorizzati per evitare potenziali effetti all ambiente ed alla salute umana Il simbolo riportato a lato indica l obbligo di effettuare la raccolta separata delle apparecchiature elettriche ed elettroniche al momento della rottamazione Richiesta pezzi di ricambio Per richiedere pezzi di ricambio contattare il rivenditore e fare riferim...

Page 13: ...Reinigungsarbeiten stets zunächst das Gerät abschalten und den Netzstecker ziehen Verpackungsmaterial außerhalb der Reichweite von Kindern aufbewahren Verpackungsmaterial gemäß den lokalen Vorschriften entsorgen Aus Sicherheitsgründen müssen beschädigte Stromkabel von einem Mitarbeiter oder empfohlenen qualifizierten Elektriker erneuert werden Dieses Gerät sollte nur dann von Personen einschließli...

Page 14: ...nen alles WARNUNG Gefahr durch elektrischen Strom Das Gerät darf nur an ordnungsgemäß installierten Einzelsteckdosen mit Schutzkontakt betrieben werden Den Stecker nicht am Kabel aus der Steckdose ziehen Das Netzkabel darf nicht mit heißen Teilen in Berührung kommen Vermeiden Sie Wasserspritzer auf dem Gerät setzen Sie das Gerät keinem Regenwasser Tropfwasser oder sonstiger Nässe aus Dieses kann z...

Page 15: ...tur zu ändern 1 Drücken und halten Sie die SET Taste für 2 Sekunden wird die C zu blinken beginnen 2 Drücken Sie die oder Tasten um die Temperatur zu ändern 3 Drücken Sie die SET Taste um die Temperatur zu speichern Manuelles Abtauen Der Kühlschrank verfügt über eine automatische Defrost Funktion Allerdings sollte das Gerät erfordern eine zusätzliche Abtauperiode drücken und halten Sie die Abtauun...

Page 16: ...nigung vor dem Einschalten Jede eventuelle Reparaturarbeiten dürfen nur durch den authourized Verteiler gesendet von einem qualifizierten Techniker durchgeführt werden die das Gerät verkauft Reinigen des Kondensator Von Zeit zu Zeit in den Kondensator Reinigung kann die Lebensdauer des Gerätes zu verlängern Der Kondensator wird unten an der Vorderseite des Gerätes befindet zugänglich nachdem der S...

Page 17: ...reinigen Türen sind nicht richtig geschlossen Prüfen ob die Türen geschlossen und die Dichtungen intakt sind Gerät befindet sich in der Nähe einer Wärmequelle in direkter Sonneneinstrahlung oder der Luftstrom zum Kondensator ist unterbrochen Das Gerät an einem geeigneten Ort aufstellen Umgebungstemperatur ist zu hoch Erhöhen Sie die Belüftung des Raumes oder das Gerät in einer geeigneten Umgebung ...

Page 18: ...rachtet werden es gibt die Verpflichtung Elektro und Elektronik Altgeräte nicht als unsortierten Siedlungsabfall zu beseitigen und diese Altgeräte getrennt zu sammeln Es empfiehlt sich mit einer auf Entsorgung spezialisierten Firma Kontakt aufzunehmen oder sich mit der Entsorgungsabteilung Ihrer Kommune in Verbindung zu setzen Dieses Symbol bedeutet die Pflicht Elektro und Elektronik Altgeräte get...

Page 19: ...il ne convient pas pour une utilisation en extérieur meme si dans des endroits à l abri de la pluie Conservez tous les emballages hors de portée des enfants Eliminez l emballage conformément à la réglementation et aux normes locales Si le cordon d alimentation est endommagé il doit être remplacé par un technicien qualifié afin d éviter tout danger Cet appareil n est pas destiné à être utilisé par ...

Page 20: ... électrique L équipement doit être raccordé à une prise électrique protégée individuellement pour les contacts indirects dans le respect des règles en vigueur dans le pays d emploi La fiche de l appareil ne doit jamais être retiré de la prise en tirant par le cordon d alimentation Le cordon d alimentation ne doit jamais être mis en contact avec des objets chauds Ne pas vaporiser de l eau sur l app...

Page 21: ...pérature réglée procéder ainsi 1 Appuyez le bouton pendant 2 secondes le symbole C se met à clignoter 2 Appuyez sur les boutons ou pour augmenter ou diminuer la température 3 Appuyez sur le bouton une fois pour enregistrer la valeur Efféctuer un dégivrage manuel defrost L appareil effectue le dégivrage automatique Si malgré tout l appareil nécessiterait d un dégivrage supplémentaire appuyez le bou...

Page 22: ...pareil avant de l allumer Toutes les opérations de réparation doivent être effèctuées par un technicien qualifié envoyé par le distributeur auprès duquel l équipement a été acheté Nettoyer le condensateur Nettoyer périodiquement le condenseur gardera l équipement en bon état de fonctionnement pendant une longue période et permettra d en prolonger la durée Le condenseur est situé dans la partie inf...

Page 23: ... La porte ne se ferme pas correctement Vérifiez que la porte se ferme bien et que le joint d étanchéité ne soit pas endommagé L appareil est situé à proximité d une source de chaleur ou le flux d air qui arrive au niveau du condensateur est bloqué Déplacer l appareil dans un endroit plus approprié La température ambiante est trop élevée Augmenter la ventilation de la pièce ou déplacer l appareil d...

Page 24: ...ecommande de porter le matériel aux centres de collecte autorisés pour éviter les effets potentiels sur l environnement et la santé humaine Le symbole figurant sur la gauche indiquant l obligation d effectuer un triage seléctif des dechets des équipements électriques et électroniques au moment de la démolition Demande des pièces de rechange Pour demander des pièces de rechange contactez votre reve...

Page 25: ...ACTERISTICS Modello Potenza assorbita Tipo di Gas Dimensioni esterne Capacità interna Dimensioni imballo Vol Peso lordo Peso netto Model Power absorbed Gas Type External dimensions Net capacity Package dimensions Vol Gross weight Net weight W mm l p h Lt cm l p h m kg kg GA200PR 300 R134a 706 706 1300 268 78 78 140 0 85 124 108 GA410PR 400 R134a 706 706 1800 468 78 78 192 1 17 163 146 TAB 1 ...

Page 26: ... 26 Schemi elettrici Electrical diagrams Schaltpläne Schémas électriques GA200PR GA410PR ...

Page 27: ...27 27 Esplosi Spare parts drawings Explosionzeichnungen Vues éclatées GA200PR GA410PR ...

Page 28: ... 28 ...

Page 29: ......

Reviews: