Description
8
Dimple Grinder User’s Guide
moistened with water or a solvent (e.g., acetone) if the contamination is difficult
to remove.
3.6 Raise/Lower Cam
The Raise/Lower Cam
allows the Platform (and the grinding wheel) to be very
gently lowered and must
always
be used to raise or lower the Platform through
the final part of its movement.
To lower the Platform
1. Rotate the Raise/Lower Cam toward the back.
This will rotate the Cam stop to the rear.
2. Manually lower the Platform as far as it will go.
3. Rotate the Raise/Lower Cam slowly toward the front.
This will rotate the Cam stop to the front and in the process gently lower the
grinding wheel onto the specimen for the last few microns of grinding.
3.7 Stereo Microscope
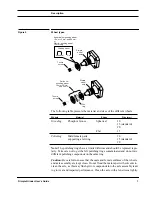
The stereo microscope (see Figure 6) projects a true image and is designed to
accurately fit the microscope mount around the Magnetic Turntable. The cross
hair within the eyepiece is aligned to the center of rotation of the Turntable. By
selectively positioning the specimen, the microscope can be precisely located
on a specific feature.
Illumination
The stereo microscope, which plugs into the light socket left of the Control
Panel (see Figure 1), contains both a Reflection and Transmission Illumination
systems. Certain materials that become transparent during final thinning may,
when mounted to glass specimen mounts, be observed by the Transmission Illu-
mination system.
Depress the
L
AMP
button on the Control Panel to turn off the “reflected” micro-
scope lamp and turn on the “transmitted” lamp mounted beneath the Turntable.
A beam will be projected through the center hole in the Turntable and illumi-
nate the specimen from below.
Summary of Contents for 656
Page 2: ...Part Number 656 82002...
Page 6: ...iv Dimple Grinder User s Guide...
Page 10: ...viii Dimple Grinder User s Guide...
Page 42: ...Spares and Consumables 32 Dimple Grinder User s Guide...
Page 44: ...I 2 Dimple Grinder User s Guide...
Page 48: ......


