23
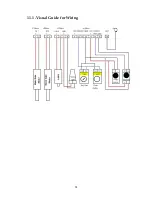
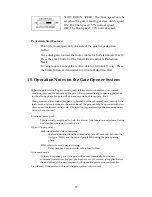
See
the
table
on
the
next
page
for
more
information
regarding
each
terminal.
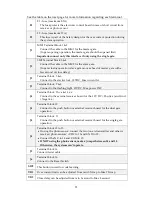
F1
F1
–
fuse
(maximum
0.5A)
The
fuse
protects
the
electronic
control
board
in
case
of
short
circuit
from
receiver
or
photo
sensor
F2
F2
–
fuse
(maximum
15A)
This
fuse
is
part
of
the
Safety
design
for
the
over
current
protection
during
the
system
operation.
J1
MM1
Terminal
block
1
&
2
Connect
the
cable
to
the
MM1
for
the
master
gate.
(In
gate
opening
operation,
the
master
gate
should
be
opened
first)
Important:
connect
only
this
interface
if
only
using
the
single
gate.
J2
SM2
Terminal
block
3
&
4
Connect
the
cable
to
the
MM2
for
the
slave
gate.
(In
gate
closing
operation,
slave
gate
moves
ahead
of
master
gate
with
a
few
second
of
close
delay)
J3
Terminal
block
5
&
6
Connect
to
the
electric
lock,
12VDC,
Max
current
3A
J3
Terminal
block
7
&
8
Connect
to
the
flashing
light.
12VDC,
Max
power
15W
J4
Terminal
block
13+ve
&
12
‐
ve
Connect
to
the
external
receiver
board
for
the
12
V
DC
(
Positive
)
and
Gnd
(
Negative
)
J4
Terminal
block
10
Connect
to
the
push
button
or
external
receiver
board
for
the
dual
gate
operation
J4
Terminal
block
11
Connect
to
the
push
button
or
external
receiver
board
for
the
single
gate
operation
J4
Terminal
block
12
to
15
If
using
the
photo
sensor:
connect
the
two
(one
is
transmitter
and
other
is
receiver)
photo
sensors’
+VDC
to
13
and
GND
to
12.
Connect
the
N.C
to
14
and
COM
to
15.
If
NOT
using
the
photo
sensor,
make
a
jumper
between
14
and
15.
Otherwise,
the
systems
can’t
operate.
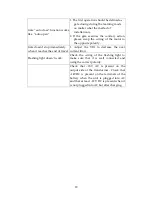
J5
Terminal
block
16
Connect
Aerial
cable
J6
Terminal
block
J6
Connect
to
the
Reset
Switch
SW2
This
button
is
used
for
code
learning.
VR1
Over
current
limit
can
be
adjusted
from
min
3.5Amp
to
Max
7.5Amp
VR2
Close
delay
can
be
adjusted
from
min
0
second
to
Max
8
second

