50
Replacing or Adding System Components
To replace the battery:
1
Restart the server and start the BIOS Setup utility by pressing F1 when
you are prompted to do so.
2
Write down the BIOS settings for each device, then from the Exit menu,
select
Exit Saving Changes
. For more information about the BIOS Setup
utility program, see “Using the BIOS Setup Utility” on page 57.
3
Observe the safety and ESD precautions in “Preventing static electricity
discharge” on page 15.
4
Turn off the server, then disconnect the power cord(s), modem cable (if
installed), and all external devices.
5
Remove the cover panel. (See “Removing the cover panel” on page 17.)
6
Remove any expansion cards that may obstruct your access to the battery.
7
Locate the battery on the system board (see “System board” on page 7).
The battery is circular and has the positive pole mark (+) on the top.
8
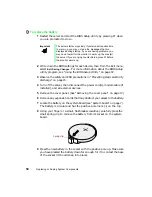
Using your finger or a small, flat-blade screwdriver, carefully press the
small spring clip to remove the battery from its socket on the system
board.
9
Press the new battery in the socket with the positive pole up. Make sure
you have pressed the battery down far enough for it to contact the base
of the socket (it should snap into place).
Important
The server starts very quickly. If your monitor requires time
to warm up, you may not see the messages that are
displayed during startup. If you are having problems, you
may need to wait for the monitor to warm up, then restart
the server. If you are trying to enter Setup, press
F1
before
the monitor warms up.
Spring clip
Summary of Contents for 910 Series
Page 1: ...8508341 Gateway 910 Series System Manual September 2001 ...
Page 6: ...iv Contents ...
Page 22: ...14 System Setup ...
Page 26: ...18 Case Access 7 Lift the back edge of the cover panel then remove the panel from the server ...
Page 28: ...20 Case Access 3 Swing the bezel outward and disengage the bezel from the hinges ...
Page 100: ...92 Troubleshooting ...
Page 112: ...104 Safety Regulatory and Legal Information ...
Page 122: ...114 Reference Data ...


