


CHAPTER 2: Getting Started
10
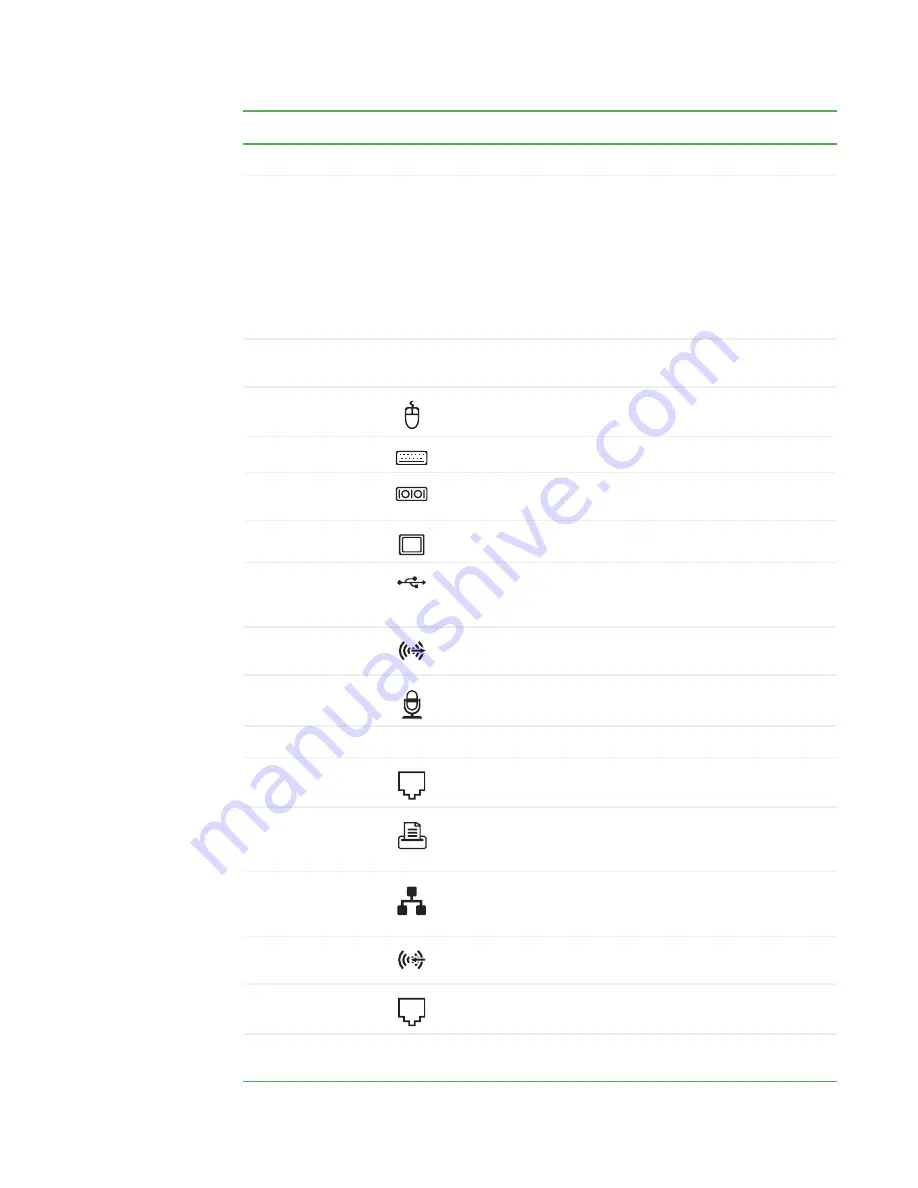
Component
Icon
Description
Power connector
Plug the power cord into this connector.
Voltage switch
Before turning on your computer, make sure that this switch is in the
correct position for the correct power available. The switch is preset at the
factory with the correct voltage for your area.
In the United States, the utility power is supplied at a nominal 115 volts
at 60 Hz. The power supply should always be set to this when your
computer is operating in the United States. In other areas of the world,
such as Europe, the utility power is supplied at 230 volts at 50 Hz. If your
computer is operating in an environment such as this, the voltage switch
should be moved to 230.
Case cover
thumbscrew
Remove this screw before opening the case.
PS/2 mouse port
Plug a Personal System/2
®
(PS/2) keyboard into this port.
PS/2 keyboard port
Plug a PS/2 mouse into this port.
Serial port
Plug a serial device into this port. For more information, see
printer, scanner, or other peripheral device” on page 18
.
Video port
Plug a monitor into this port.
USB ports
Plug USB (Universal Serial Bus) devices (such as a printer, scanner, camera,
keyboard, or mouse) into these ports. For more information, see
a printer, scanner, or other peripheral device” on page 18
.
Headphone/analog
speakers jack (green)
Plug powered speakers, an external amplifier, or headphones into this
jack.
Microphone jack (red
or pink)
Plug a microphone into this jack.
Telephone jack
Plug a telephone cable into this jack.
Case cover
thumbscrew
Remove this screw before opening the case.
Parallel port
Plug a parallel device (such as a printer) into this port. For more
information, see
“Installing a printer, scanner, or other peripheral device”
Ethernet (network)
jack
Plug a 10/100 Ethernet network cable or a device (such as a DSL or cable
modem for a broadband Internet connection) into this jack.
For more information, see
“Networking Your Computer” on page 97
Audio input (Line in)
jack (blue)
Plug an external audio input source (such as a stereo) into this jack so you
can record sound on your computer.
Modem jack
Plug a modem cable into this jack. For more information on modems, see
“Connecting the dial-up modem” on page 18
Case cover
thumbscrew
Remove this screw before opening the case.
Summary of Contents for E-1500
Page 1: ...USER GUIDE Gateway Computer...
Page 13: ...CHAPTER 1 Getting Help www gateway com 6...
Page 27: ...CHAPTER 2 Getting Started www gateway com 20...
Page 57: ...CHAPTER 5 Sending and Receiving Faxes www gateway com 50...
Page 105: ...CHAPTER 8 Customizing Your Computer www gateway com 98...
Page 119: ...CHAPTER 9 Networking Your Computer www gateway com 112...
Page 135: ...CHAPTER 11 Recovering Your System www gateway com 128...
Page 149: ...CHAPTER 12 Maintaining Your Computer www gateway com 142...
Page 189: ...CHAPTER 14 Troubleshooting www gateway com 182...
Page 195: ...APPENDIX A Safety Regulatory and Legal Information www gateway com 188...
Page 203: ...Index www gateway com 196...
Page 204: ...MAN GW ATX PRO USR GDE R0 3 06...


