CHAPTER 4: Installing Components
42
6
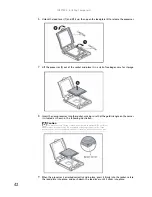
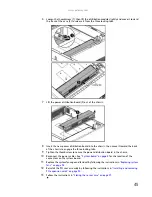
Unlock the load lever (1) and lift it up, then open the load plate (2) to release the processor.
7
Lift the processor (3) out of the socket and place it in a static-free bag or case for storage.
8
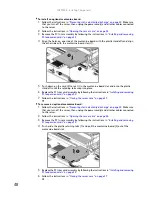
Insert the new processor into the socket, making sure that the gold triangle on the corner
is situated as shown in the following illustration.
9
When the processor is oriented correctly and in place, press it firmly into the socket, rotate
the load plate into place, and push down the load lever until it clicks into place.
Caution
The processor only fits the socket when oriented as indicated. Do not force
the processor into the socket. You may bend or damage the processor. If the
processor does not fit completely, check its orientation and check for bent pins.
Summary of Contents for E-9722R
Page 1: ... E 9722R Server USERGUIDE ...
Page 2: ......
Page 6: ...Contents iv ...
Page 16: ...CHAPTER 1 Checking Out Your Gateway Server 10 ...
Page 28: ...CHAPTER 3 Maintaining Your Server 22 ...
Page 58: ...CHAPTER 4 Installing Components 52 ...
Page 66: ...CHAPTER 5 Using the BIOS Setup Utility 60 ...
Page 84: ...CHAPTER 6 Troubleshooting 78 ...
Page 92: ...APPENDIX A Server Specifications 86 ...
Page 93: ...APPENDIXB 87 BIOS Settings ...
Page 101: ...APPENDIXC 95 Legal Information ...
Page 106: ...APPENDIX C Legal Information 100 ...
Page 110: ...Contents 104 ...
Page 111: ......
Page 112: ...A MAN E 9722R USR R0 02 07 ...


