Chapter 4
167
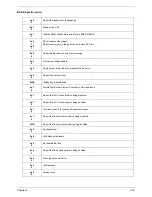
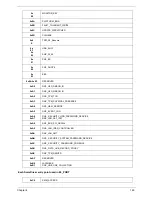
0x
56
PLATFORM_IDE
0x
57
SMBIOS
0x
58
MEMORY_SUB_CLASS
0x
59
MISC_SUB_CLASS
0x5A
CON_PLATFORM
0x5B
SAVE_MEMORY_CONFIG
0x5C
ACPI_SUPPORT
0x5D
CON_SPLITTER_UGA_VGA / CON_SPLITTER
0x5
E
VGA_CLASS
0x
5F
DATA_HUB
0x
60
DISK_IO
0x
61
0x
62
MEMORY_TEST
CRISIS_RECOVERY
0x
63
LEGACY_8259
0x
64
LEGACY_REGION
0x
65
LEGACY_INTERRUPT
0x
66
BIOS_KEYBOARD
0x
67
BIOS_VEDIO
0x
68
MONITER_KEY
0x
69
LEGACY_BIOS
0x6A
LEGACY_BIOS_PLATFORM
0x6B
PCI_PLATFORM
0x6C
ISA_FLOOPY
0x6D
PS2_MOUSE
0x6
E
USB_BOT
0x
6F
USB_CBI0
Summary of Contents for EC14T Series
Page 6: ...vi ...
Page 10: ...x Table of Contents ...
Page 13: ...Chapter 1 3 System Block Diagram ...
Page 32: ...22 Chapter 1 ...
Page 48: ...38 Chapter 2 ...
Page 65: ...Chapter 3 55 4 Unlock the FPC 5 Remove the FPC and keyboard ...
Page 67: ...Chapter 3 57 4 Partially open the LCD module 5 Remove the hinge cap ...
Page 83: ...Chapter 3 73 6 Remove the CRT cable ...
Page 96: ...86 Chapter 3 7 Pry up the bezel bottom edge 8 Remove the bezel ...
Page 106: ...96 Chapter 3 4 Remove the hinge ...
Page 110: ...100 Chapter 3 11 Remove both antenna cables from the cover ...
Page 124: ...114 Chapter 3 6 Replace the screw covers 7 Insert the stylus ...
Page 153: ...Chapter 3 143 2 Replace the HDD in the bay 3 Adhere the black tape 4 Replace the HDD FPC ...
Page 158: ...148 Chapter 3 ...
Page 206: ...196 Appendix B ...
Page 208: ...198 ...
Page 211: ...201 ...
Page 212: ...202 ...


