192
Appendix A
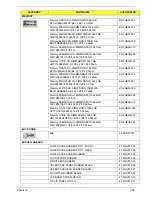
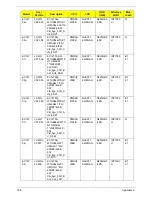
EC18T
01i
LX.WH
M02.00
2
EC18T01i EM
W7HP64EMWTP
H1 UMACrr
1*2G/320/BT/
6L2.8/5R/
CB_n2_0.3D_AU
_ES61
C2DSU
7300B
NLED11.
6WXGAG
N320GB5
.4KS
SP1x2H
MW
BT
2.1
EC18T
02t
LX.WH
M01.00
1
EC18T02t EM
W7HB64EMWTT
H1 UMACrr
2*2G/500_L/BT/
6L2.8/5R/
CB_n2_0.3D_AU
r_TH41
C2DSU
7300B
NLED11.
6WXGAG
N500GB5
.4KS
SP1x2H
MW
BT
2.1
EC18T
02h
LX.WH
M02.00
1
EC18T02h
W7HP64WTCA2
UMACrr 2*2G/
320/BT/6L2.8/
5R/
CB_n2_0.3D_AU
_ENJ1
C2DSU
7300B
NLED11.
6WXGAG
N320GB5
.4KS
SP1x2H
MW
BT
2.1
Model
Acer
Part No
Description
CPU
LCD
HDD
1(GB)
Wireless
LAN1
Blue
tooth
Summary of Contents for EC14T Series
Page 6: ...vi ...
Page 10: ...x Table of Contents ...
Page 13: ...Chapter 1 3 System Block Diagram ...
Page 32: ...22 Chapter 1 ...
Page 48: ...38 Chapter 2 ...
Page 65: ...Chapter 3 55 4 Unlock the FPC 5 Remove the FPC and keyboard ...
Page 67: ...Chapter 3 57 4 Partially open the LCD module 5 Remove the hinge cap ...
Page 83: ...Chapter 3 73 6 Remove the CRT cable ...
Page 96: ...86 Chapter 3 7 Pry up the bezel bottom edge 8 Remove the bezel ...
Page 106: ...96 Chapter 3 4 Remove the hinge ...
Page 110: ...100 Chapter 3 11 Remove both antenna cables from the cover ...
Page 124: ...114 Chapter 3 6 Replace the screw covers 7 Insert the stylus ...
Page 153: ...Chapter 3 143 2 Replace the HDD in the bay 3 Adhere the black tape 4 Replace the HDD FPC ...
Page 158: ...148 Chapter 3 ...
Page 206: ...196 Appendix B ...
Page 208: ...198 ...
Page 211: ...201 ...
Page 212: ...202 ...


