background image

40

www.gateway.com

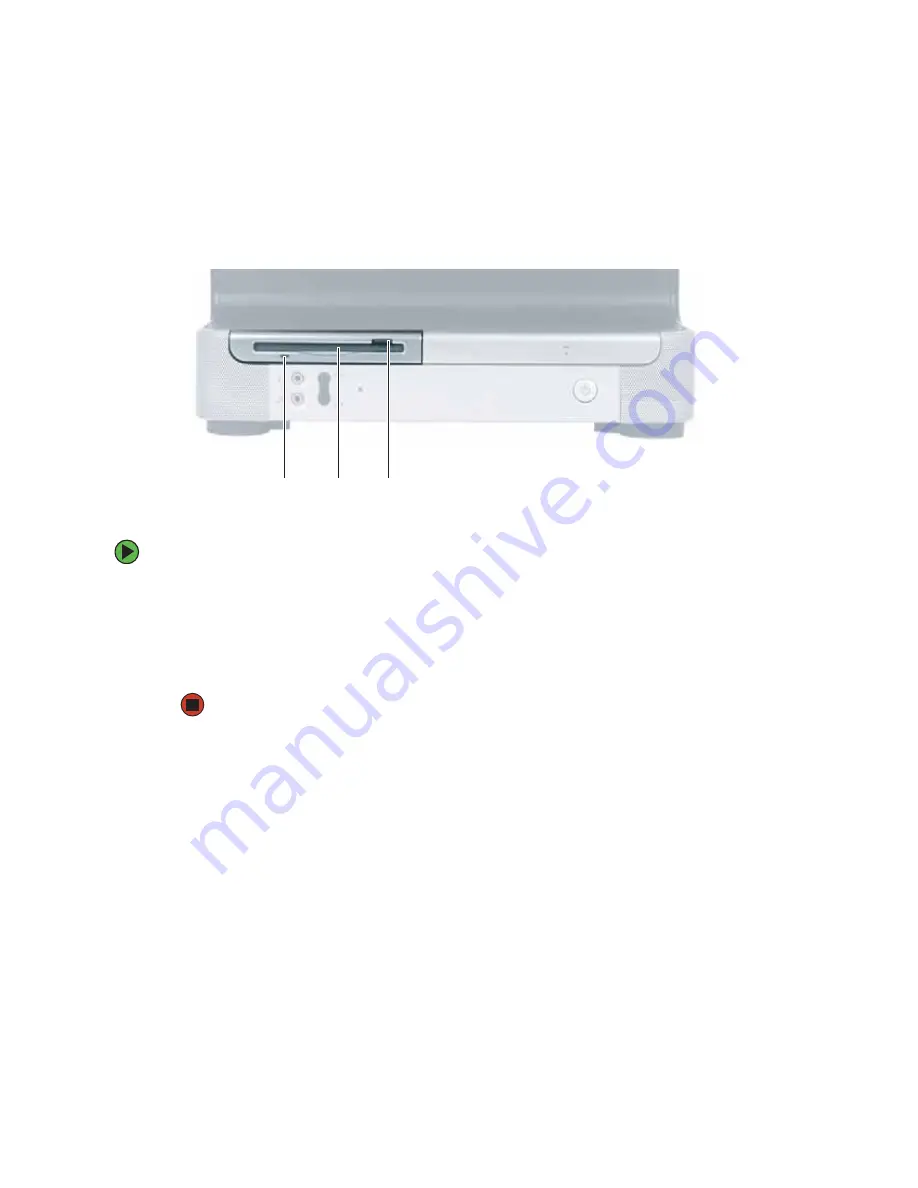
Using the diskette drive 

The optional diskette drive uses 3.5-inch diskettes (sometimes called floppy disks). 
Diskettes are useful for storing files or transferring files to another computer.

To use a diskette:

1

Insert the diskette into the diskette drive with the label facing up.

2

To access a file on the diskette, click 

Start

, then click 

My Computer

. Double-click the 

diskette drive letter (for example, the A: drive), then double-click the file name.

3

To remove the diskette, make sure that the drive activity light is off, then press the 
diskette eject button.

Diskette drive

activity light

Diskette 
slot

Diskette 
eject button

Summary of Contents for Gateway Profile 5

Page 1: ...User Guide Gateway Profile 5 5 5...

Page 2: ......

Page 3: ...ing up your computer desk and chair 18 Setting up your computer and computer accessories 19 Sitting at your computer 19 Avoiding discomfort and injury from repetitive strain 19 Protecting from power s...

Page 4: ...computer 48 Updating Windows 48 Protecting your computer from viruses 49 Cleaning your computer 51 Cleaning the exterior 51 Cleaning the keyboard 52 Cleaning the computer display 52 Cleaning the mouse...

Page 5: ...cting a network connection 89 Creating an Ethernet network 96 Installing Ethernet cards and drivers 96 Making sure your broadband connection works 97 Naming the computers and the workgroup 97 Configur...

Page 6: ...iv www gateway com A Safety Regulatory and Legal Information 125 B Specifications 131 Index 137...

Page 7: ...Chapter 1 1 Getting Help Using the Gateway Web site Using Help and Support Using BigFix Using Your Computer guide Using Do More With Gateway Using online help Contacting Gateway...

Page 8: ...liarize yourself with our range of services and support We have highlighted some basic care and safety information to help you keep your computer in good operating condition Gateway stands behind our...

Page 9: ...s online support is available 24 hours per day 7 days per week and provides the most current drivers product specifications tutorials and personalized information about your computer Visit the Gatewa...

Page 10: ...oduct Support Click Product Support to view a list of all the products that Gateway supports Downloads Click Downloads then click My Downloads to get the latest software updates for BIOS and driver up...

Page 11: ...and automated support Use Help and Support to answer questions about Windows and to help you quickly discover and use the many features of your Gateway computer To start Help and Support Click Start...

Page 12: ...n the words you entered in the Search box You must be connected to the Internet to search for and access these topics To view a list of your search results click the results header for the type of res...

Page 13: ...he Using Your Computer guide Click Start All Programs then click Gateway Documentation Online help Many programs provide information online so you can research a topic or learn how to perform a task w...

Page 14: ...com Gateway contact information To help you locate Gateway contact information you can find the Gateway Web site Online Support and technical support contact information on the label located on your...

Page 15: ...ing Out Your Gateway Computer Identifying features Locating your computer model and serial number Locating the Microsoft Certificate of Authenticity Locating the specifications for your computer Purch...

Page 16: ...10 www gateway com Front Speaker Power button CD DVD Recordable drive Memory card reader or diskette drive Microphone jack Display controls Headphone jack Volume control buttons Speaker...

Page 17: ...s and store large files onto recordable CDs or DVDs For more information see Using the CD or DVD drive on page 43 and Creating CDs and DVDs on page 46 This drive may be a CD recordable CD DVD or recor...

Page 18: ...USB ports Ethernet jack Power connector Microphone jack Audio line out jack PS 2 mouse port Monitor out port optional Modem jack optional PS 2 keyboard port Serial port Monitor in port Audio line in...

Page 19: ...less keyboard wireless mouse and your computer For more information see the Wireless keyboard setup guide Modem jack optional Plug a modem cable into this jack For more information see Connecting the...

Page 20: ...uch as a digital video camera into these 4 pin and 6 pin IEEE 1394 ports For more information see Installing a printer scanner or other peripheral device on page 38 USB ports Plug USB Universal Serial...

Page 21: ...duct key code for your operating system Finding your specifications For more information about your computer such as memory size memory type and hard drive size see visit Gateway s eSupport page at su...

Page 22: ...are relatively inexpensive but they are slower than laser printers Using an inkjet color printer you can print pictures banners and greeting cards as well as documents Laser printers and cartridges a...

Page 23: ...ed Using your computer safely Protecting your computer from power source problems Turning your computer on and off Adjusting the volume Using the keyboard and the mouse Using the computer display Inst...

Page 24: ...by installing a glare screen filter on your display Use soft indirect lighting in your work area Do not use your computer in a dark room Avoid focusing your eyes on your computer screen for long peri...

Page 25: ...Setting up your computer and computer accessories Set up the computer so the top of the display is no higher than eye level the controls are within reach and the screen is tilted to be perpendicular...

Page 26: ...your computer for an extended period of time with a UPS a UPS lets you run your computer long enough to save your work and shut down your computer normally Starting your computer To start your compute...

Page 27: ...in Standby mode move the mouse or press the power button to wake it up Important Your computer has a built in variable speed fan In addition your computer uses a powerful processor which produces heat...

Page 28: ...unplug the power cord and modem cable from the wall outlets We recommend disconnecting the power cord and modem cable when your computer will not be used for long periods For more information about ch...

Page 29: ...Press CTRL ALT DEL The Task Manager window opens 2 Click the Applications tab then click the program that is not responding 3 Click End Task 4 Click X in the top right corner of the Windows Task Mana...

Page 30: ...the cover with the slots above the back ports then swing the cord cover s bottom tabs into the slots on the bottom of the computer view shown from below for clarity To remove the cord cover Press the...

Page 31: ...le lock to prevent the theft of your computer or its internal components While the cable lock is installed the computer s back panel cannot be removed To lock your computer Install a cable lock into t...

Page 32: ...are using external speakers turn the knob on the front of the speakers OR Use the mute and volume control buttons on the keyboard For more information see Using the keyboard on page 27 Tips Tricks Fo...

Page 33: ...inning of a document or to the end of a document Indicators Show if your NUM LOCK CAPS LOCK or SCROLL LOCK keys are activated Press the corresponding key to activate the function Windows keys Press on...

Page 34: ...he end of a document Indicators Show if your NUM LOCK CAPS LOCK or SCROLL LOCK keys are activated Press the corresponding key to activate the function Windows keys Press this key to open the Windows S...

Page 35: ...r DVD chapter Volume down Decrease the volume Volume up Increase the volume Mute Turn off all sound My Documents Opens the My Documents folder You can customize this button to open another program Hel...

Page 36: ...ctions included in the box to set it up and use it Search Open online search You can customize this button to open another program Internet Open your Web browser You can customize this button to open...

Page 37: ...you move the mouse the pointer arrow on the display moves in the same direction You can use the left and right buttons on the mouse to select objects on the display You can use the scroll wheel on th...

Page 38: ...icking Access a shortcut menu or find more information about an object on the computer display Position the pointer over the object Quickly press and release the right mouse button once This action is...

Page 39: ...ork For information about setting up a wired or wireless Ethernet network see Networking Your Computer on page 87 To connect to a wired Ethernet network 1 Insert one end of the network cable into the...

Page 40: ...en display OSD that lets you adjust and save contrast brightness and other settings for the display Your computer saves changes you make to the settings even if you turn off the display Auto Press the...

Page 41: ...n menu screen 5 If you want to adjust additional ODS options repeat Step 2 through Step 4 until all adjustments are made 6 Press the EXIT button again to exit the OSD OSD menus You can access any of t...

Page 42: ...e left and right You can also use the Auto function to configure the vertical and horizontal position automatically For more information on the Auto function see External controls on page 34 This menu...

Page 43: ...justing the screen and desktop settings in Using Your Computer which has been included on your hard drive To access this guide click Start All Programs then click Gateway Documentation Language Change...

Page 44: ...gnize such a device whenever you plug it into the appropriate port When you use an IEEE 1394 or USB device for the first time your computer will prompt you to install any software the device needs Aft...

Page 45: ...Chapter 4 39 Using Drives and Ports Using the diskette drive Using the memory card reader Using CD or DVD drives...

Page 46: ...skette 1 Insert the diskette into the diskette drive with the label facing up 2 To access a file on the diskette click Start then click My Computer Double click the diskette drive letter for example t...

Page 47: ...signed a different drive letter for example the E and F drives so data can be transferred from one media type to another Card Type Slot Insert CompactFlash Upper left Label facing up IBM Microdrive Up...

Page 48: ...top blinking then pull the media out of the slot Caution To avoid memory card damage or errors while using a memory card insert only one memory card in a slot at a time Caution Do not remove the media...

Page 49: ...cessing data creating CDs and playing DVDs DVD drive Installing programs playing audio CDs playing DVDs and accessing data DVD RW Installing programs playing audio CDs playing DVDs accessing data and...

Page 50: ...44 www gateway com Inserting a CD or DVD Important Some music CDs have copy protection software You may not be able to play these CDs on your computer Activity indicator Eject button Manual eject hole...

Page 51: ...press down carefully on the disc until it snaps into place You can place your other hand underneath the disc tray to support it while you press the disc into place 3 Gently push the tray in until it i...

Page 52: ...program on your computer to copy tracks from a music CD to your hard drive copy or create data CDs and DVDs create music CDs create video DVDs and more Tips Tricks For more information about playing C...

Page 53: ...intaining Your Computer Caring for your computer Updating Windows Protecting your computer from viruses Cleaning your computer Restoring your system Opening the computer case Adding memory and replaci...

Page 54: ...puter for an extended period of time unplug AC power Updating Windows Windows Update is the online extension of Windows that helps you to keep your computer up to date Use Windows Update to choose upd...

Page 55: ...m to check files and programs that are on diskettes attached to e mail messages or downloaded from the Internet Checking all programs for viruses before installing them Disabling macros on suspicious...

Page 56: ...in the Scan for Viruses area then under Actions click Scan To remove a virus 1 If Norton AntiVirus finds a virus follow all on screen instructions to remove the virus 2 Turn off your computer and leav...

Page 57: ...air that has a narrow straw like extension Cotton swabs A CD or DVD drive cleaning kit Cleaning the exterior Always turn off your computer and other peripherals before cleaning any components Use a d...

Page 58: ...eyboard upside down Let the liquid drain then let the keyboard dry before trying to use it again If the keyboard does not work after it dries you may need to replace it Cleaning the computer display U...

Page 59: ...the bottom of the mouse counter clockwise then remove the retaining ring and mouse ball 3 Remove any dust lint or dirt from the mouse ball with a soft cloth 4 Clean the mouse rollers with a cotton sw...

Page 60: ...lable on the backup Restore CDs or DVDs that you created or they are available on the hard drive If you need to restore your computer to the original configuration you can restore from the backup Rest...

Page 61: ...from their antistatic bags only when you are ready to use them Do not lay components on the outside of antistatic bags because only the inside of the bags provide electrostatic protection Always hold...

Page 62: ...nect the power cord and all other external cables 3 Press the power button to drain any residual power from your computer 4 Remove the four screws on the back of the computer case 5 With your hands po...

Page 63: ...ther non abrasive surface 2 Hook the back panel s tabs into the notches on the top of the open computer s back then swing the back panel down and press it into place 3 Replace the four screws removed...

Page 64: ...ocedure is the same To replace the hard drive 1 Open the case by following the instructions in Opening the case on page 56 2 Press the drive cage release latch Tips Tricks For more stability place you...

Page 65: ...59 www gateway com 3 While holding the latch pull the drive cage out of the computer Profile 5 shown 4 Disconnect the drive cable and power cable from the hard drive...

Page 66: ...60 www gateway com 5 Remove the four screws that secure the hard drive to the hard drive cage 6 Remove the drive Screw Screw Screw Screw...

Page 67: ...placing 8 Insert the new drive into the drive cage and secure it with the four screws removed earlier 9 Connect the drive cable and power cable to the drive 10 Slide the drive cage into the computer u...

Page 68: ...place DIMM memory 1 Open the case by following the instructions in Opening the case on page 56 2 Find the memory module banks sometimes called add in slots on your system board 3 If you are removing a...

Page 69: ...on the sides of the memory module should secure the memory module automatically When the module is secure you hear a click 5 Close the case by following the instructions in Closing the case on page 5...

Page 70: ...ecause your computer supports hot swapping Hot swapping means that you can insert a PC Card while your computer is running If the PC Card does not work after hot swapping see the PC Card manufacturer...

Page 71: ...bar then select the PC Card name and click Stop OR Turn off your computer 2 Release the eject button by pressing the PC Card eject button once 3 Eject the PC Card by pressing the eject button again Im...

Page 72: ...66 www gateway com...

Page 73: ...Chapter 6 67 Troubleshooting Troubleshooting typical hardware and software problems Getting telephone support Using automated troubleshooting systems Getting tutoring and training...

Page 74: ...or mouse does not work make sure that all connections are secure Make sure that your hard drive is not full If an error message appears on the screen write down the exact message The message may help...

Page 75: ...hut down and restart your computer Some music CDs have copy protection software You may not be able to play these CDs on your computer Clean the disc For more information see Cleaning CDs or DVDs on p...

Page 76: ...DVD drives contain regional codes that help control DVD title exports and help reduce illegal disc distribution To be able to play a DVD the disc s regional code and your DVD drive s regional code mu...

Page 77: ...ct error message Move the write protection tab in the upper right corner of the diskette down unprotected The diskette may be full Delete unnecessary files on the diskette and try again Make sure that...

Page 78: ...ctric fan fluorescent light metal shelf or laser printer The text on the display is dim or difficult to read Adjust the brightness and contrast controls Change the display settings DVD drives See CD o...

Page 79: ...ard drive using Disk Cleanup For instructions on deleting unnecessary files see Using Disk Cleanup in Using Your Computer which has been included on your hard drive To access this guide click Start Al...

Page 80: ...isk error error message Eject the diskette from the diskette drive then press ENTER Internet You cannot connect to the Internet If you are using a dial up modem make sure that the modem cable is plugg...

Page 81: ...n Web pages Having multiple Web browsers open performing multiple downloads and having multiple programs open on your computer People are sending you e mail messages but you have not received any mail...

Page 82: ...help determine if a memory module is failing You see a Not enough memory error message Close all programs then restart your computer Memory card reader Drive letters for the memory card slots do not a...

Page 83: ...not connect these devices to the same telephone line as the modem Make sure that you are not using a digital rollover or PBX line These lines do not work with your modem Check for line noise scratchy...

Page 84: ...Your ISP may not support 48K uploads Your fax communications program only sends and receives faxes at 14 400 bps when you have a 56K modem Current fax technology only supports a maximum send and rece...

Page 85: ...connect If the handshaking sounds are too loud you can turn down the modem volume To turn down the modem volume 1 Click Start then click Control Panel The Control Panel window opens If your Control Pa...

Page 86: ...tion about setting up a network in your home see Networking Your Computer on page 87 For more information about troubleshooting your network see Troubleshooting Your Ethernet network on page 121 Passw...

Page 87: ...ve selected it in the printer setup To set a default printer 1 Click Start then click Control Panel The Control Panel window opens If your Control Panel is in Category View click Printers and Other Ha...

Page 88: ...fline button that you need to press after adding paper Sound You are not getting sound from the speakers Make sure that the volume controls are turned up For more information see Adjusting the volume...

Page 89: ...way see the manufacturer s documentation and technical support resources If you have how to questions about using a program see Online Help Printed documentation The Microsoft Windows documentation Th...

Page 90: ...y the minute 800 229 1103 chargedto your credit card 900 555 4695 chargedto your telephone bill Gateway Customer Care Talk to a Gateway Customer Care representative about a non tutorial technical supp...

Page 91: ...a major credit card 900 555 4695 rate charged per minute charged to your telephone bill Training Gateway provides the following computer based training Help and Support For more how to information abo...

Page 92: ...86 www gateway com...

Page 93: ...Chapter 7 87 Networking Your Computer Introducing networking Creating an Ethernet network Testing your network Sharing your resources Troubleshooting your Ethernet network...

Page 94: ...py files from computer to computer by copying and pasting or dragging and dropping You will no longer waste your time transferring files by using recordable media In addition you can map a drive on a...

Page 95: ...h your computer is as important as network speed Your computer has wireless Ethernet for networking Using a wireless Ethernet network A wireless Ethernet network is ideal for creating a home or office...

Page 96: ...wireless Ethernet is already installed on your computers on page 93 Important Note any antenna placement constraints in the user guide of each type of wireless device in your network Network Type Spe...

Page 97: ...ontrol point for the network Attached to the access point is the cable or DSL modem that provides access to the Internet Each of the computers or Ethernet ready devices communicate with the access poi...

Page 98: ...net connection optional Tips Tricks To add the ability to access a wired Ethernet network to your wireless Ethernet network connect an access point to the router or use a router that has a built in ac...

Page 99: ...2 11b and IEEE 802 11g All wireless Ethernet components must use the same frequency A combination of IEEE 802 11a and IEEE 802 11b or IEEE 802 11a and IEEE 802 11g components will not work Some wirele...

Page 100: ...offices around the world and can be used to build computer networks in the home Ethernet Fast Ethernet or Gigabit Ethernet Ethernet is available at three different speeds Standard Ethernet runs at 10...

Page 101: ...he Internet Equipment you need for a router based wired Ethernet network For a wired Ethernet network you need Two or more computers with Ethernet jacks One router One broadband Internet connection op...

Page 102: ...s on the computers that do not have Ethernet already installed To order wired or wireless Ethernet PCI or PC cards visit the Accessories Store at accessories gateway com Use the documentation that com...

Page 103: ...sers on the network Use a computer name of up to 15 characters with no blank spaces Each computer name must be unique on your network All numeric computer names are not allowed Names must contain some...

Page 104: ...arily assign an IP address to a computer on the network IP Address Internet Protocol IP address is a number that uniquely identifies a computer on the network Subnet Mask Subnet mask is a number that...

Page 105: ...N connection setup click Create a new connection and follow the instructions in the New Connection Wizard 4 Click to select the Internet Protocol TCP IP check box in the This connection uses the follo...

Page 106: ...the Local Area Connection Properties dialog box 10 Click X to close the Network Connections window 11 Repeat this procedure for every computer on your network Where to go from here If you are setting...

Page 107: ...uctions in Setting up a network using a router on page 108 then go to Step 7 OR If you are not connecting any wired devices to your wireless access point router go to Step 2 2 Plug one end of a straig...

Page 108: ...ill not be able to connect to your network without knowing the name of your access point Channel In the United States you can specify any channel between 1 and 11 WEP To use WEP wired equivalent priva...

Page 109: ...Network and Internet Connections The Network and Internet Connections window opens 2 Click Double click Network Connections The Network Connections window opens 3 Right click the Wireless Network Con...

Page 110: ...s those used by the access point To configure computer settings with WEP security for an access point wireless Ethernet network 1 With the Wireless Network Connection window open click Change advanced...

Page 111: ...twork key and Confirm network key boxes to match those set on the access point OR If the WEP network key is provided automatically then leave the check mark in The key is provided for me automatically...

Page 112: ...ly happens when you set the access point s Allow Broadcast SSID to associate to No For more information see Configuring the access point on page 101 To manually add an access point wireless Ethernet n...

Page 113: ...ed automatically click to clear The key is provided for me automatically check box then type the network key settings in the Network key and Confirm network key boxes to match those set on the access...

Page 114: ...r can assign IP addresses to the computers on the network and can provide firewall protection for your network as well Help and Support For more information about configuring a wireless network click...

Page 115: ...3 Plug one end of a straight through network cable into any numbered port on the router except the WAN port The WAN port is used to connect the router to the DSL or cable modem and is identified by a...

Page 116: ...the following values in the appropriate fields Router Name and Domain Name Check with your ISP to see if entries are required in these fields and if so what entries are required Normally leaving the...

Page 117: ...n Internet connection on page 112 Check all physical cable connections Compare the status lights on the front of the router or access point with the patterns described in the router or access point li...

Page 118: ...rocedure uses the Windows XP New Connection Wizard and Internet Explorer The example screens show those screens that typically appear in the course of using the wizard If your Internet connection diff...

Page 119: ...113 www gateway com 3 Click the Connections tab 4 Click Setup The New Connection Wizard opens 5 Click Next The Network Connection Type screen opens...

Page 120: ...en opens 7 Click Set up my connection manually then click Next The Internet Connection screen opens 8 Click the type of Internet connection you are setting up then click Next 9 Click Finish 10 Repeat...

Page 121: ...es or folders If you want to share a drive or folder use the following instructions To share drives or folders 1 Make sure that each computer on your network has Windows file and printer sharing turne...

Page 122: ...ou have previously enabled remote file access and you want to share a drive or folder with others on the network network sharing click to select the Share this folder on the network check box type a s...

Page 123: ...click Control Panel The Control Panel window opens If your Control Panel is in Category View click Printers and Other Hardware 2 Click Double click the Printers and Faxes icon The Printers and Faxes w...

Page 124: ...es and folders are listed Mapping a network drive After a drive or folder on one computer is mapped as a drive on another computer the contents of the drive or folder can be accessed as if the drive w...

Page 125: ...e click the folder containing the file then double click the file Copying files across the network To copy files across the network 1 Click Start then click My Computer The My Computer window opens 2...

Page 126: ...work obtain information about the network such as the SSID password key and security settings to use and enter that information See Configuring computer settings for an access point on page 104 for in...

Page 127: ...number you assign between 0 and 254 The first N should be the same for all computers on your network and the second N should be different for all computers on your network The computer does not recog...

Page 128: ...oint Your wireless Ethernet network is running slower than you expect If your wireless Ethernet network is running slower than you expect you should check your network signal strength If you find the...

Page 129: ...ure that both the WAP and the WLAN in the computer have matching WEP keys You are in a wireless network but no available networks are listed in the Windows XP Wireless Networking utility If the networ...

Page 130: ...124 www gateway com...

Page 131: ...Appendix A 125 Safety Regulatory and Legal Information Safety information Regulatory statements Notices...

Page 132: ...sert the plug into an outlet contact an electrician to install the appropriate outlet If you use an extension cord with this system make sure that the total ampere rating on the products plugged into...

Page 133: ...by turning the equipment off and on the user is encouraged to try to correct the interference by one or more of the following measures Reorient or relocate the receiving antenna Increase the separatio...

Page 134: ...main on the line and briefly explain to the dispatcher the reason for the call Perform such activities in the off peak hours such as early morning or late evenings The United States Telephone Consumer...

Page 135: ...ce may consist of any combination of devices subject only to the requirement that the sum of the Ringer Equivalence Numbers of all the devices does not exceed 5 Laser safety statement All Gateway syst...

Page 136: ...way com In no event will Gateway be liable for direct indirect special exemplary incidental or consequential damages resulting from any defect or omission in this manual even if advised of the possibi...

Page 137: ...Appendix B 131 Specifications...

Page 138: ...processor 400 MHz 533 MHz 800 MHz System memory depending on memory and processor DDR266 333 400 Two sockets available which can hold memory upgrades for a maximum capacity of 2 GB To determine your c...

Page 139: ...ront panel Power rating 5 W per channel Audio CODEC Profile 5 Sigmatel STA09758T Profile 5 5 RealTek ALC203 Modem optional Internal V 92 56 Kbps data fax RJ 11 MDC Network Integrated LAN RJ 45 Remote...

Page 140: ...dard PS 2 keyboard 2 button PS 2 wheel mouse Optional Multimedia keyboard Wireless keyboard wireless wheel mouse PCMCIA PC Card One Type II 32 bit PC Card slot Controller TI 4510 I O ports and connect...

Page 141: ...LAN Alert on LAN with limited functionality ACPI power management Physical specifications Dimensions System without cord cover installed W H D 15 inch LCD 13 86 inches 15 49 inches 6 95 inches 352 mm...

Page 142: ...136 www gateway com...

Page 143: ...tness 35 broadband connection 33 88 97 jack 13 C cable modem 33 91 95 101 108 jack 13 Caps Lock indicator 27 28 cards See also PC Card slots 41 troubleshooting memory card 76 types of memory cards sup...

Page 144: ...13 14 network 13 33 parallel 13 power 13 power cord 13 printer 13 14 PS 2 keyboard 13 PS 2 mouse 13 scanner 13 14 serial 13 speakers 13 USB 13 14 VGA 13 Zip drive 13 14 contrast 35 copying files acros...

Page 145: ...rge ESD 55 e mail button 29 entering IP address 98 subnet mask 98 ergonomics 18 eSupport 15 using 4 Ethernet connecting 33 creating network 96 installing cards 96 installing drivers 96 jack 13 33 exte...

Page 146: ...eyboard mouse connect button 13 keys application 27 28 arrow 27 28 directional 27 28 function 27 28 Multifunction keyboard 28 navigation 27 28 numeric 27 28 Windows 27 28 L label Microsoft Certificate...

Page 147: ...sing DVD drive 43 using Windows Media Player 46 multi player game playing 89 muting sound 26 29 My Documents button 29 N name computer 97 domain 102 110 router 102 110 workgroup 97 naming computers 97...

Page 148: ...arallel port 13 sharing 88 115 117 troubleshooting 81 USB port 13 14 printing files across network 120 programming My Documents button 29 shortcut buttons 29 programs closing unresponsive 23 opening 3...

Page 149: ...o 88 subnet mask entering 98 surge protector 20 T TCP IP protocol configuring 98 technical support automated troubleshooting 84 eSupport 15 Technical Support 84 tips before contacting 83 tutorial serv...

Page 150: ...ing modem 79 buttons 29 control button 11 controls 26 29 muting 26 29 troubleshooting 82 W WAN IP Address 102 110 Web browser button 30 Web site Gateway 3 Windows file and printer sharing 115 New Conn...

Page 151: ......

Page 152: ...NSK DWL PFL5 5 5 USR GDE R1 8 04...

Reviews: