background image

2

www.gateway.com

Replacing the Memory Module

Technical Support

See the label on the bottom of the notebook for Customer 
Care Information. See your hardware guide for important 
safety, regulatory, and legal information.

© 2006 Gateway, Inc. All rights reserved. Gateway and 
eMachines are trademarks or registered trademarks of 
Gateway, Inc. in the United States and other countries. 
All other brands and product names are trademarks or 
registered trademarks of their respective companies.

10

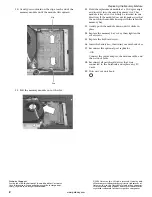
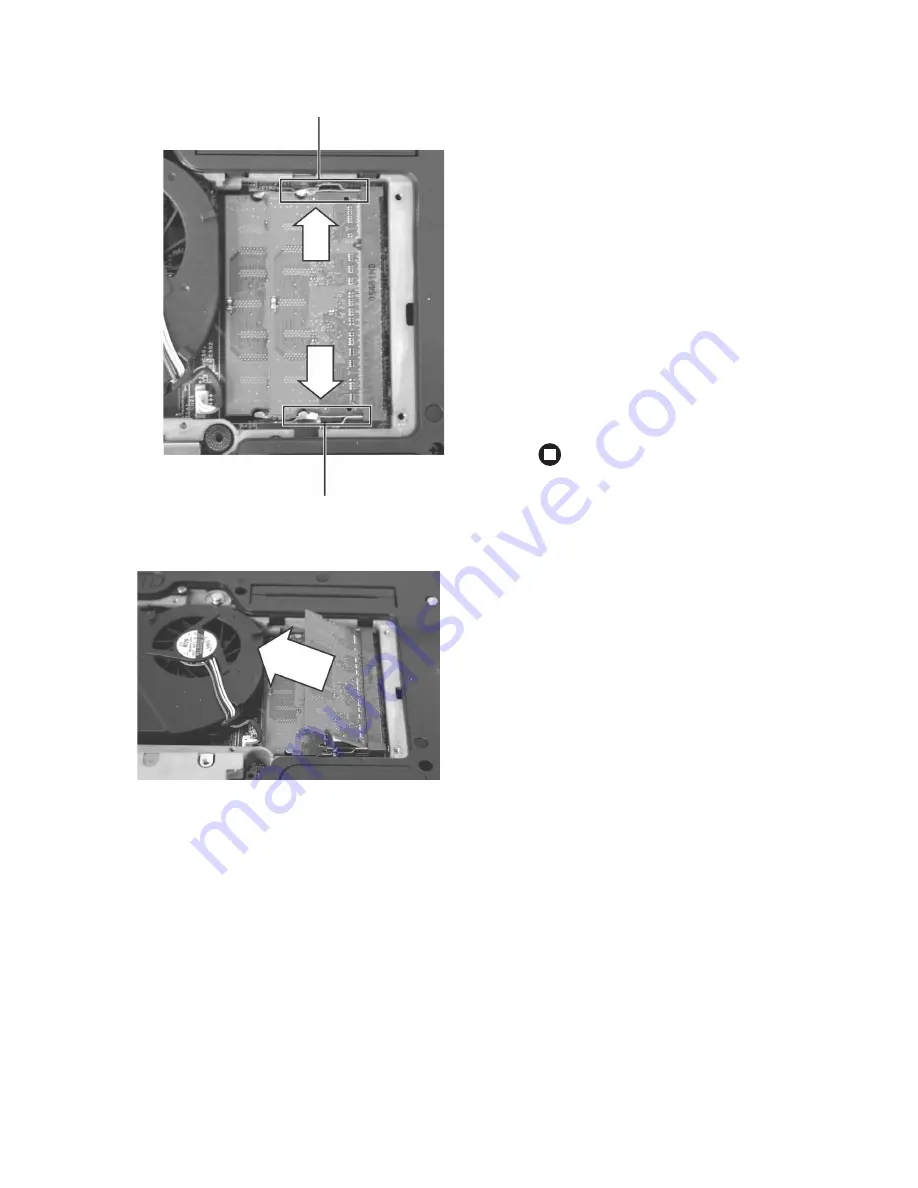
Gently press outward on the clip at each end of the 
memory module until the module tilts upward.

11

Pull the memory module out of the slot.

12

Hold the replacement module at a 30-degree angle 
and insert it into the empty memory slot. This 
module is keyed so it can only be inserted in one 
direction. If the module does not fit, make sure that 
the notch in the module lines up with the tab in the 
memory bay.

13

Gently push the module down until it clicks in 
place.

14

Replace the memory bay cover, then tighten the 
cover screws.

15

Replace the keyboard screw.

16

Insert the battery(ies), then turn your notebook over.

17

Reconnect the optional port replicator.

-OR-

Connect the power adapter, the modem cable, and 
the network cable.

18

Reconnect all peripheral devices that were 
connected to the notebook and replace any PC 
Cards.

19

Turn on your notebook.

Clip

Clip

Summary of Contents for M255

Page 1: ...ug the power cord into a wall outlet The battery charge indicator turns on If the battery charge indicator does not turn on unplug the adapter from your notebook then plug it back in Caution Replace the power cord if it becomes damaged The replacement cord must be of the same type and voltage rating as the original cord or your notebook may be damaged Warning Do not attempt to disassemble the AC a...

Page 2: ...Slide the battery lock to the unlocked position 6 Slide the battery release latch 7 Slide the battery out of the notebook 8 Slide a battery into the notebook until it snaps into place 9 Slide the battery lock to the locked position 10 Turn your notebook over 11 Reconnect the optional port replicator 12 Open the LCD panel and press the power button Tips Tricks If your notebook is connected to AC po...

Page 3: ...ch a bare metal surface on your workbench or other grounded object Replacing the hard drive kit To replace the hard drive kit 1 If possible create a Drivers and Applications Recovery disc For more information see Creating Drivers and Applications Recovery discs in the online User Guide 2 Follow the guidelines under Preventing static electricity discharge 3 Turn off your notebook 4 Disconnect your ...

Page 4: ...drive bracket 14 Remove the bracket from the old drive 15 Place the new drive label side up onto the bracket so the screw holes line up 16 Replace the screws that secure the bracket to the drive 17 Slide the new hard drive kit into your notebook then replace the screws that secure the hard drive kit to the notebook 18 Replace the hard drive bay cover then tighten the cover screws 19 Replace the ke...

Page 5: ...t electronics stores and attach it to a bare metal part of your workbench or other grounded connection Touch a bare metal surface on your workbench or other grounded object Removing the old keyboard To remove the old keyboard 1 Follow the guidelines under Preventing static electricity discharge 2 Turn off your notebook 3 Disconnect your notebook from the optional port replicator 4 Disconnect the A...

Page 6: ...tor clip back to lock the connector in place 3 Rotate the keyboard toward the LCD panel until the keyboard is almost face up 4 Insert the tabs on the front edge of the keyboard into the slot under the palm rest You may need to press down on the keyboard keys along the front edge of the keyboard to seat the retaining tabs into their corresponding slots 5 Gently press the keyboard down until it is f...

Page 7: ...Never slide components over any surface Wear a grounding wrist strap available at most electronics stores and attach it to a bare metal part of your workbench or other grounded connection Touch a bare metal surface on your workbench or other grounded object Replacing the memory module To replace the memory module 1 Follow the guidelines under Preventing static electricity discharge 2 Turn off your...

Page 8: ... tilts upward 11 Pull the memory module out of the slot 12 Hold the replacement module at a 30 degree angle and insert it into the empty memory slot This module is keyed so it can only be inserted in one direction If the module does not fit make sure that the notch in the module lines up with the tab in the memory bay 13 Gently push the module down until it clicks in place 14 Replace the memory ba...

Page 9: ...Wear a grounding wrist strap available at most electronics stores and attach it to a bare metal part of your workbench or other grounded connection Touch a bare metal surface on your workbench or other grounded object Replacing the wireless network module To replace the wireless network module 1 Follow the guidelines under Preventing static electricity discharge 2 Turn off your notebook 3 Disconne...

Page 10: ...and insert it into the empty slot This module is keyed so it can only be inserted in one direction If the module does not fit make sure that the notch in the module lines up with the tab in the module slot 13 Move the antenna wires out of the way 14 Replace the wireless network card screws 15 Reattach the black antenna cable to the connector labelled MAIN or M then reattach the light gray antenna ...

Reviews: