background image

47

Replacing the palm rest assembly

www.gateway.com

11

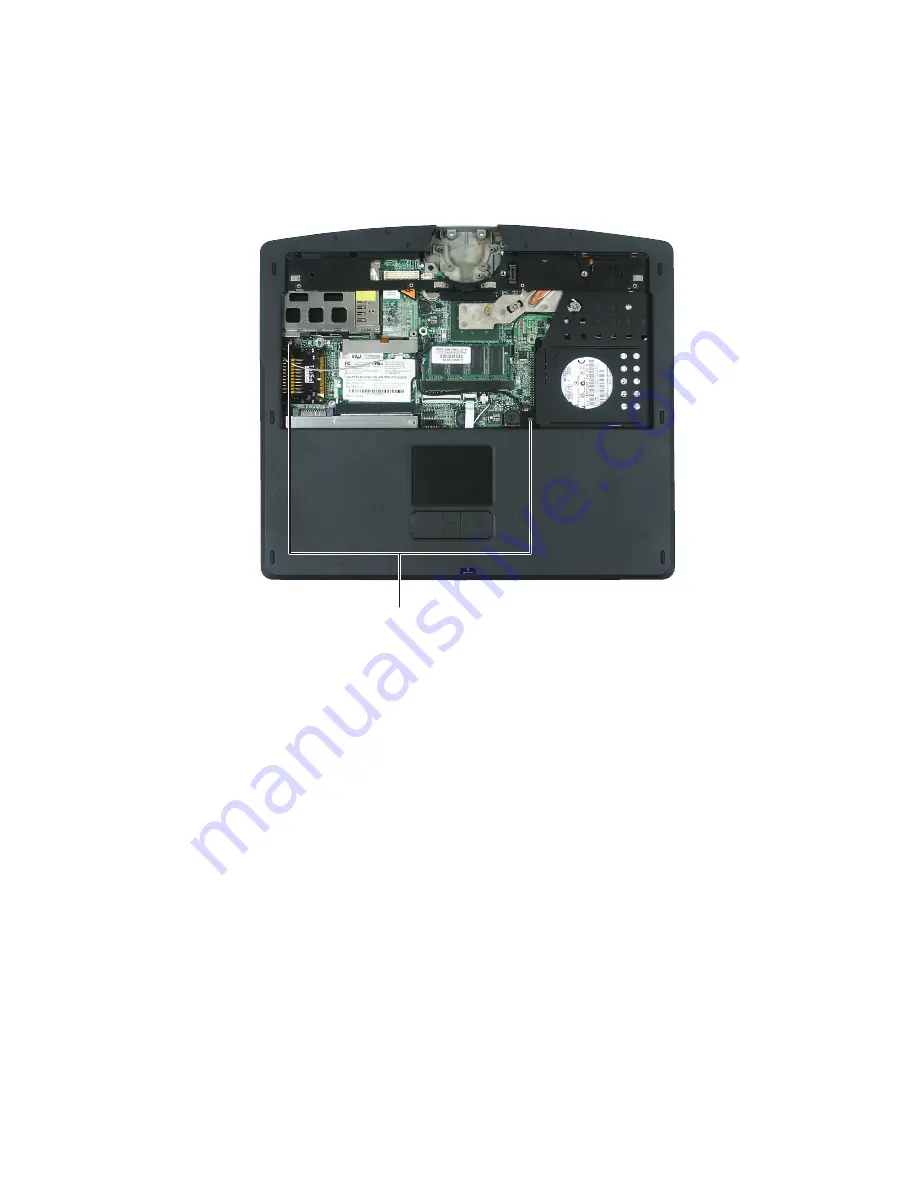
Remove the two screws on the top of the convertible tablet PC.

Screws

Summary of Contents for M275

Page 1: ...Gateway M275 Notebook Customizing Troubleshooting serviceguide...

Page 2: ...Thank you for purchasing this Factory Service Manual CD DVD from servicemanuals4u com Please check out our eBay auctions for more great deals on Factory Service Manuals servicemanuals4u...

Page 3: ......

Page 4: ...kit 13 Replacing the optical drive 15 Replacing the keyboard cover 18 Replacing the keyboard 22 Adding or replacing memory modules 27 Adding or replacing memory in the memory bay 28 Replacing memory...

Page 5: ...suggestions regarding the content of this guide send an e mail with the subject Service Guide Comments to channel services gateway com 2003 Gateway Inc All rights reserved Gateway Gateway Country the...

Page 6: ...le tablet PC contains information that identifies the convertible tablet PC model and its features Warning It is important that you use the correct service guide for the convertible tablet PC Failure...

Page 7: ...number indicates screw length Use this chart to identify the main components of the convertible tablet PC For a complete list of replaceable parts see the Contents on page i Modem see page 57 Cooling...

Page 8: ...e cable before removing the screws when possible to avoid damaging the cable As you remove components and screws lay them toward the rear of your work surface behind the convertible tablet PC or far e...

Page 9: ...nplug the power cord and the modem and network cables Turn over the convertible tablet PC and remove the battery For more information see Removing the battery on page 8 Disconnect all peripheral devic...

Page 10: ...Preparing the convertible tablet PC To prepare the convertible tablet PC for maintenance Make sure that the CD or DVD drive is empty Disconnect all peripheral devices Remove any memory cards PC Cards...

Page 11: ...t Normal use wears down the pen s point so the pen ships with extra points and a replacement tool To replace the pen point 1 Use the replacement tool to grab the old point and pull it out of the pen 2...

Page 12: ...em and network cables and prepare the convertible tablet PC by following the instructions in Preparing the convertible tablet PC on page 6 2 Turn the convertible tablet PC over so the bottom is facing...

Page 13: ...9 Removing the battery www gateway com 4 Lift the battery out of the bay...

Page 14: ...g Gateway M275 Components www gateway com Replacing the hard drive kit Tools you need to complete this task Screws removed during this task Phillips 0 screwdriver 2 chrome 2 5 6 mm hard drive kit Hard...

Page 15: ...ructions in Preparing the convertible tablet PC on page 6 2 Turn the convertible tablet PC over so the bottom is facing up 3 Remove the battery by following the instructions in Removing the battery on...

Page 16: ...cket go to Step 9 OR If you need to move the hard drive kit bracket from the old hard drive kit to the new hard drive follow the instructions in Replacing the hard drive in the hard drive kit on page...

Page 17: ...d network cables and prepare the convertible tablet PC by following the instructions in Preparing the convertible tablet PC on page 6 2 Turn the convertible tablet PC over so the bottom is facing up 3...

Page 18: ...ive into the bracket so the screw holes line up 8 Replace the two screws that secure the bracket to the drive 9 Place the new hard drive kit into the bay and slide it into the connector 10 Replace the...

Page 19: ...cables and prepare the convertible tablet PC by following the instructions in Preparing the convertible tablet PC on page 6 2 Turn the convertible tablet PC over so the bottom is facing up 3 Remove t...

Page 20: ...slide the optical drive release latch next to the optical drive screw 5 Slide the old drive out of the convertible tablet PC 6 Slide the new drive into the convertible tablet PC Installing the optical...

Page 21: ...17 Replacing the optical drive www gateway com 8 Replace the optical drive screw 9 Replace the battery connect the AC adapter and modem and network cables then turn on the convertible tablet PC...

Page 22: ...the AC adapter and modem and network cables and prepare the convertible tablet PC by following the instructions in Preparing the convertible tablet PC on page 6 2 Turn the convertible tablet PC over...

Page 23: ...ing the keyboard cover www gateway com 4 Remove the two keyboard screws marked with a K 5 Turn the convertible tablet PC over so the top is facing up 6 Open the LCD panel to the fully open position Sc...

Page 24: ...rtible tablet PC by pulling the keyboard cover toward you and at the same time lifting its front to clear the keyboard You will hear small snapping sounds as the keyboard cover comes away from the con...

Page 25: ...un the finger along the keyboard cover and find no loose spots The keyboard cover should be flat all the way across 11 Close and latch the LCD panel 12 Turn the convertible tablet PC over so the botto...

Page 26: ...by following the instructions in Preparing the convertible tablet PC on page 6 2 Turn the convertible tablet PC over so the bottom is facing up 3 Remove the battery by following the instructions in R...

Page 27: ...23 Replacing the keyboard www gateway com 5 Make sure that the convertible tablet PC is positioned so the top is facing up 6 With a small Phillips screwdriver remove the four keyboard screws Screws...

Page 28: ...ies keys down on top of the convertible tablet PC Be careful not to damage the LCD panel 8 Carefully insert the small flat blade screwdriver between the keyboard cable and the black plastic hinge wher...

Page 29: ...hinge on the system board keyboard connector is in the raised position 11 Insert the end of the keyboard cable between the black plastic hinge and the white connector 12 Press the black plastic hinge...

Page 30: ...r the palm rest 15 Gently press the keyboard down until it is flat all the way across Be careful not to damage the LCD panel 16 Replace the four keyboard screws 17 Replace the keyboard cover and batte...

Page 31: ...gned for the Gateway M275 for upgrading the memory SO DIMMs are located in two places inside the convertible tablet PC Both SO DIMMs can be upgraded For instructions on upgrading the SO DIMM located o...

Page 32: ...ts www gateway com Adding or replacing memory in the memory bay Tools you need to complete this task Screws removed during this task Flat blade driver Scribe or non marring tool OR Phillips 0 screwdri...

Page 33: ...ter and modem and network cables and prepare the convertible tablet PC by following the instructions in Preparing the convertible tablet PC on page 6 2 Turn the convertible tablet PC over so the botto...

Page 34: ...m 4 Loosen the two memory bay cover screws then remove the memory bay cover 5 If you are removing a module gently press outward on the clip at each end of the memory module until the module tilts upwa...

Page 35: ...If the module does not fit make sure that the notch in the module lines up with the tab in the memory bay 8 Gently push the module down until it clicks in place 9 Replace the memory bay cover and tigh...

Page 36: ...6 2 Turn the convertible tablet PC over so the bottom is facing up 3 Remove the battery by following the instructions in Removing the battery on page 8 4 Remove the keyboard cover by following the ins...

Page 37: ...8 Pull the memory module out of the slot 9 Hold the new or replacement module at a 30 degree angle and press it into the empty memory slot This module is keyed so it can only be inserted in one direc...

Page 38: ...lose the keyboard compartment by following the instructions in Replacing the keyboard on page 22 12 Replace the keyboard cover by following the instructions in Replacing the keyboard cover on page 18...

Page 39: ...PC over so the bottom is facing up 3 Remove the battery by following the instructions in Removing the battery on page 8 4 Remove the keyboard cover by following the instructions in Replacing the keyb...

Page 40: ...onents www gateway com 7 With a small Phillips screwdriver remove the two screws securing the LED panel 8 Insert the small flat blade screwdriver or non marring tool under the edge of the LED panel th...

Page 41: ...D panel www gateway com 9 Insert the new LED panel and secure with two screws 10 Replace the keyboard keyboard cover and battery connect the AC adapter and modem and network cables then turn on the co...

Page 42: ...and prepare the convertible tablet PC by following the instructions in Preparing the convertible tablet PC on page 6 2 Turn the convertible tablet PC over so the bottom is facing up 3 Remove the batt...

Page 43: ...the small flat blade screwdriver or non marring tool under the bottom of the hinge cover then carefully pry it up 7 Snap the new cover into place over the hinge 8 Replace the hinge cover screw 9 Repla...

Page 44: ...eparing the convertible tablet PC on page 6 2 Turn the convertible tablet PC over so the bottom is facing up 3 Remove the battery by following the instructions in Removing the battery on page 8 4 Remo...

Page 45: ...Make sure that the convertible tablet PC is positioned so the top is facing up 7 Open the keyboard compartment by following the instructions in Replacing the keyboard on page 22 8 Remove the hinge cov...

Page 46: ...cated in front of the cable channel on the hinge 11 Remove the four hinge screws that secure the LCD panel to the hinge Note the location of the grounding cable 12 Detach the microphone cable from the...

Page 47: ...Place the new LCD panel assembly onto the hinge of the convertible tablet PC then replace the four hinge screws Make sure to reattach the grounding cables to the appropriate screws 16 Replace the sin...

Page 48: ...Scribe or non marring tool OR Phillips 0 screwdriver 2 chrome 2 5 5 mm top palm rest 10 chrome 2 5 6 mm bottom palm rest 2 chrome 2 5 2 5 mm bottom palm rest 1 chrome 2 5 5 mm bottom palm rest 4 chro...

Page 49: ...he convertible tablet PC on page 6 2 Turn the convertible tablet PC over so the bottom is facing up 3 Remove the battery by following the instructions in Removing the battery on page 8 4 Remove the fo...

Page 50: ...op is facing up 8 Remove the keyboard by following the instructions in Replacing the keyboard on page 22 9 Remove the hinge cover by following the instructions in Replacing the hinge cover on page 38...

Page 51: ...47 Replacing the palm rest assembly www gateway com 11 Remove the two screws on the top of the convertible tablet PC Screws...

Page 52: ...condary antenna cable 13 Carefully insert the small flat blade screwdriver between the touchpad cable and the black plastic hinge where the cable connects to the system board Gently lift the hinge off...

Page 53: ...white connector 20 Press the black plastic hinge onto the touchpad cable 21 Replace the LCD panel the hinge cover the keyboard and the keyboard cover 22 Make sure that the convertible tablet PC is pos...

Page 54: ...ing tool OR Phillips 0 screwdriver 2 chrome 2 5 5 mm top palm rest 10 chrome 2 5 6 mm bottom palm rest 2 chrome 2 5 2 5 mm bottom palm rest 1 chrome 2 5 5 mm bottom palm rest 4 chrome 2 5 5 mm bottom...

Page 55: ...tom of the convertible tablet PC that secure the palm rest assembly to the chassis by following the instructions in Step 5 of Replacing the palm rest assembly on page 44 6 Remove the keyboard cover by...

Page 56: ...52 Replacing Gateway M275 Components www gateway com 12 Remove the two screws from the fan Screws...

Page 57: ...teway com 13 Unplug the fan wires from the system board 14 Lift the fan up and away from the convertible tablet PC Replace with new fan assembly 15 Secure the new fan with the two screws 16 Reassemble...

Page 58: ...Scribe or non marring tool OR Phillips 0 screwdriver 2 chrome 2 5 5 mm top palm rest 10 chrome 2 5 6 mm bottom palm rest 2 chrome 2 5 2 5 mm bottom palm rest 1 chrome 2 5 5 mm bottom palm rest 4 chrom...

Page 59: ...ws on the bottom of the convertible tablet PC that secure the palm rest assembly to the chassis by following the instructions in Step 5 of Replacing the palm rest assembly on page 44 6 Remove the keyb...

Page 60: ...l the new cooling assembly in the convertible tablet PC 15 Tighten the three cooling assembly screws in the numerical order marked on the cooling assembly Each screw hole has a numeral next to it 16 R...

Page 61: ...iver Torx T8 screwdriver 2 chrome 2 5 5 mm top palm rest 10 chrome 2 5 6 mm bottom palm rest 2 chrome 2 5 2 5 mm bottom palm rest 1 chrome 2 5 5 mm bottom palm rest 4 chrome 2 5 5 mm bottom hinge 2 ch...

Page 62: ...n the bottom of the convertible tablet PC that secure the palm rest assembly to the chassis by following the instructions in Step 5 of Replacing the palm rest assembly on page 44 6 Remove the keyboard...

Page 63: ...59 Replacing the modem www gateway com 12 Remove the Torx screw that secures the modem cable to the modem Torx Screw...

Page 64: ...M275 Components www gateway com 13 Remove the screw that secures the modem to the convertible tablet PC 14 Insert the small flat blade screwdriver or non marring tool under the modem and gently pry it...

Page 65: ...modem cable into the new modem 17 Align the modem s screw holes with the holes on the convertible tablet PC then press the modem into place 18 Replace the screw that secures the modem to the convertib...

Page 66: ...ls you need to complete this task Caution By law only approved wireless modules provided by Gateway or a Gateway authorized representative explicitly for the Gateway M275 may be installed in this note...

Page 67: ...ry by following the instructions in Removing the battery on page 8 4 Remove the four screws on the bottom that secure the hinge to the chassis by following the instructions in Step 4 of Replacing the...

Page 68: ...the keyboard cover on page 18 7 Make sure that the convertible tablet PC is positioned so the top is facing up 8 Remove the keyboard by following the instructions in Replacing the keyboard on page 22...

Page 69: ...onnections Caution Legal requirements dictate that a security screw or other means be used to attach the mini PCI cover to the chassis in a manner that restricts end user access End users are strictly...

Page 70: ...ures the modem to the convertible tablet PC 14 Insert the small flat blade screwdriver or non marring tool under the modem and gently pry it up about inch 15 Remove the metal plate between the mini PC...

Page 71: ...67 Replacing the IEEE 802 11 Mini PCI card www gateway com 16 Unplug the two antenna cables on the mini PCI card noting how they are installed for later re assembly...

Page 72: ...lacing Gateway M275 Components www gateway com 17 Move the antenna wires out of the way then press outward on the clips at both sides of the card until the card tilts upward 18 Pull the card out of th...

Page 73: ...led MAIN or M then reattach the light gray antenna cable to the connector labelled AUX or A 22 Slide the metal plate under the Torx screw hole on the modem and position the plate between the mini PCI...

Page 74: ...ing tool OR Phillips 0 screwdriver 2 chrome 2 5 5 mm top palm rest 10 chrome 2 5 6 mm bottom palm rest 2 chrome 2 5 2 5 mm bottom palm rest 1 chrome 2 5 5 mm bottom palm rest 4 chrome 2 5 5 mm bottom...

Page 75: ...acing the palm rest assembly on page 44 6 Remove the keyboard cover by following the instructions in Replacing the keyboard cover on page 18 7 Make sure that the convertible tablet PC is positioned so...

Page 76: ...ing tool OR Phillips 0 screwdriver 2 chrome 2 5 5 mm top palm rest 10 chrome 2 5 6 mm bottom palm rest 2 chrome 2 5 2 5 mm bottom palm rest 1 chrome 2 5 5 mm bottom palm rest 4 chrome 2 5 5 mm bottom...

Page 77: ...bottom of the convertible tablet PC that secure the palm rest assembly to the chassis by following the instructions in Step 5 of Replacing the palm rest assembly on page 44 6 Remove the keyboard cove...

Page 78: ...bles away from slots on convertible tablet PC 14 Remove the single screw near the front corner securing the speakers to the convertible tablet PC 15 Install the new speakers and secure with the screw...

Page 79: ...acing the system board www gateway com Replacing the system board Tools you need to complete this task Flat blade driver Scribe or non marring tool OR Phillips 0 screwdriver Torx T8 screwdriver Allen...

Page 80: ...rome 2 5 2 5 mm keyboard 2 chrome 2 5 6 mm keyboard cover 2 chrome 2 5 6 mm hard drive 2 chrome 2 5 2 5 mm Memory bay 1 chrome 2 5 6 mm optical drive 2 black 2 5 2 5 mm fan 2 black 2 5 2 5 mm LED pane...

Page 81: ...modules from the memory bay by following the instructions in Adding or replacing memory in the memory bay on page 28 7 Remove the battery by following the instructions in Removing the battery on page...

Page 82: ...ollowing the instructions in Replacing the LCD panel assembly on page 40 17 Complete removal of the palm rest assembly by following the instructions in Replacing the palm rest assembly on page 44 18 R...

Page 83: ...the speakers from the system board one connector 23 Unplug the modem cable from the system board 24 Remove the two small hex nuts on the rear I O panel Use the Allen wrench to remove the two larger h...

Page 84: ...80 Replacing Gateway M275 Components www gateway com 25 Remove the three system board screws Screws...

Page 85: ...assis and the side audio jacks clear the bottom of the chassis 27 Place the new system board into the convertible tablet PC 28 Replace the three system board screws in the holes on the top of the syst...

Page 86: ...82 Replacing Gateway M275 Components www gateway com...

Page 87: ...MAN SYS M275 SERVICE GDE R0 11 03...

Reviews: