background image

4     Using Your Gateway Solo™ 9100 Multimedia Notebook

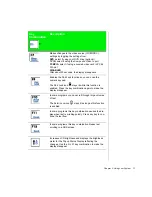
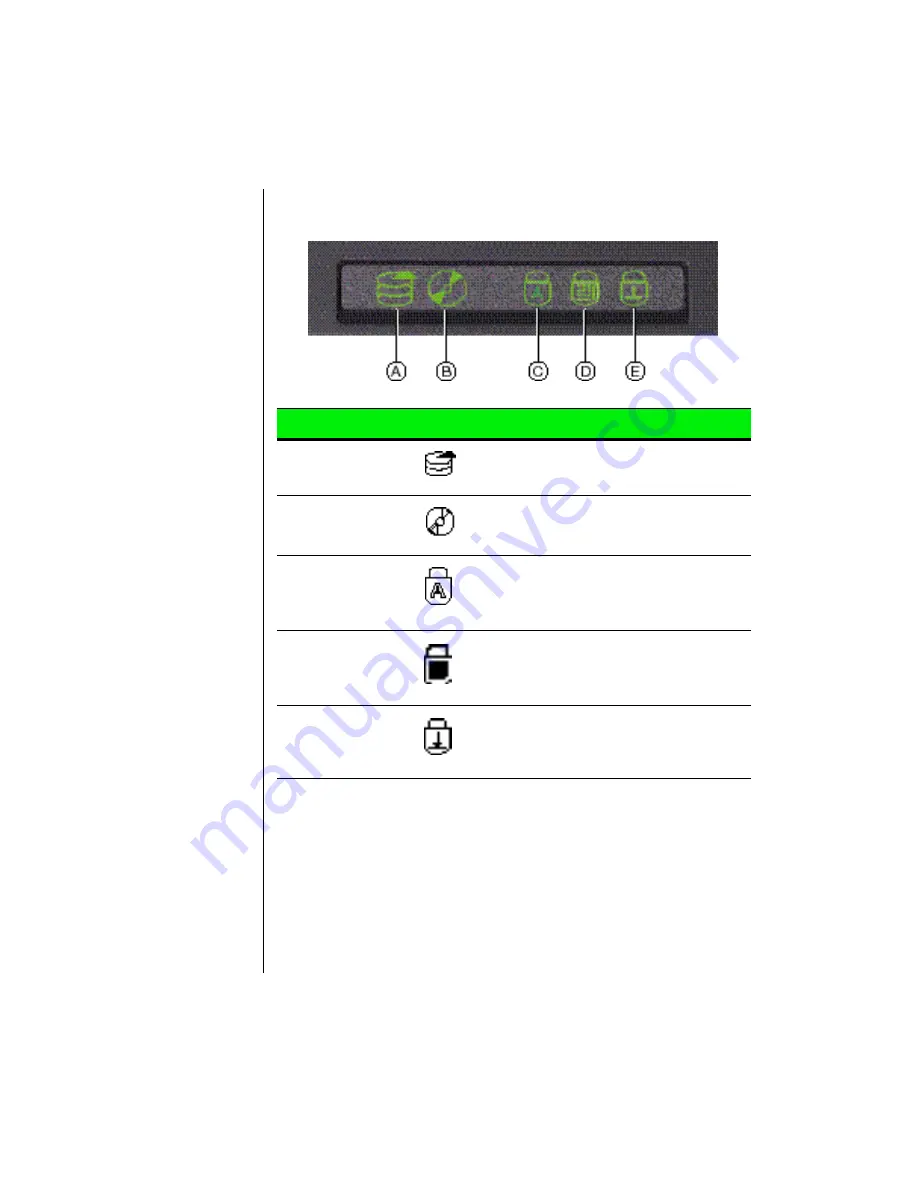
System Status Indicators

Indicator

Icon

Description

A. Hard drive 

access light

Indicates that the hard drive is in use.

B. CD-ROM/Dis-

kette disk drive

Indicates that the CD-ROM or the diskette 
drive is in use.

C. Caps lock

Indicates that the caps lock in on. When the 
Caps lock light is on, you type in all capital 
letters.

D. Pad lock

Indicates that the pad lock is on. When the 
Pad lock light is on, you can access the 
embedded numeric keypad.

E. Scroll lock

Indicates that the scroll lock is on. When 
Scroll lock light is on, some programs allow 
you to scroll through large volumes of text.

Summary of Contents for Solo 9100

Page 1: ...20 Customizing the EZ Pad 21 Using an External Mouse or Keyboard 21 Swapping Option Bay Modules 22 Using the Audio 25 Adjusting the volume 25 Making an Audio Recording 26 Using Disc Media CD ROM 28 Playing an audio CD 28 Removing or Replacing the Hard Disk Drive 30 Using PC Cards 32 About CardBus Cards 33 USB Universal Serial Bus Ports 34 Using Fast IR Ports 34 Using the Composite Video Ports 35 U...

Page 2: ...Thank you for purchasing this Factory Service Manual CD DVD from servicemanuals4u com Please check out our eBay auctions for more great deals on Factory Service Manuals servicemanuals4u ...

Page 3: ...y life 44 Managing power 45 Windows 98 45 Windows 95 and Windows NT 48 Modifying the power button mode 49 Using the BIOS Setup Utility 49 Using the Power Menu 50 Status display 52 Appendix A Solo Notebook Accessories 53 Accessories 54 Appendix B Contacting Gateway 55 Contacting Gateway 56 Calling Gateway 56 Index 57 ...

Page 4: ...Chapter 1 Checking Out Your Notebook Keyboard and LCD Panel 2 System Status Indicators 4 Left side 5 Back 6 Right Side 8 Bottom 9 ...

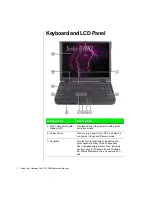
Page 5: ... resolution with backlit anti glare screen B Power button Press to turn power ON or OFF Can also be configured to Suspend Resume mode C Keyboard Provides full functionality of a desktop com puter keyboard Many of these keys have been assigned alternate functions including shortcut keys for Windows 95 and Windows 98 Status Display menus and numeric key pad ...

Page 6: ...es that the power status mode Steady green light indicates power is on and computer is in operation Flashing green light indicates that the com puter is in standby or suspend mode No LED indicates that the system power is off I Battery LED Indicates the battery status mode Green light indicates that the battery is fully charged Yellow light indicates that the battery is charging Red light indicate...

Page 7: ... the CD ROM or the diskette drive is in use C Caps lock Indicates that the caps lock in on When the Caps lock light is on you type in all capital letters D Pad lock Indicates that the pad lock is on When the Pad lock light is on you can access the embedded numeric keypad E Scroll lock Indicates that the scroll lock is on When Scroll lock light is on some programs allow you to scroll through large ...

Page 8: ...ker volume external speaker and headphone volume Other port volume levels are controlled by multimedia soft ware B PC Card slots Accepts two Type II PC Cards or one Type II Card C Eject buttons Ejects the PC Cards from the PC Card slots D Speaker Provides high quality sound reproduction for software and audio CDs ...

Page 9: ...ice that uses infrared for example another computer printer or other peripheral Place infrared devices up to 3 feet 1 meter apart D Mic Connect an external microphone to this port Connecting an external microphone will dis able the built in microphone E Line in Records from another computer stereo equipment or a VCR F Line out Connect an amplified speaker to this port The Line out port is not capa...

Page 10: ... s screen from a VCR or video camera using a standard video cable J Reset switch Restarts the notebook if necessary Insert a paper clip to press switch K Kensington lock Attach Kensington lock to this port L PS 2 port Connect an external mouse or keyboard to this port M Serial port Connect an optional serial device to this port N VGA port Connect a VGA monitor cable to this port O Docking station ...

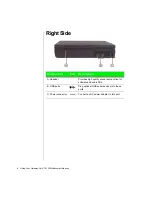
Page 11: ...otebook Right Side Component Icon Description A Speaker Provides high quality sound reproduction for software and audio CDs B USB ports Plug optional USB serial devices into these ports C Power connector Connect an AC power adapter to this port ...

Page 12: ...ssor speed D Memory bay Open the memory bay cover to install or remove SO DIMM memory modules E Battery pack bay Slide battery pack into bay for battery power and battery charging F Battery release latch Slide the latch to release the battery pack from the battery pack bay G Combination module release latch Slide the latch to release the combination drive module from the bay H Combination module P...

Page 13: ...10 Using Your Gateway Solo 9100 Multimedia Notebook ...

Page 14: ...15 EZ Pad Pointing Device 20 Using an External Mouse or Keyboard 21 Swapping Option Bay Modules 22 Using the Audio 25 Using Disc Media CD ROM 28 Removing or Replacing the Hard Disk Drive 30 Using PC Cards 32 USB Universal Serial Bus Ports 34 Using Fast IR Ports 34 Using the Composite Video Ports 35 ...

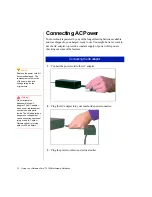
Page 15: ...the AC adapter 2 Plug the AC adapter into your notebook s power connector 3 Plug the power cord into an electrical outlet Connecting the AC adapter Warning Do not attempt to disassemble the AC adapter The AC adapter has no user replaceable or user serviceable parts inside The AC adapter has dangerous voltages that can cause serious personal injury or death Contact Gateway about returning defective...

Page 16: ...book To turn on your notebook press the power button located in the upper left corner on the notebook surface close to the left LCD hinge The power button on your system is preset in On Off mode However you can set it to function either in On Off or Suspend Resume mode using the setup screens see Using the BIOS Setup Utility on page 49 Power button ...

Page 17: ...ire cover forward or backward to adjust the viewing angle Press the FN key together with the up arrow and down arrow keys to control display brightness Some screens may have a small number of colored dots This is normal and does not affect the overall screen image Note This system ships with the Auto dim with battery feature enabled Auto dim cuts LCD power 50 when your notebook is operating on bat...

Page 18: ...hat has the full functionality of a desktop computer keyboard Many of the keys have been assigned alternate functions including shortcut keys for Windows function keys for specific system operations and pad lock keys for the numeric keypad Function Key Function keys for function key combinations ...

Page 19: ...See LCD Panel on Page 14 Windows 95 LCD and Hard Drive shut off Pressing any key will bring them back within a few seconds Windows 98 System goes to sleep Pressing the power button will bring the system out of sleep mode Makes temporary changes to the power management PM mode settings by toggling the setting options PM ON enables power management with AC or battery power PM DC enables power manage...

Page 20: ...this function is enabled Press the key combination again to make the display disappear In some programs you can scroll through large volumes of text The Scroll Lock icon stays lit as long as this function is enabled In some programs this key combination pauses the dis play when text is scrolling quickly Press any key to con tinue the text flow In some programs this key combination breaks text scro...

Page 21: ...reases LCD brightness and displays the brightness meter for the Popup Status Display reflecting the changes Use the FN F2 key combination to make the display disappear Key Description Use this key to display the Windows Start menu Use this key to provide quick access to shortcut menus and help assistants in Windows Key Combination Description ...

Page 22: ... 2 Using Your System 19 Pad Lock keys Press FN F9 PAD LOCK keys to activate the keypad The keypad section of the keyboard functions as a numeric keypad Press FN F9 to bring the keyboard back into standard mode ...

Page 23: ...ou first start your system the Information about your Touchpad displays Select Tell me more for detailed information about features and how to customize the EZ Pad With the EZ Pad you have two choices for each operation To click Position the cursor on the item and press the left button once Position the cursor on the item and tap on the pad once OR To double click Position the cursor on the item a...

Page 24: ...you want when you set button configuration drag and edge motion or cursor speed rate and size 1 Click on Start Settings and Control Panel 2 Double click on the mouse icon 3 Click on each of the different tabs to see the options available Using an External Mouse or Keyboard You can attach an external mouse or keyboard to the notebook using the PS 2 port the USB port or the serial port The optional ...

Page 25: ... a modular option bay that accepts the modular CD ROM Diskette disk combination drive or an additional battery The CD ROM Diskette disk combination drive can be replaced by a second battery module in the modular option bay Each time you switch them however you must restart your system Modular option bay ...

Page 26: ...ating system 2 Close the cover and turn your notebook over 3 Locate the modular bay access latch Slide and hold the latch open then place your fingers over the raised bar near the front of the notebook To switch the combination module for the battery module Raised bar Modular bay access latch ...

Page 27: ...ome with the second battery 6 Turn the battery module over Your notebook was turned over so the module being installed must be turned over as well 7 Firmly push the module straight into the bay until the latch clicks into place If you don t hear the click try it firmly again making sure it clicks 8 Restart your system Note Anytime you replace a module you must restart your system for the module to...

Page 28: ...system speakers The volume level for other ports is controlled by the multimedia software 1 Click Start Settings and Control Panel Double click the Multimedia icon The Multimedia Properties dialog box opens 2 Click the Audio tab 3 Set the Playback and Recording levels to your preference 1 Double click the Speaker icon bottom right hand corner A Volume Control dialog box opens containing volume and...

Page 29: ...n Audio Properties then set or check record volume levels 3 Click OK 4 Click the Record button Recording starts 5 When you are finished recording the Stop button Recording stops 6 Click File then Save As 7 Name the recording 8 Click Save The recording is saved 1 Click Start Programs Accessories Multimedia then Media Player The Media Player opens To make an audio recording To play back a recording ...

Page 30: ...pter 2 Using Your System 27 2 Click File then Open The Open dialog box appears 3 Select the file to play back 4 Click Open 5 To play the file click the Play button 6 To stop the file click the Stop button ...

Page 31: ... two playable sides place the disc so that the name of the side you want to play A or B is facing up 3 Press the Eject button The tray closes 1 Double click the My Computer icon The My Computer window opens 2 Double click the CD ROM drive icon Playing an audio CD The CD ROM accepts standard CD data discs and music CDs You can play and control an audio CD using the CD Player application in Windows ...

Page 32: ...er software 3 Slide the mouse pointer slowly over the control buttons on the CD Player software to get familiar with each button function 4 You can change music tracks view playing times control the volume set preferences define a play list and even set the system to continuous or random play using this dialog box 5 Control audio play as desired ...

Page 33: ...ating system s shut down procedure to turn your notebook completely off 3 Close the LCD lid 4 Disconnect the AC power and turn your notebook over 5 Locate the modular bay access latch Slide and hold the latch open and remove the combination CD ROM diskette drive module from the modular option bay 6 Open the flap door next to the modular option bay notebook shown with bottom up To remove and replac...

Page 34: ...l the hard disk drive straight out from the notebook Slide the new hard drive firmly into your notebook and close the flap door 8 9 Reinstall the CD ROM diskette combination drive module and AC connections Flap door Hard drive Caution Do not force the hard drive ...

Page 35: ...s not work when hot swapping refer to the PC Card manufacturer s documentation for further information 1 Insert the PC Card with the label face up 2 Slide the card firmly into the PC Card slot When the card is installed correctly the computer emits a two toned beep 3 Follow the Windows Setup Wizard installation steps the first time you insert a PC Card Operate the device as recommended in the PC C...

Page 36: ...ve applications like full motion video high speed network connections full motion video capture and display and high performance peripheral interfaces While not many 32 bit CardBus cards are on the market yet you can use them interchangeably with 16 bit cards in your notebook However please note that some Solo docking solutions do not support CardBus CardBus cards function only in your notebook s ...

Page 37: ...s and configures the necessary drivers and the system resources Using Fast IR Ports The IR infrared port uses infrared technology to send and receive signals between the notebook and a remote device equipped with an IR port A variety of desktop computers printers and other peripherals are IR equipped Use the manufacturer s documentation to set up a remote IR device Your notebook shipped with the I...

Page 38: ...ite Video Out 4 Reset your display setting to 640 x 480 resolution with large text fonts for best viewing 1 Connect one end of a standard video cable to the Composite Video In port on the notebook 2 Connect the other end of the cable to the Video Out connector on your VCR or camera 3 Use the key combination FN F7 to select the TV IN video source To connect your notebook to a TV To connect a VCR Ca...

Page 39: ...urce to the Line In port on your notebook 3 Press FN F7 until TV IN appears in the VIDEOSRC window in the upper left corner of your screen 4 Click the Start button then click Programs Video Capture and Microsoft VidCap The program starts 5 Play your external video source Adjust the display if necessary 6 Click Capture to view menu options Single Frame captures one frame of video Frames lets you ma...

Page 40: ...rst time you use VidCap the Set File Size dialog box opens Set the amount of hard disk drive space you want the capture file to use then click OK A window opens asking if you want to begin capturing You can set the your file size equal to the amount of free disk space However we do not recommend that you use the total amount of free space If you do you will have to either delete your capture or ot...

Page 41: ...38 Using Your Gateway Solo 9100 Multimedia Notebook ...

Page 42: ...Chapter 3 Managing Power Consumption Using the battery 40 Swapping the battery 42 Maximizing the battery life 44 Managing power 45 Using the BIOS Setup Utility 49 ...

Page 43: ...e increases the battery gauge accuracy Gauge accuracy changes over time Because the learning cycle can take as long as 16 hours per battery we suggest that you start the Learning Cycle program and run it overnight 1 Insert the battery into the battery bay 2 Plug the AC adapter into the notebook and an AC outlet 3 Insert the Battery Learning Cycle diskette in the A drive 4 Start up your notebook Th...

Page 44: ...ment icon You can view the battery status and set power preferences from this screen which stay in effect until they are changed in Windows OR Press the FN key together with the F2 Status key The power status display appears in the upper left corner of the display This display monitors battery status and power management selection BAT1 monitors the status of the battery pack in the battery bay Pre...

Page 45: ...2 In Windows 98 press the FN key together with the F4 key to put the system into standby mode In Windows 95 press the FN key together with the F5 key to put the system into suspend mode 3 Close the cover and turn your notebook over 4 Slide the battery release latch toward the center of the notebook 5 Hold the latch in place and place your fingers over the raised bar on the battery pack next to the...

Page 46: ...t and away from your notebook You may now release the battery release latch 7 Slide a battery pack bottom side up straight into the battery bay until it snaps into place 8 Turn the notebook right side up and open the cover 9 Press the power button to resume power to the system ...

Page 47: ...acturer s documentation to find out if the card uses power when not in use Keep the battery pack in the computer when using AC power to continuously charge the battery Minimize using CD ROM drive The CD ROM drive uses considerable battery power Adjust the Power management settings most effectively for the way you use your notebook See Managing power on Page 45 for more information about changing t...

Page 48: ...dows 95 and Windows NT The following two sections address these differences Refer to the section that applies to your operating system Windows 98 To modify your power management settings in Windows 98 you do not need to open the BIOS setup program This is only necessary if you want to change the power button setting Instead Windows 98 includes a Power Management Properties dialog box 1 Click the S...

Page 49: ...t one of three pre defined power schemes from the Power schemes drop down list You can also create your own power scheme and add it to the list 1 In the Power Schemes window set the properties as you want them to be in your power scheme 2 Click Save As 3 Type a name for your power scheme and click OK 4 Select your power scheme from the Power scheme drop down list 5 Click OK at the bottom of the Po...

Page 50: ... to keep tabs on your battery power alarms letting you know that you might be about to lose battery power are useful The Alarms window lets you turn off and turn on the alarms set the point at which your notebook alerts you that your battery is running low and select the notification method ...

Page 51: ...ement settings See Using the Power Menu on Page 50 for more information on these settings and how to modify them Using Suspend mode in Windows 95 and Windows NT Windows 95 and Windows NT use Suspend mode When in Suspend mode your notebook enters a sleep state according to the power management settings Suspend mode cuts off power from most devices except memory If your notebook is and you want to t...

Page 52: ...d and saved even when the power is off This section contains information about this setup utility and is intended to serve as a guide so that you can make changes to your system BIOS when necessary The screen example that you see in this chapter is similar to what you see on your LCD However you may have a system with a newer BIOS version than the one described in this manual If there are differen...

Page 53: ...g the right side of each menu To access the Power Setup menu PhoenixBIOS Setup Utility Main Advanced Security Power Exit Item Specific Help Power Button Mode PM Control Power Savings Standby timeout Suspend timeout Hard disk timeout Video timeout Audio timeout Battery Low suspend Resume On Modem Ring Resume On Time Resume Time Auto Dim With Battery Only Cooling Control On Off Battery Maximum Batte...

Page 54: ...ment Setting this option to Maximum Performance provides the notebook with the best system performance Setting this option to Maximum Battery Life provides your notebook the best battery performance Setting this option to Customize allows you to manually set the Standby Suspend Hard disk and Video timeouts Press the spacebar to choose between options Auto dim with battery which decreases when this...

Page 55: ...eflects the status of the primary battery pack If the battery level is low a warning icon will appear The power management levels appear in the third and fourth lines You can toggle between levels by pressing the FN key together with the F6 Pwr Mgmt key AC power status is monitored on the fifth line The Brightness meter shows the brightness level for the LCD panel Press the FN key and tap the Up A...

Page 56: ...Appendix A Solo Notebook Accessories ...

Page 57: ...n external keyboard mouse or joystick to the docking station Once you connect the peripherals you can leave them attached for the next time you need them The Mini docking station which enhances the capabilities of your Solo notebook by providing a one step connection to external devices such as a monitor keyboard mouse printer serial device joystick external power speakers and microphone This dock...

Page 58: ...Appendix B Contacting Gateway Contacting Gateway 56 Calling Gateway 56 ...

Page 59: ..._____________________ Calling Gateway Gateway offers a wide range of customer service technical support and information services If you have questions or problems contact the Gateway service that is most appropriate For assistance or information about Contact At Systems pricing orders billing state ments warranty ser vice and other non technical issues Sales customer support If outside the US chec...

Page 60: ...ttery status 41 break function key 17 button power 2 standby resume 2 C calling Gateway 56 U S Canada 56 cap lock 4 CardBus 32 33 CD ROM drive 3 4 CD ROM drive 22 charging battery pack 41 client ID 56 combination drive module 31 combination module CD ROM drive 22 31 diskette drive 22 31 composite video TV In port 35 composite video TV Out port 35 contacting Gateway 56 customizing the EZ Pad 21 D d...

Page 61: ...ck 4 serial port 7 VGA port 7 increase LCD brightness 17 indicators system status 3 inserting PC cards 32 K keyboard 2 15 external 21 keypad 17 keys application 18 F10 17 F11 17 F12 17 F2 16 F3 16 F4 16 F6 16 F9 17 function 16 pad lock 18 Windows 18 L LCD brightness decrease 18 increase 17 display external monitor 16 LCD XGA display 14 LCM system status indicators 3 LEDs power 3 lid switch on off ...

Page 62: ... power connector 8 power LED 3 power management 45 functions key 16 Windows 95 48 Windows 98 45 Windows NT 48 processor speed 9 R removing battery 9 hard disk drive 30 PC cards 32 replacing battteries 42 replacing drives hard disk 30 S sales customer support 56 scroll lock 4 function key 17 serial number 9 56 serial port 7 setting power button 49 standby resume 49 shutdown Windows 98 48 software b...

Page 63: ...ltimedia Notebook T technical support 56 U USB Universal Serial Bus ports 34 using Fast IR port 34 keyboard 21 mouse 21 PC cards 32 V VGA port 7 video ports 35 volume wheel 5 W Windows key 18 Windows 98 standby mode 48 Z zoomed video 32 ...

Page 64: ...Index 61 ...

Page 65: ...and receiver Connect the equipment into an outlet on a circuit different from that to which the receiver is connected Consult the dealer or an experienced radio TV technician for help Accessories This equipment has been tested and found to comply with the limits of a Class B digital device The accessory associated with this equipment is the shielded power cord This accessory is required to be used...

Page 66: ...ipment is in the Class 2 category Information Technology Equipment to be used in a residential area or an adjacent area thereto and conforms to the standards set by the Voluntary Control Council for Interference by Information Technology Equipment aimed at preventing radio interference in such residential area When used near a radio or TV receiver it may become the cause of radio interference Read...

Page 67: ...go are trademarks of Gateway 2000 Inc Intel Intel Inside logo and Pentium are registered trademarks and MMX is a trademark of Intel Corporation Microsoft MS MS DOS and Windows are trademarks or registered trademarks of Microsoft Corporation All other product names mentioned herein are used for identification purposes only and may be the trademarks or registered trademarks of their respective compa...

Reviews: