


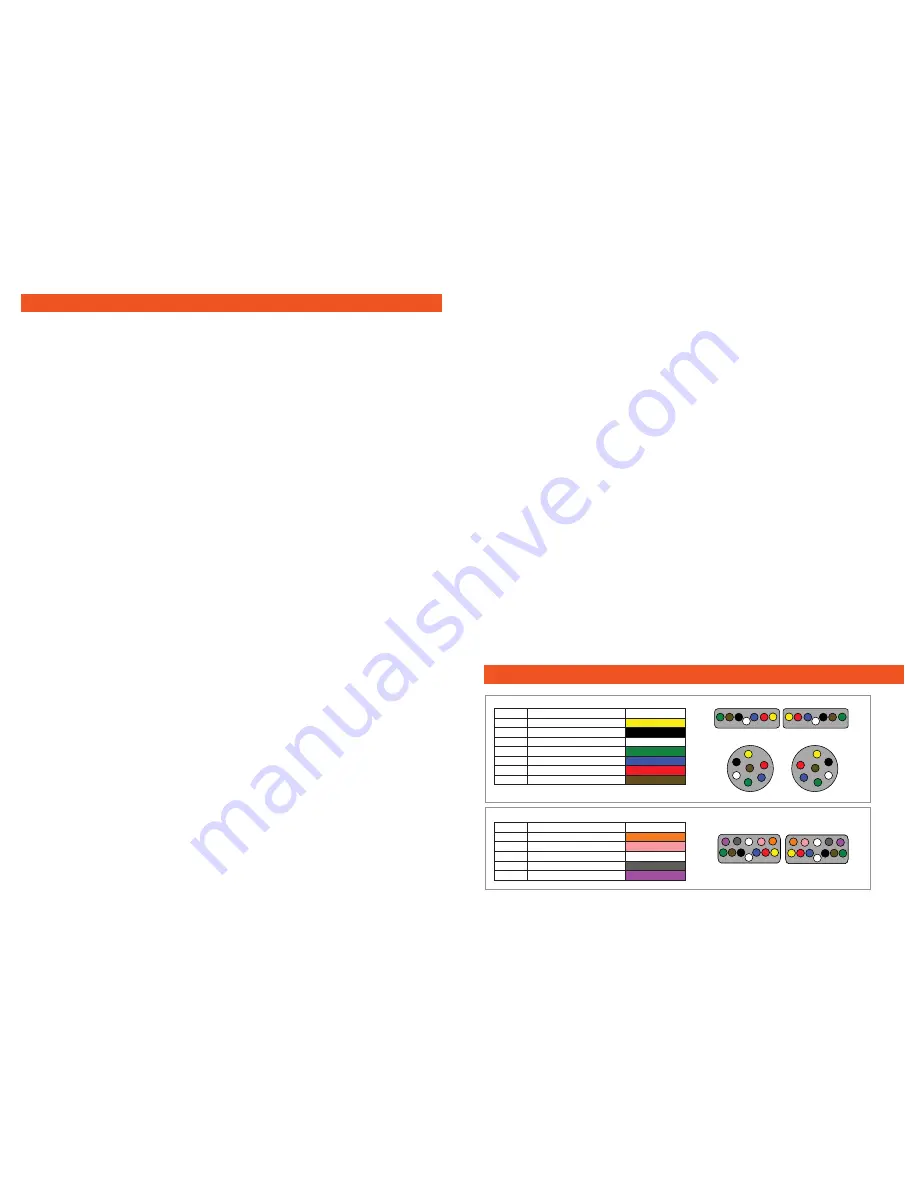
7 Pin Plug
Extra for Flat 12 Pin Plug
Pin
1
2
3
4
5
6
7
Pin
8
9
10
11
12
Connection
Left Indicator
Auxiliary or Reverse Light
Earth
Right Indicator
Electric Brakes
Stop Light
Tail Lights
Connection
Left Indicator
Auxiliary or Reverse Light
Earth
Right Indicator
Electric Brakes
Colour
Yellow
Black
White
Green
Blue
Red
Brown
Colour
Orange
Pink
White
Grey
Violet
Common Trailer pin configurations
(Always check your individual trailers wiring in case its not standard)
1
6
5
3
2
7
4
4
7
2
3
5
6
1
1
1
2
3
2
3
7
7
4
5
6
6
5
4
1
6
5
3
10
11
7
4
2
12
9 6
1 6
5
6 9
3
10
2
11
7
12
4
7 Pin Flat
7 Pin Round
12 Pin Flat
Socket View
Plug View
Socket View
Plug View
Socket View
Plug View
P3
P4
Menu structure
When pressing the buttons on this unit be sure to hold the button down long enough for
the unit to register. Press the Menu button once to scroll through each menu item.
Keep pressing the Menu button to advance to the next set of menus. To scroll down to
the item you wish to change press the Mode button. Use the left and right arrow buttons
to change the value of the menu item selected. To exit the menu system simply wait 6
seconds without pressing any buttons.
The menu structure is in the following sequence.
Picture, System, Mirror, Delay.
1. Picture:
Bright(ness)/ Contrast/ Color (Saturation)/ Tint/ Reset
2. System:
Language/ Guidelines/ Show mode
3. Mirror:
Front Cam/ Back Cam/ Left Cam/ Right Cam
4. Delay:
Front Cam/ Back Cam/ Left Cam/ Right Cam
Menu item descriptions.
1. Picture:
Brightness:
Adjusts the brightness of the screen. Be careful not to adjust this setting to
high as this will reduce the contrast (blacks will eventually become greys reducing the
contrast to whites)
Contrast:
Adjust the transitions of highlighted areas to darkest shadows. A higher
contrast makes the image appear sharper, but to much contrast will remove subtle details
in the mid tones.
Colour (Saturation):
This adjusts the colour saturation. Higher levels yield more colour,
however to much colour may effect night time performance (may result in a noisy image).
Tint:
This function adjusts the colour hue of the monitor. It shifts the monitors colour in
the red direction if you decrease the number and it shifts it to the green direction if you
increase the setting.
Reset:
Returns the unit to factory settings.
2. System:
Language:
There are 9 different language settings including popular languages such as
German, French, Chinese, Italian, and Spanish.
Guide lines:
When selected to be on the rear camera channel will have parking guide
lines added to the image when it is triggered. When the Ch2 (back) camera is selected
manually no guide lines are present.
Show mode:
When selected on each channel will be labled on screen with its image.
For example: Ch2 will be labeled "Back” Ch1 will be labeled "Front".
3. Mirror:
Front Cam, Rear Cam, Left Cam, Right Cam:
Depending on the direction of the
camera, you may wish to change the orientation of the image for each camera. An
example of this function would be in the event you have a forward facing camera and a
rear facing camera. One of these images is best viewed as a mirror image (the rear view)
and the other as a normal view (the front facing camera). This model is capable of
selecting mirror mode individually for each camera.
4. Delay:
Front Cam, Rear Cam, Left Cam, Right Cam:
A delay off can be set for each camera channel of up to 10 seconds. This sets the switch
off time after the trigger is removed. This function operates when a camera is triggered.
For example the vehicle is in reverse and so the back up light wire of the car triggers the
back camera to turn on automatically. When the trigger is lost (the vehicle is taken out of
reverse) the Image is normally switched off or the monitor returned to its previous state.
Delay time allows the camera to stay on for a prescribed amount of seconds after the
trigger is lost.
Using delay for blind spot priority when changing lanes.
The off delay can be used to
keep a camera on when a trigger is intermittent like in the case of using the indicator bulb
positive as a trigger to turn on a camera that views the blind spot on that side of the
vehicle. When set to as little as 3 seconds the camera will stay on when changing lanes
with the indicator on even though the trigger is not constant (on/off, on,off etc etc).


