background image

PAGE 2

GRV43MKT

INSTRUCTION MANUAL

INTRODUCTION

WELCOME

Thank you for purchasing the Gator GRV43MKT 4.3” Mirror M Reverse 

Camera. Please ensure that you have read the product manual and instructions in full, 

prior to installation and use. Failure to do so may result in product failure/damage or 

incorrect operation and therefore impact the product performance.

PRODUCT FEATURES

Mirror Monitor

• 

4.3” 16:9 High-resolution LCD screen

• 

Resolution 480*272  

• 

Clip-On mount extends 53-70mm

• 

12V Compatible

• 

PAL 

• 

Secondary Video RCA Input

• 

Dimensions 75(H) x 37(W) x 285mm(L)

Butterfly Camera

• 

120 Degree wide angle lens

• 

Parking guide lines

• 

IP-67 Dust and water protection

• 

Surface plate mount

• 

CMOS Sensors

• 

0.2 Lux

• 

PAL

• 

6M Video extension cable

PACKAGE COMPONENTS

Parts supplied include:

• 

Mirror monitor

• 

Butterfly mount camera

• 

6M RCA extension cable

• 

Instruction manual

• 

Mirror monitor harness

• 

Camera harness

Summary of Contents for Rv43MKT

Page 1: ...PAGE 1 GRV43MKT INSTRUCTION MANUAL PRODUCT USER MANUAL Screen Size 4 3 120 Wide Angle Parking Guides Clip On Mount Wired IP67 Rating IP67 Rear view Mirror Reversing Camera GRv43MKT...

Page 2: ...product performance PRODUCT FEATURES Mirror Monitor 4 3 16 9 High resolution LCD screen Resolution 480 272 Clip On mount extends 53 70mm 12V Compatible PAL Secondary Video RCA Input Dimensions 75 H x...

Page 3: ...2 PRODUCT FEATURES PAGE 2 PACKAGE COMPONENTS PAGE 2 TABLE OF CONTENTS PAGE 3 INSTALLATION OF MIRROR MONITOR PAGE 4 INSTALLING THE CAMERA PAGE 5 6 TESTING THE REVERSE CAMERA FUNCTION PAGE 6 MENU FUNCT...

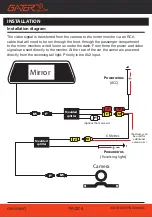
Page 4: ...to the mirror monitors wired loom run under the dash From there the power and video signals are sent directly to the monitor At the rear of the car the camera is powered directly from the reversing t...

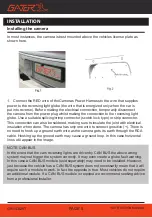
Page 5: ...t with electrical insulation when done The camera has only one wire to connect positive There is no need to hook up a ground earth wire as the camera gets its earth through the RCA cable Hooking up th...

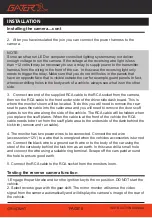
Page 6: ...les in the bodywork of a vehicle always see what is on the other side 3 Connect one end of the supplied RCA cable to the RCA socket from the camera then run the RCA cable to the front under side of th...

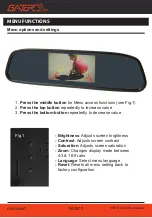
Page 7: ...e top button repeatedly to increase value 3 Press the bottom button repeatedly to decrease value Brightness Adjusts screen brightness Contrast Adjusts screen contrast Saturation Adjusts screen saturat...

Page 8: ...e manuals software This manual is considered correct at time of printing but is subject to change For latest manuals and updates refer to the website Copyright 2017 by TDJ Australia All rights reserve...

Reviews: