background image

S300.100.250®

 | 

USER GUIDE

14 | Initial Setup

3.5 CONNECTING TO OMNI 2

1. 

Turn on the OMNI 2 controller by pressing 
and holding the power button.

2. 

Connect the OMNI 2 Link to the wired connection 
port on the right side of the simulator. 

3. 

Enable the bluetooth connection on the simulator 
by pressing the ON button on the OMNI 2 Link.

4. 

Select "Allow" for turning on the 
tablet's Bluetooth. The simulator will 
connect automatically to the tablet.  

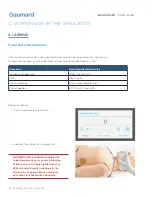
NOTE:A startup screen is shown while OMNI 
2 is detecting the simulator's features. 

Summary of Contents for CODE BLUE III ADULT

Page 1: ...a certified instructor It is not a substitute for a comprehensive understanding of the subject matter and not intended for clinical decision making User Guide 18 6 1 Gaumard Scientific Company 2018 Al...

Page 2: ......

Page 3: ...PACKAGE CONTENTS 11 3 3 EQUIPMENT SETUP 11 3 4 BATTERY CHARGER 12 3 5 CONNECTING TO OMNI 2 14 3 6 POWERING OFF THE SIMULATOR 15 4 WORKING WITH THE SIMULATOR 16 4 1 AIRWAY 16 4 2 BREATHING 19 4 3 CARD...

Page 4: ...7 1 MAINTENANCE 51 7 2 TROUBLESHOOTING 52 7 3 OMNI LINK SETUP NOTIFICATION APPEARS 53 7 4 PARTS LIST 54 8 WARRANTY 55 8 1 EXCLUSIVE ONE YEAR LIMITED WARRANTY 55 8 2 EXTENDED WARRANTY 55 9 CONTACT GAUM...

Page 5: ...nship Electronic transmission is warranted to be free from defects at the moment of transmission Your sole and exclusive remedy and Gaumard s sole liability is to replace the defective media or to rep...

Page 6: ...or such purposes General Ball point pens ink and markers permanently stain the skin Do not wrap this or any other Gaumard product in newsprint Marks made with ballpoint pens ink or marker cannot be re...

Page 7: ...h washing soap Remove all traces of any lubricant Do not clean with harsh abrasives Do not use povidone iodine on the simulator Dry thoroughly The simulator is splash proof but not water proof Do not...

Page 8: ...ly Avoid using solid gel pads since they present higher risk of burning the simulator s skin Gel pads have a shelf life Make sure they are not expired to avoid arcing Make sure the simulator is not in...

Page 9: ...Oral suctioning Gastric distension with excessive BVM Breathing Bilateral lung sounds Programmable chest rise and fall Built in air compressor for continuous breathing Circulation Intraosseous access...

Page 10: ...ake physiological changes on the fly or trend them over time Event Log records participant actions vital signs changes and input notes to support debriefing Monitor CPR quality metrics in real time Ti...

Page 11: ...ace capable of supporting the weight of a real adult patient WARNING To avoid damage to the simulator please store and ship it in the clear poly bag provided 3 2 PACKAGE CONTENTS Lower left leg Lower...

Page 12: ...and tighten the hardware with the hexagonal wrench 3 4 BATTERY CHARGER The simulator is shipped with the internal battery disconnected Connect the battery lead as part of the first install process 1...

Page 13: ...g the charger into a wall outlet and into the simulator 2 Allow to charge until the light turns green 3 Disconnect charger when charged CAUTION Do not store the simulator with a discharged battery It...

Page 14: ...2 Link to the wired connection port on the right side of the simulator 3 Enable the bluetooth connection on the simulator by pressing the ON button on the OMNI 2 Link 4 Select Allow for turning on th...

Page 15: ...the tutorial again tap on the Menu icon and select Show Tutorial 3 After the tutorial OMNI 2 will proceed automatically to the Favorites page and establish a connection to the simulator WARNING Do not...

Page 16: ...imulator s airway has anatomical landmarks and can be intubated orally nasally and through the trachea using an endotracheal tube nasopharyngeal tube or LMA Before intubating 1 Turn the respiratory ra...

Page 17: ...he left lung automatically Once tubing position is corrected the left lung will be enabled NOTE Endotracheal tubes with a black colored end may interfere with intubation sensor detection An endotrache...

Page 18: ...synchronized with his breathing Use the software controls to change the sound type and adjust the volume Auscultate using a standard stethoscope 2 Flush the tubing by inserting a mixture of 70 30 iso...

Page 19: ...breathing rate and the inspiratory percentage Lung Sounds Lung sounds are synchronized with the respiratory rate Use the software to control both right and lung sounds Choose from the library of lung...

Page 20: ...l time in the CPR tab 4 3 CARDIAC Heart Sounds Heart sounds are synchronized with the heart rate Use the software to choose from the library of heart sounds Move the slider below to adjust the volume...

Page 21: ...chment of real electrodes Track cardiac rhythms and events with real medical equipment just as you would with a real human patient Only deliver a shock to the large gold sternum and apex sites Review...

Page 22: ...o continue with the scenario NOTE To auto convert to a normal sinus rhythm after a shock the setting on the OMNI 2 may be changed Reference the OMNI 2 user guide for more details WARNING Defibrillatio...

Page 23: ...brillation snaps are installed The chest skin sternum and apex gold patches are disabled when the defibrillation snaps are enabled Apex Snap The defibrillation snaps and modified defibrillation cables...

Page 24: ...e Simulator 3 Gently squeeze the black clip to disconnect the connector from the pacer module 4 Pull out the Defib Snap Harness 5 Connect the pacer cable to the Defib Snap Harness 6 Connect the vest t...

Page 25: ...ess the chest skin back in place 8 Insert the chest skin placement pin into the guiding hole located on the Velcro to align the chest skin 7 Tuck the cables into the chest cavity Refer to Section 6 3...

Page 26: ...ons result in palpable carotid pulses Chest compressions are measured and logged in the OMNI 2 software for debriefing purposes 4 4 CIRCULATION Palpable Pulses Automatic bilateral carotid and femoral...

Page 27: ...left arm using a modified sphygmomanometer In addition users can auscultate the Korotkoff sounds programmed by the software Bilateral Femoral Left Radial Setup 1 Locate the Luer Lock port on simulator...

Page 28: ...libration Before starting the calibration process place the blood pressure cuff on the simulator as it would be placed as instructed above 1 Tap the gear in the upper right corner of the screen and se...

Page 29: ...right arm may be used for bolus or intravenous infusions as well as drawing fluids NOTE It is recommended to use size 22 or 23 gauge needles or smaller Filling the Vasculature WARNING Do not attempt...

Page 30: ...ts on the right side of the simulator 2 Fill the syringe with fluid 3 Connect the fill syringe to one red port and connect the drain hose to the other red port and leave the clamp open 4 Push the flui...

Page 31: ...amp for infusion exercises Draining the Vasculature It is recommended to drain the vasculature after every simulation 1 Unclamp the drainage hose 2 If simulated blood was used fill the syringe with a...

Page 32: ...ing with the Simulator 4 Once fluid runs clear push air through the vasculature Intraosseous Access The right leg tibia has the capacity to simulate an intraosseous access line 1 Remove the tibia skin...

Page 33: ...S300 100 250 USER GUIDE Working with the Simulator 33 5 Fill the bone with fluid 3 Attach the IO adapter to the syringe 4 Fill the syringe with fluid 6 Connect the bones together...

Page 34: ...the Simulator 8 Reattach the skin cover Draining the IO Bone It is recommended to drain the reservoir after every simulation 1 Lift the skin cover and remove the IO bone 2 Insert the filling kit and s...

Page 35: ...using OMNI 2 Use the slider or the and buttons to adjust the intensity Intramuscular Injection Sites IM sites are located on both deltoids and quadriceps for placement exercises WARNING Do not inject...

Page 36: ...pad is attached with Velcro Osat Monitor Placement Detection The Code Blue III Adult can detect the placement of an Osat monitor on the left index finger Setup 1 Power on the simulator and the oximete...

Page 37: ...rtup Battery Indicator There are two battery indicators on the upper right corner of the screen One is for the OMNI 2 tablet and another is for the simulator Connection Status The communication indica...

Page 38: ...kly changed from the Favorites Page or from the Vitals page Follow the steps below to change one of the parameters 1 Tap on a vital sign 2 Adjust the vital sign by using the slider or the buttons 3 Se...

Page 39: ...PR by monitoring cadence and depth of cardiac compressions and airway ventilations in real time WARNING Do not perform mouth to mouth ventilation since the simulator airway can be difficult to clean a...

Page 40: ...R session Reset a CPR session Activate an audible tone for training Virtually defibrillate the simulator 5 4 BLOOD PRESSURE The Blood Pressure page has a virtual manometer gauge that shows the simulat...

Page 41: ...page then select Auscultatory Gap and slide the ON OFF button to ON 2 To increase or decrease the High Gap and Low Gap slide the top and bottom bars left or right or tap the or buttons 3 Tap APPLY NO...

Page 42: ...PEECH The simulator contains over 80 pre recorded expressions Use the OMNI 2 tablet to activate the speeches 1 Select the Speech Icon on the upper right corner of the screen 2 Tap a speech category 3...

Page 43: ...o access the Scenario Page Use this page to create load and run scenarios 2 Press New Scenario to the create a custom scenario 1 Select Load Scenario if there are already programmed scenarios 2 Press...

Page 44: ...S300 100 250 USER GUIDE 44 Working with OMNI 2 Graphics Function Add a node Save a scenario Load a scenario Clear a scenario...

Page 45: ...UIDE Options 45 6 OPTIONS 6 1 UNI TABLET 1 Remove the OMNI LINK from the communication port 2 Plug the RF module into the USB port of the tablet 3 Turn on the tablet 4 Double click the UNI icon to ini...

Page 46: ...r more information on using UNI to operate the simulator 6 2 VIRTUAL PATIENT MONITOR The simulator must be connected to the OMNI 2 tablet in order to establish a connection to the Virtual Monitor Conn...

Page 47: ...r screen NOTE Verify the serial number corresponds to your simulator 2 The Virtual Monitor Wi Fi setup window will prompt you to input a valid activation code The activation code is found in the purch...

Page 48: ...the Network Connectivity icon on the bottom right corner of the screen 2 Once its connected to the wifi open the Gaumard Vitals software 3 Tap the WIFI icon on the top left 4 Verify the IP address in...

Page 49: ...and are compatible with the defibrillation snap sites The snap cable adapter connects to a real defibrillator and carries electrical therapy energy to the snap sites They are compatible with most elec...

Page 50: ...energy Use the same cautions as with a real patient Follow the safety guidelines and operating procedures outlined in the defibrillator s manual Do not apply electrical therapy or deliver a shock whil...

Page 51: ...e to latex should avoid contact Discontinue use of this product and seek medical attention if an allergic reaction occurs Replacing the IV Veins 1 Remove the arm skin NOTE Apply heat to the skin to ma...

Page 52: ...the simulator The distance should not be more than 10 meters 30 ft away Manikin is not paired Follow steps from Section 7 3 to ensure the manikin is paired Battery needs charging Connect the charger t...

Page 53: ...2 Select the simulator s serial number under Available Devices NOTE The device name will be Gaumard_ SimulatorSerialNumber where the Serial number is the numerical value assigned to your simulator Wa...

Page 54: ...ection Site S300 100 043 L M D Antecubital Veins S300 100 411 Modified Philips Defibrillation Snaps S300 100 126 Modified Physio Lifepack Defibrillation Snaps S300 100 127 Modified Zoll Defibrillation...

Page 55: ...by Gaumard This limited warranty does not apply to any products provided along with the Gaumard product that are manufactured by third parties For example third party products such as computers deskt...

Page 56: ...simulator for possible troubleshooting as needed Technical Support Email support gaumard com USA 800 882 6655 INT 01 305 971 3790 9 2 GENERAL INFORMATION Sales and Customer Service E mail sales gaumar...

Page 57: ......

Page 58: ...Krash Kids Premie UNI Omni Omni 2 SmartSkin are trademarks of Gaumard Scientific Company Always dispose of this product and its components in compliance with local laws and regulations www gaumard co...

Reviews: