background image

NOELLE  S554.100 |  

User Manual

 Working with UNI |   15

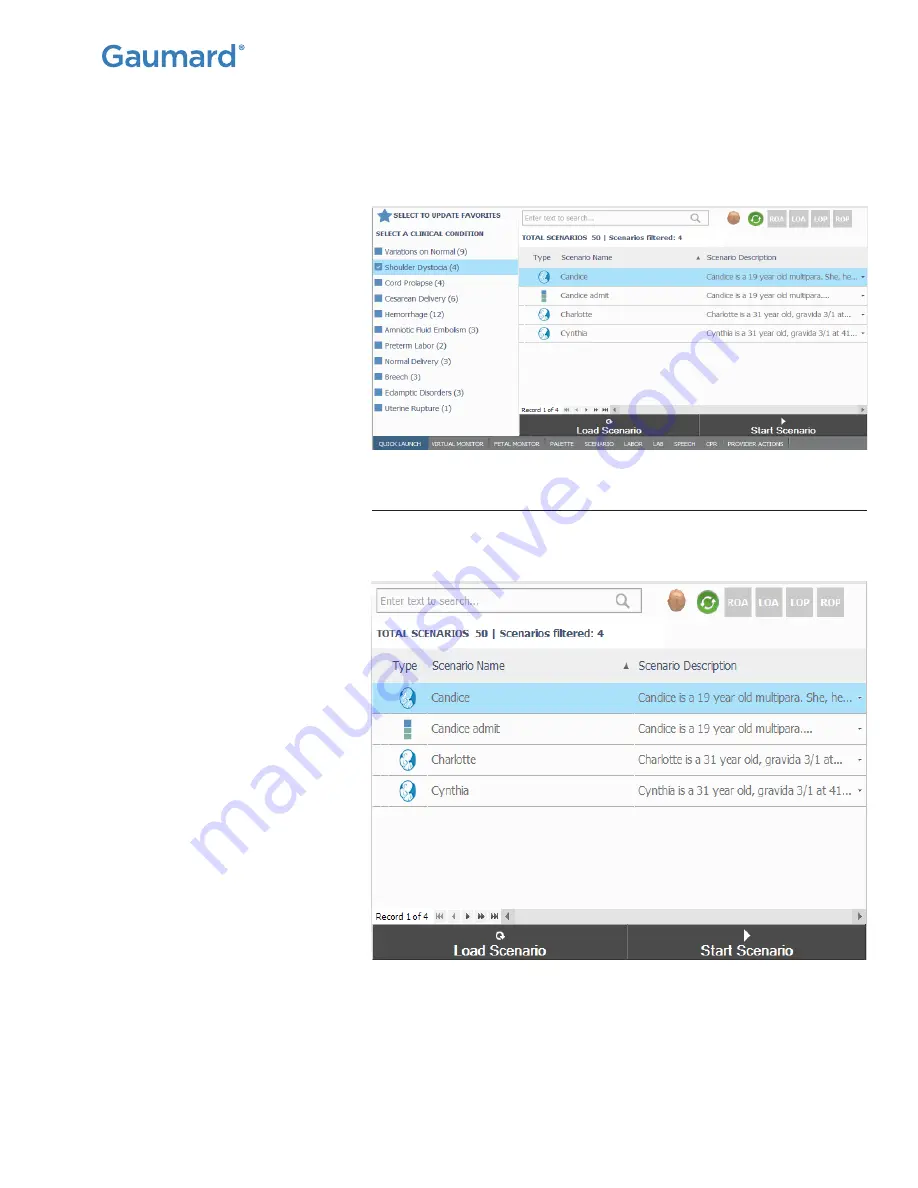
Notice that one or more scenario types can be selected at the same time 
and the list of scenarios on the right will display only the scenarios 
included in the selected categories.

Selecting the Scenario

Click on one of the scenarios listed to highlight it and the scenario can 
either, be started immediately or loaded.

Summary of Contents for NOELLE S554.100

Page 1: ...ractive educational system developed to assist a certified instructor It is not a substitute for a comprehensive understanding of the subject matter and not intended for clinical decision making User...

Page 2: ......

Page 3: ...s 3 Storage Conditions 3 Procedures 3 Cleaning 3 Birth Canal Maintenance 4 Post Partum Hemorrhage Check List and Warnings 4 Labor 4 2 Getting Started 5 2 1 Overview 5 Highlights 5 Noelle Simulator 5 N...

Page 4: ...12 4 2 UNI Interface 13 Connection Status 13 Back Up Battery Indicator 13 Power Stand By 14 4 3 Quick Launch 14 Clinical Condition 14 Selecting the Scenario 15 Favorites 17 4 4 Status Details Controls...

Page 5: ...ptional Leopold Maneuvers 40 Dilating Cervix 41 Shoulder Dystocia 42 Cesarean Delivery 43 Optional Cesarean Delivery 44 Prolapse of the Umbilical Cord 44 Placenta Previa 44 Breech Birth 45 5 6 Postpar...

Page 6: ...nd User License Agreement vii 7 Other 53 53 54 Replacement Instructions 54 56 8 Wireless Network 60 60 Configure the Vital Signs Broadcast 61 9 Warranty 63 9 1 Exclusive One Year Limited Warranty 63 6...

Page 7: ...manship Electronic transmission is warranted to be free from defects at the moment of transmission Your sole and exclusive remedy and Gaumard s sole liability is to replace the defective media or to r...

Page 8: ...with abdominal cover Length 5 8 inches 172 cm Wired connectivity Gaumard USB Communication Module RJ45 Battery Charger Power input 100 240 VAC 50 60 Hz 500 ma 50 VA Power output 12 VDC 2 A 24VA Weight...

Page 9: ...cause allergic reac tions Users allergic or sensitive to latex should avoid contact Dis continue use of this product and seek medical attention if an allergic reaction occurs Only use liquid colorant...

Page 10: ...the simulator When simulating drug administration via endotracheal tube providers must use an empty syringe Passing liquids into the trachea or esophagus may cause internal damage Mouth to mouth resus...

Page 11: ...f the birth canal until the cervix closes around the built in recess Failure to do so could result in liquid accumulating in the pelvic cavity and damage to the birthing mechanism Always position the...

Page 12: ...cal competencies Maternal vital signs monitor Fetal heart tones and neonatal vital signs monitor Set up and run OB emergency simulations for shoulder dystocia postpartum hemorrhage eclampsia umbilical...

Page 13: ...itor 2 2 Terminology UNI The Gaumard User Interface software application used to control the simulator and evaluate care providers Facilitator The person conducting the simulation an instructor or lab...

Page 14: ...lay period Wait or a pause Wait Indefinitely 2 3 Birthing Package Check List 48 hour postpartum uterine assembly Abdomen cover Articulating birthing fetus Automatic birthing mechanism Carrying bag for...

Page 15: ...he knee bolts without over tightening Power Supply Connect the power supply to the wall outlet and then connect to the power input located on NOELLE s right side Always operate NOELLE with the power s...

Page 16: ...tion Review all manufacturer warnings and procedural information included with the laptop s documentation before continuing Communications Module Follow the steps below to connect the communication mo...

Page 17: ...monitor system components for important safety installation and start up information be fore turning on the computer for the first time Please find assembly instructions in booklet included Virtual Mo...

Page 18: ...nitor s home screen The Gaumard Monitors software is now ready to receive vital signs information generated by the UNI control software MICRO Optional The Micro system is an all in one debriefing and...

Page 19: ...ing as standard with Noelle serial number M2107588 and above Simulators with serial numbers lower than M2107588 will need to have the RJ45 port modified For simulators without the OMNI Link Wireless A...

Page 20: ...the UNI icon and select the correct simulator profile Ensure you are using UNI version 2 46 2 or newer 3 Upon software startup a warning message will appear stating that the RF Module was not found C...

Page 21: ...le Bluetooth connection in the absence of an RF module and ask you if you would like to attempt Bluetooth connection Select Yes in this case 4 In the UNI software click the blue gear icon in the upper...

Page 22: ...will appear Allow the simulator to connect NOTE The OMNI Link has to be flashing green for the simulator to connect If the OMNI Link is purchased separately from the simulator the OMNI Link and UNI T...

Page 23: ...and caution information 2 Press the power button to turn on the PC The UNI software initializes the simulator 3 Double click the UNI icon on the tablet s home screen to start 4 Select NOELLE and clic...

Page 24: ...xcellent communication i e normal operation Back Up Battery Indicator The battery status indicator updates as the backup battery in the simulator is used The excla mation mark indicator is shown when...

Page 25: ...he simulator to stand by mode and then again to resume 4 3 Quick Launch The UNI interface opens up showing the quick launch page for the scenarios This page is used to easily access the preprogrammed...

Page 26: ...ypes can be selected at the same time and the list of scenarios on the right will display only the scenarios included in the selected categories Selecting the Scenario Click on one of the scenarios li...

Page 27: ...the appropriate scenario and starts it playing without the user having to do anything else with the control computer Notice that the position of the fetus should be selected before clicking Start Scen...

Page 28: ...cking the star icon Then select the categories or scenario types to be stored under this feature 4 4 Status Details Controls The Status Details panel is used to monitor and control the simulator s vit...

Page 29: ...To adjust numerical values click the slider control e g heart rate blood pressure respiratory rate etc Alternatively use the key board for manual entry and click the green checkmark to confirm the ch...

Page 30: ...ttings are submitted using the Apply panel After the list of changes is created click NOW to up date the vital signs instantly Alternatively click a trending timer to update numerical vital sign param...

Page 31: ...e vital sign settings into a single loadable object Use a palette item to update a set of vital signs quickly To create a new palette item set the values for the desired vital signs parameters using t...

Page 32: ...NOELLE S554 100 User Manual Working with UNI 21 Select the palette item from the Load Palette Item menu and click Load Click the apply option to sub mit the changes...

Page 33: ...l Modeling State Pause Model will pause at the current state Improve Model trend to a healthy state Once the model reaches the complete Healthy state the model will go to Pause mode Deteriorate Model...

Page 34: ...By adjusting the oxygen rate the baby will improve faster with proper ventilation Epinephrine Administer epinephrine to the model Set the epinephrine dose and then click add Administering epinephrine...

Page 35: ...hniques can be practiced on NOELLE including BVM nasal oral intuba tion and suctioning Endotrache al tubes NG tubes and LMAs can be used Procedure Recommended Device Size Intubation Blade size Miller...

Page 36: ...rmally permitting realistic chest rise WARNING Do not perform mouth to mouth ventilation as it will contaminate the airway Doing so may lead to molding of the air way The airway itself cannot be sanit...

Page 37: ...tion A green filled oval in dicates that the ventilation was recorded successfully 4 Perform ventilation 2 as prompted by the wizard A green filled oval indicates that the ventilation was recorded suc...

Page 38: ...ompressions sensor is factory calibrated prior to shipment To customize the parameters for chest compressions please follow the procedure outlined in the compression calibration procedure To calibrate...

Page 39: ...compression 2 as prompted by the wizard A green filled oval indicates that the compression was recorded successfully 6 Continue through the calibration wizard to record a total of five compressions 7...

Page 40: ...leave the drain port connected when injecting fluids into the system Use only Gaumard s simulated blood Any other simulated blood brand containing sugar or any additive may cause blockage and or inte...

Page 41: ...tes connect only the syringe Pull the plunger to create suction which will col lapse the veins Disconnect the syringe tube from the arm port while maintaining suction The port will seal and the veins...

Page 42: ...ricant 4 Attach the umbilical cord to the baby WARNING Route the cord so that it does not bind in the mechanism The umbilical cord can be wrapped around the fetal neck or coiled out of the way 5 Attac...

Page 43: ...re inserted 9 Attach the fetus to the birthing mechanism 10 Once the baby is connected and locked onto the mecha nism position the baby to its initial birthing position 11 From the UNI labor tab selec...

Page 44: ...cciput Posterior LOP 12 Put the abdominal cover in place WARNING Do not operate the birthing mechanism without the ab dominal cover in place To load a labor scenario 1 Go to the labor tab and click Lo...

Page 45: ...lick Play to start the labor scenario 5 The green vertical bar on the labor graph moves to the right indicating the labor progress For more information about the labor graph and the labor stations go...

Page 46: ...itudinal axis of the vulva The fetus is released from the birthing arm when the vertical progress bar reaches the end of the labor graph The release button displays Releasing to indicate that the fetu...

Page 47: ...if the fetus latching mechanism is unlocked 8 Deliver the fetus 9 Practice umbilical cord clamping and cutting on the consumable cords 10 Click the reset button to re turn the delivery mechanism to i...

Page 48: ...all 2 Inspect the placenta for retained fragments 3 If retained fragments are noted the student must retrieve them WARNING Ensure that the birthing mechanism is completely retracted before allowing th...

Page 49: ...g the soft scalp over the skull improves the vacuum seal between the fetal head and the vacuum 2 Lubricate the fetus as de scribed in the Normal Labor and Delivery section 3 Click Play to start a labo...

Page 50: ...within simulator 3 Route the inflation bulb outside NOELLE through any space provided on the left side 4 Inflate the elevating pillow 5 Lubricate the fetus and elevating pillow 6 Place birthing fetus...

Page 51: ...unnecessary stress to NOELLE s midsection if left installed for more than two hours To set up the Leopold Maneuver cover simply secure the cover into place with the velcro Perform the maneuvers on the...

Page 52: ...1 To demonstrate shoulder dystocia place the fetal baby in the ROA position UNI includes several prepro grammed dystocia labor scenar ios e g Cynthia Candice and Charlotte 2 Load a shoulder dystocia...

Page 53: ...rmed properly click the Release button to unlatch the fetus 8 Alternatively uncheck the Shoulder dystocia option to complete the rest of the scenario similarly to a nor mal labor Cesarean Delivery Dem...

Page 54: ...critical position and decreasing the fetal heart rate from the UNI status and details tabs Placenta Previa To simulate placenta previa with NOELLE place the placenta in the desired position to simula...

Page 55: ...fetus The fetus has a receptacle at the rectum and frontal fontanelle location into which the matchng pin is located on the birthing mechanism is inserted 3 Lubricate the fetus and birth canal 4 Inser...

Page 56: ...with the simulated blood solution 3 Connect the kit syringe to the PPH port located behind the right knee and inject simulated blood into the reservoir 4 Fill up to 900 mL of fluid into the PPH reserv...

Page 57: ...e uterine hemor rhage port to the fluid port located inside the abdomen The postpartum uterine assembly consists of a thin outer uterine skin and a smaller harder inner uterus It also contains a filli...

Page 58: ...ink the boggy uterus into a smaller and firmer condition 9 Turn hemorrhaging off when the uterine pressure is reached Cleaning the PPH System Clean PPH reservoir at the end of the simulation session t...

Page 59: ...ng delivery and select one of the two episiotomy repair modules Velcro a repair module into place Use a 000 size suture and small curved needle to repair the surgical incision or tear To install an ep...

Page 60: ...554 100 User Manual Working with NOELLE 49 4 Secure the insert to the hook and loop fasteners around the circumference of the pelvis 000 sized sutures are recommended to extend the life of the repair...

Page 61: ...al intubation Failure to do so will make intubation very difficult and is likely to result in damage Do not place silicone oil directly into the mouth and airway The nasogastric intubation feature is...

Page 62: ...install umbilical cord while Newborn is ON Newborn s umbilical cord can be catheterized or injected with up to 2ccs To fill the umbilical cord with fluid inject any of the three blood vessels with 2...

Page 63: ...mulates a vital signs monitor attached to Newborn The vital signs are synchronized through a wireless network between the facilitator s tablet and the computer running the monitor Each trace can be cu...

Page 64: ...Light Medium Dark Consumable S554 100 134 PLacenta with detachable fragments Replace ment S554 100 136 R2 Umbilical Cords Set of 2 Consumable S554 100 137 R2 Umbilical Cord Studs Set of 2 Consumable S...

Page 65: ...ing items Replacement vein set Silicone oil Heat gun or blow dryer Hemostat Optional Replacement Instructions 1 Turn off the simulator 2 Gently heat the arm skin 3 Pull back the skin from the lower ar...

Page 66: ...ck rings 7 To replace the dorsal vein of the hand gently pull out the vein from the white connec tors 8 Once removed attach one end of the replacement vein to one of white connectors 9 Feed this vein...

Page 67: ...ther 56 12 Apply small amounts of sili cone oil on the lower arm to aid the skin placement 13 Place the skin over the hand Stop half way and insert the foam covering the IV fill and drainage ports 14...

Page 68: ...ted to the simulator Both simulators operate using a wired connection Connect the wired commu nication module to the simulator and restart UNI Streaming Audio sound quality is poor Sound is too low or...

Page 69: ...ing the communication module for at least five seconds then plug it back in and restart the software Drivers not properly loaded Perform a full shutdown procedure on the tablet Is the communication in...

Page 70: ...t be the case either let it go it won t break or simply move motor forward a few turns and then reset Initial fetus position was not specified on the software Lock the baby into the birthing mechanism...

Page 71: ...2 Connect Router to USB pow er supply Computer can be packaged with router con nected 3 Or connect the TPLink to the wall outlet 4 Open the Wireless Network Connection on the Monitor Computer and conn...

Page 72: ...click Connect manually 2 Start the UNI control software on the control computer 3 On the UNI menu bar click the Gear Monitors Configuration 4 The simulator Virtual Monitor Setup window is displayed no...

Page 73: ...NOELLE S554 100 User Manual Wireless Network 62 12 Click Connect to accept the incoming connection...

Page 74: ...hasers or users of the product acquire the product as is and this limited warranty does not apply This limited warranty applies only to the products manufactured and produced by Gaumard This limited w...

Page 75: ...possible troubleshooting as needed Technical Support Email support gaumard com USA 800 882 6655 INT 01 305 971 3790 11 2 General Information Sales and Customer Service E mail sales gaumard com USA 800...

Page 76: ...Seatbelt Susie Krash Kids Premie UNI Omni SmartSkin OMNI 2 are trademarks of Gaumard Scientific Company Always dispose of this product and its components in compliance with local laws and regulations...

Reviews: