background image

4

PRINCIPLES OF OPERATION

UV Lamps

Systems incorporating UV lamps will have the extra added 
benefit of further break down of grease, in some cases down 
to  CO2,  H20,  and  base  minerals.    The  processes  called 
“Photolytic  Oxidation”,  and  “Ozonolysis”  are  the  drivers 
behind keeping your ducts clean and free of containments 
for much greater durations over conventional kitchen exhaust 
systems  not  utilizing  the  UVC  technology.   The  processes 
break down, and condition grease dramatically reducing its 
ability to burn or in some cases even combust.  For proper 
UV operation, the hoods must be maintained in good working 
order.  UV Lamps will accumulate a light gray dust on them 
that will have to be periodically wiped off from below.  Duct 
work will have to be inspected in accordance with NFPA-96 
or local guidelines, though frequency of duct cleanings will 
be dramatically reduced.

Important Notice:

 Never operate your Ventilator without 

the XG Extractors in place.  The XG extractors are UL 1046 
Flame Exposure tested to protect you’re your system from 
penetration of fire into the exhaust duct.  The XG Extractor is 
also a light attenuation barrier to remain in place at all times 
during the use of your UV system.

Cleaning

At the end of each cooking day the fan is to be turned off and 
the XG Extractors are to be safely removed from the hood 
and cleaned.  The 

“XG” Extractors

 can be washed either 

in a dishwasher or soaked and rinsed off.  The XG filter has 
a  unique  dual  hinge  design  that  will  allow  the  extractor  to 
be  opened  so  its  internal  components  are  accessible  for 
cleaning.  Periodic internal scrubbing of the extractors may 
be necessary in lines servicing busy kitchens, or lines using 
sugary sauces or bastings.

The 

UV lamps

 will develop a coating of dust, and sometimes 

debris  that  will  have  to  be  periodically  wiped  away  to 
optimize the UVC Systems performance.  The lamps should 
be  inspected  weekly  once  the  filters  are  removed.   When 
necessary, the lamps can be cleaned from below by carefully 
wiping the bulbs with a wet cloth using some mild detergent.  
A  maintenance  rotation  should  be  initiated  at  the  point  of 
start up by a Gaylord Industries certified Service Agent to 
address  any  maintenance,  or  repair  issues  that  may  be 
required.

Fire Protection

NFPA-96  Requires  the  use  of  Surface  Fire  Protection 

(Duct, Plenum, Surface/Appliance)

 on all hoods.  It is these 

systems that are the first line of defense against equipment 
fires.  Refer to the fire extinguishing systems owner’s manual 
for  operation  and  maintenance  instruction  of  for  these 
systems.

The 

XG-GFBD

  Series  ventilator  incorporates  a  fire  / 

balancing damper in stalled in the duct collar to protect your 
ducts, fans, and roof tops from the threat of fire in the event 
your primary fire protection system fails to extinguish the fire.  
In  the  event  of  a  fire  when  the  thermostat  reaches  its  set 
point of 325°F, the power to the hood will be cut allowing the 
dual blade damper to spring shut sealing the duct entrance 
and keeping the fire contained in the plenum, where it can 
be  properly  managed.    Exhaust  dampers  are  an  excellent 
way to protect your roof top and un-maintained grease ducts 
from the threat of fire. 

The hood may also be supplied without a fire damper, which 
would be designated by either the suffix 

“ND”

 or 

GBD

 in the 

model number.  

GBD

 designates a balancing ONLY damper.  

Refer  to  the  nameplate  on  the  hood  for  the  exact  model 
number designation.

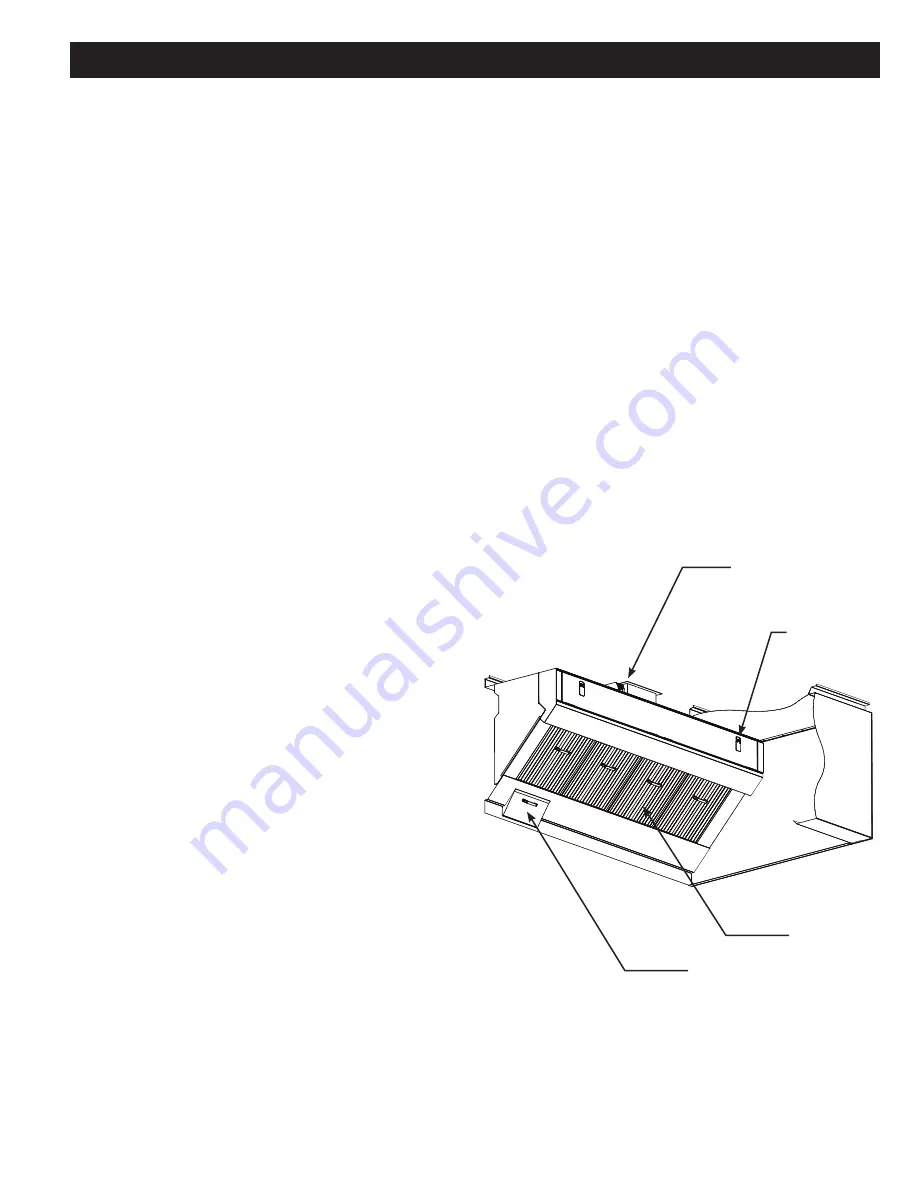
GFBD Damper 

(Shown)

UV Access 
(Keyed Latch)

XG Extractor

Grease Drawer

FIGURE 7

XG-UV-GFBD BDL

Summary of Contents for XG-BDL

Page 1: ...LATION OPERATION MAINTENANCE MANUAL for XG SERIES HOODS 10900 S W AVERY STREET TUALATIN OREGON 97062 U S A 1 800 547 9696 503 691 2010 FAX 503 692 6048 email info gaylordventilation com GAYLORD INDUSTRIES Revised 10 2015 ...

Page 2: ...e refer to the corresponding supplementary equipment manuals If you have further questions please call us toll free at 1 800 547 9696 We are more than happy to help Sincerely Gaylord Industries STREET ADDRESS 10900 S W Avery Street Tualatin Oregon 97062 U S A PHONE 503 691 2010 800 547 9696 FAX 503 692 6048 email info gaylordventilation com www gaylordventilation com GAYLORD INDUSTRIES INC World H...

Page 3: ...lord Industries ADDITIONAL COPIES 10 00 The manufacturer reserves the right to modify the materials and specifications resulting from a continuing program of product improvement or the availability of new materials ALL RIGHTS RESERVED NO PART OF THIS BOOK MAY BE REPRODUCED STORED IN A RETRIEVAL SYSTEM OR TRANSMITTED IN ANY FORM BY AN ELECTRIC MECHANI CAL PHOTOCOPYING RECORDING MEANS OR OTHERWISE W...

Page 4: ...igh Efficiency XG Extractor Will remove up to 4 times as much Grease as a Standard Baffle Filter Model XG BDL DS CL APPLICATION Used for cafeteria lines or any other single line island arrangement FIGURE 1 Standard Ventilator Models FIGURE 2 XG GFBD BDL Non UV Hood Shown Model XG BDL BB APPLICATION Used for typical island style back to back cooking arrangement 1 ...

Page 5: ...tilator with XG Super High Efficiency Filtration Extractors with ultraviolet lamps Gaylord Balancing Damper Manually Set Gaylord Fire Balancing Damper Has a thermostatically activated electric Fire Balancing damper located at the duct collar Can be used in the horizontal position No Damper Wall canopy style Island style for single line of cooking equipment using one extraction chamber Light Medium...

Page 6: ...sures that the restaurant employee s will always have access to the inside of the extractors for easy cleaning and will not mistakenly install the units in the opened or disassembled position Optional Recessed Fluorescent or Incandescent Light 100 Watt Incandescent Light Fixture Standard Optional Gaylord Balancing or Fire Balancing Damper Available 3 min air space for compliance with NFPA 96 when ...

Page 7: ...g busy kitchens or lines using sugary sauces or bastings The UV lamps will develop a coating of dust and sometimes debris that will have to be periodically wiped away to optimize the UVC Systems performance The lamps should be inspected weekly once the filters are removed When necessary the lamps can be cleaned from below by carefully wiping the bulbs with a wet cloth using some mild detergent A m...

Page 8: ...007 edition of NFPA 96 Standard for Ventilation Control and Fire Protection of Commercial Cooking Operations require that hoods ducts and exhaust fans be inspected by a properly trained qualified and certified company or person s in accordance with the following table Upon inspection if found to be contaminated with deposits from grease laden vapors the entire exhaust system shall be cleaned by a ...

Page 9: ...ut off stay off An audible alarm on the CUV 100 should come on The Red UV Safety Interlock Activated light on the ventilator and CUV 100 control should come on 4 Check all gaskets for damage a Replace any gaskets that are worn or damaged only with factory provided replacements 5 Check the Hour Meter a Record the hours b Determine the approximate hours between inspection intervals c Determine when ...

Page 10: ...amounts is harmful to skin and eyes The amount of UVC generated in these hoods is greater than that what results from direct exposure to the sun Under no circumstances is it acceptable to view the lighted lamps without proper eye protection or expose bare skin directly to the light All interlocks and safety precautions called for in this manual must be followed to avoid the potential for harm to s...

Page 11: ...res 4 8 The GFBD is intended to close upon the deactivation of the exhaust fan every night The feature is intended to eliminate cool air from drafting down the exhaust ducts and entering the kitchen Both the GFBD shown in Figure 14 and the GBD are not advised for use over solid fuel applications and should be inspected at least semi annually with the rest of the exhaust system For further details ...

Page 12: ...9 GFBD INTERNAL WIRING SINGLE SECTION XG Damper 1 Part 19176 At Duct Collar XG Damper 1 Part 19176 At Duct Collar Positioner 1 Part 18876 Access from below FIGURE 16 GFBD Internal Wiring Diagram ...

Page 13: ...10 GFBD EXTERNAL WIRING MULTIPLE SECTION FIGURE 16B GFBD External Wiring Diagram ...

Page 14: ...ntinuity across each switch on that circuit Ex To do so for Extractor 9 check for continuity across F9 F9 To check Filter 10 check for continuity between F9 F10 See Page 25 for diagram Once repaired or replaced the LED should again light up when all XG Extractors are in place see below for more detail UV HOOD WIRING BOARD UV System Interlock Connections Pull to disconnect Fuse Protection for UV Mo...

Page 15: ...ign that the actual air static pressure represents 10 Remove an XG Extractor The red Safety Interlock Activated lampshouldcomeon and an audible alarm sound 11 Check the UV Access door interlock Open the UV Access door with the fan on The red Safety Interlock Activated lamp should come on and an audible alarm will sound Caution Before any Fire tests are performed check with the building superintend...

Page 16: ...le Section During the course of the start up the Gaylord Industries representative or balancer will have to balance all hoods common to a single fan simultaneously This process will require knowledge of the ducting and a little technique Prior to starting the process the Balancer will have to verify the preset on all GBD and or GFBD Dampers To Preset the Gaylord Industries balancing dampers the ba...

Page 17: ...0 0 19 170 0 17 300 0 23 190 0 21 340 0 28 210 0 25 380 0 30 220 0 34 440 0 36 240 0 37 460 0 43 265 Values need to be multiplied by the hood section overall length to get the total CFM 0 55 300 0 63 320 0 75 350 GBD GFDB Flow Characteristion Chart 0 20 0 40 0 60 0 80 1 00 1 20 1 40 1 60 0 00 1 00 2 00 3 00 4 00 DSD Damper Set Position Measured Center Opening Dimension inches SP Adder to Plenum Pr...

Page 18: ...iling height and distributed throughout the kitchen area 3 Make up air registers located near the hood the louvers should be adjusted to direct the air away from the hood Directing or forcing make up air at the hood typically creates cross drafts resulting in smoke loss Ceiling make up air should not exceed 150 FPM at the inlet E Exhaust fan discharge 1 There should be no screen over the discharge...

Page 19: ...ity of fuses and replace if necessary E Fan on off switch has not been wired properly 1 Refer to wiring diagram in this manual and re wire 2 If when the fan switch is turned on to the exhaust position air is not being pulled through the hood but you can hear the fan running A Fire damper at exhaust collar if equipped has closed 1 Open necessary access panels to duct collar inspect and take correct...

Page 20: ...amp Failure light on 2 With fan running open UV Access Door 3 Depress the UV Access Door switch and identify which Lamp Ballast s green light is not on 4 Switch the pin connector on that Ballast with another Ballast and check again If the alternate Ballast s green light comes on replace the Ballast If the alternate Ballast s green light does not come on replace the Lamp B The contacts on the UV Mo...

Page 21: ...entilator C The contacts on the UV Module Controller has failed to close 1 Check for continuity between 1A 3A at the ventilator If a UV lamp has failed and there are 6 green 3 red lights lit on the UV Module Controller the UV Module Controller needs to be replaced 5 Red UV Safety Interlock Activated light on AND Audible Alarm on A UV Access Door Switch DS has failed or needs to be adjusted 1 Check...

Page 22: ...upply Fan Fire Switch Connections N C Contacts Closed Closed Open FS3 FS4 Exhaust Fan Fire Switch Connections N O Contacts Open Open Closed 1U Input from UV System On Green 0 VAC 120 VAC Normal 2U Input from UV Lamp Failure Amber 0 VAC 0 VAC Normal 3U Input from UV Safety Interlock Activated Red 0 VAC 0 VAC Normal 5U 120 VAC Neutral Leg High Voltage Common 6U Output to UV Lamps Contactor 0 VAC 120...

Page 23: ...ver the UV System is energized and one or more of the UV Lamps and or UV Ballasts have failed or if the UV Lamps do not have power The rest of the UV Lamps will continue to run call a Certified Service Agent for service UV Safety Interlock Activated Red Light On when a UV Access Door is Open On when an XG Extractor is not in place On when UV Pressure Switch detects that the static pressure is too ...

Page 24: ...Tool For 250 400 CFM Lin Ft Extractors 10119 Light Globe Frosted Kason 13211 INCANDESCENT LIGHT FRAME LENS 12 x12 Recessed Light Lens Retainer 13210 10111 10112 FLUORESCENT LIGHT LENS FRAME 2Ft Recessed Light Lens Retainer 3Ft Recessed Light Lens Retainer 4Ft Recessed Light Lens Retainer 18314 C 150 Start Stop Switch Control 19872 Exahust Duct Thermostat 6 NC 325 F ...

Page 25: ... Damper Control Motor 24 Volt For GFBD Model Dampers 76028 UV Monitoring Board with Contactor Complete Mounted on Din Rail 19663 UV Pressure Switch Preset to 0 07 WG 19365 UV Access Door Latch 19430 UV Hood Cooling Fan 120 VAC 19545 Static Tap PARTS LIST ...

Page 26: ...ght UV Chase Gaskets for End Caps 8 Plenum Access Gasket 75879 PC NO DESCRIPTION GAYLORD PART NO 14 UV Chase Cover Left 19290 15 UV 3 Ballast Cover 19300 UV 5 Ballast Cover 19305 16 UV Chase Cover Right 19291 17 UV 3 Light Module Frame All Sheet Metal Parts Includes Bolts Washers Retaining Clip Does NOT include Gaskets or Grommets 19307 UV 5 Light Module Frame All Sheet Metal Parts Includes Bolts ...

Page 27: ...V Status Light Label 19397 2 Indicator Light Red 19162 3 Indicator Light Yellow 12510 4 Indicator Light Green 12512 5 Cancel Switch 19076 6 UV Alarm Cancel Label 19396 7 Hour Meter 19164 8 C 150 Label 18644 9 C 150 Switch 18314 10 Access Door Latch 11119 1 2 3 4 5 6 7 8 9 ...

Page 28: ...3 3 Control Relay CR11 Safety Interlock 11399 Socket 11413 4 Control Relay CR12 Lamp Failure 11399 Socket 11413 5 Control Relay CR13 System On 11399 Socket 11413 6 Timing Relay TR1 To Latch the Audible Alarm 30375 Socket 30376 7 Timing Relay TR2 Delays Audible Alarm until Exhaust Fan reaches operating speed 30375 Socket 30376 8 Sonalert 30528 1 2 3 4 5 6 7 8 ...

Page 29: ...26 UV HOOD WIRING BOARD SCHEMATIC ...

Page 30: ...27 WIRING DIAGRAM FOR MODEL CUV 100 WITH XG UV SERIES HOODS ...

Page 31: ...28 WIRING DIAGRAM FOR GAD 100 CONTROLLERS WITH GFBD DAMPERS ...

Page 32: ...29 WIRING DIAGRAM FOR GAD 100 CONTROLLERS WITH NO DAMPER ...

Page 33: ...ucted of 18 Ga stainless steel Type 304 No 4 finish unless otherwise noted on drawings AIR FLOW RATES 1 The exhaust air flow rates and supply if part of the hood must be set at the rate stamped on the hood nameplate The exhaust volumes and supply when provided were established under controlled laboratory conditions and greater exhaust and or lesser supply may be required for complete vapor and smo...

Page 34: ... came on ___Yes ___No 2 Turn off the exhaust fan A The damper should move to the fully closed position in approx 15 seconds_____Yes_____No B The exhaust fan shut off ___Yes ___No INSTALLATION INCLUDES THE FOLLOWING Gaylord Auto Start Controller Gaylord Clearair Pollution Control Unit RSPC The Gaylord Quencher Fire Protection System Gaylord Distributor UDS Wet Chemical Fire Protection System Person...

Page 35: ... be e v i t a t n e s e r p e r d e z i r o h t u a s t i r o r e r u t c a f u n a M d r o l y a G d e s n e c i L e h t r o s e i r t s u d n I d r o l y a G y b d e h s i n r u f Such labor shall only be provided Mondays through Fridays between the hours of 8 a m and 4 p m Re quests for repairs or replacement parts should be made to GAYLORD INDUSTRIES 10900 SW Avery Street Tualatin Oregon 97062...

Page 36: ...FIED SERVICE AGENCY WWW GAYLORDVENTILATION COM GAYLORD INDUSTRIES SSSSSSSSSSSSSSSSSSSSS SSSSS E E EES EEEEEE E EEEEEE EEEGEE S7S62 E E PEEEE 5S3 6SS 2SSS EE S 8SS 547 S6S6 EEX 5S3 6S2 6S48 EEEEE EEEE GESEEEE EEEEEEEEEE EEE FORM NO TM XG 1015 COPYRIGHT 2015 GAYLORD INDUSTRIES LITHO IN U S A ...

Reviews: