


17
Gazelle Specifications:
Length:
43-1/2”
Width:
34”
Height:
54”
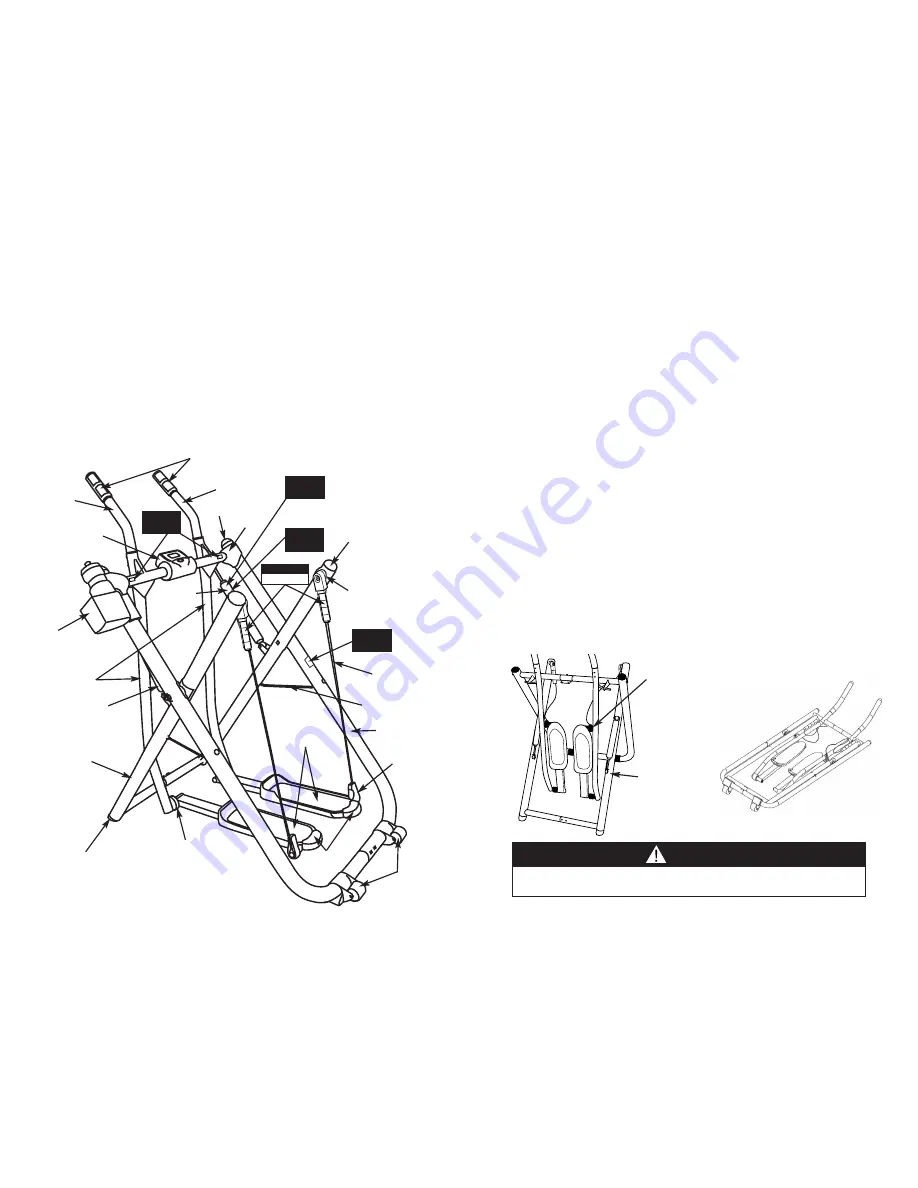
4
Fitness
Computer
Front Feet
Swing Arms
Water Bottle
and Holder
Left Frame
Assembly
Top Cable
Holder
Bottom
Cable
Holder
Hydraulics
Hydraulics
Foot
Platforms
End Cap
End Cap
Cover
Rear Swing
Cables
Right Frame
Assembly
Frame Cable
Handlebar
Handlebar
Pulse Sensors
Rollers
Wheels
Bumpers
S
PECIFICATIONS & PARTS
ALSO INCLUDES:
• Crosstrainer Workout
• Lower Body Solutions Workout
• Awesome Abs Workout
• Advanced Total Buttkickin’ Workout
Product Weight:
Approx. 59 lbs.
Maximum user weight:
300 lbs.
NEW
Soft Glide
WARNING
LABEL 2
ON THE FRONT
OF BOTH
HYDRAULICS
CAUTION
LABEL 1
ON THE FRONT
OF BOTH
HYDRAULICS
WARNING
LABEL 1
ON FRONT
OF FRAME
WARNING
LABEL 3
Caring for your Gazelle
Your unit has been carefully designed to require minimum maintenance for a
lifetime of use. To ensure this, we recommend the following:
• Keep your unit clean by wiping sweat, dust or other residue
off with a soft, clean cloth after each use.
• Wipe your handle grips down with a soft, damp cloth frequently
to prevent accumulation of sweat and dirt.
• If squeaks or other noises develop over time, we recommend the following:
a) Lubricate all moving parts. For best results we recommend using white
lithium grease.You may also apply clear household grease (i.e. petroleum
jelly) to axle tube.
b) Spray cable holders (top & bottom) with WD40 or equivalent.
c) Check to be sure that the screws on the bottom of the platforms are tight.
Storing your Gazelle
Your unit conveniently folds down for easy storage. To fold your unit:
a.
IMPORTANT:
Before folding, first disengage hydraulics for storage position.
b. Fold foot platforms and lock into place by snapping lower cable holders onto
swing arms.
c. Place foot on rear frame tube (to hold in place) and slide front frame tube towards
you by grabbing front swing arms.
d. Carefully lower the unit towards the ground until the wheels engage and roll unit
out of the way.
Store your equipment in an area away from children and high traffic areas.
Lock the foot
platforms into
place by snapping
cable holders onto
swing arms.
Disengage
hydraulics
before folding
as shown.
Unit is ready
for storage.
C
ARE & STORAGE
C A U T I O N
You MUST disengage the hydraulics before folding. Take caution when
lowering the unit towards you as the hydraulics can swing freely.


