background image

5 - CONNECTION DIAGRAM

5.2 - Electric lock - energised to release

Grey

Y

ellow

White

Blue

Red

Black


+

+

Power supply

12-24 V DC

Diode 
1N4004
supplied

(**)

Electric lock - 

energised


to release


Push
Button
(PTE) 

(*)

(*)

Push Button (PTE)

Enable relay for "timed relay" (see 
chap. 10) or as long as the contact 
is closed.
The Push button input does not work 
in bistable mode

(**)

Diode 1N4004

To be used only with power supply 
in DC

Summary of Contents for DCD300

Page 1: ...DCD300 DCD300 Waterproof multifunction keypad with double relay for stand alone access control USER MANUAL UK ...

Page 2: ... both 12 backlit metallic buttons 1 8 digits up to 100 000 000 combinations 125Khz up to 6cm 1 999 Output 0V Door open too long Door forced Max no wrong attempts Anti tampering Relay output Exit button Alarm Door Contact Doorbell Green red blue yellow Buzzer Beep sound 2 m IP 66 from 30 C to 60 C 98 RH 55 x 135 x 24 mm 0 54 Kg 1 TECHNICAL SPECIFICATIONS 2 FORM OF IDENTIFICATION Card Tag PIN code C...

Page 3: ...k Green Green Black White White Black Grey Yellow Orange Brown Purple usable only in DC NO 1 NO 2 NC 1 NC 2 COM 1 COM 2 GND OPEN 1 OPEN 2 D_IN Alarm Power supply 12 24V ac dc Power supply 12 24V ac dc Normally open Relay 1 Normally open Relay 2 Normally close Relay 1 Normally close Relay 2 Common Relay 1 Common Relay 2 GND Push button Relay 1 PTE Push button Relay 2 PTE Location contact of the doo...

Page 4: ...ised to release Clock Push Button PTE 5 CONNECTION DIAGRAM 5 1 Electric lock device de energised to release Clock Push Button PTE Enable relay for timed relay see chap 10 or as long as the contact is closed The Push button input does not work in bistable mode Diode 1N4004 To be used only with power supply in DC ...

Page 5: ...Power supply 12 24 V DC Diode 1N4004 supplied Electric lock energised to release Push Button PTE Push Button PTE Enable relay for timed relay see chap 10 or as long as the contact is closed The Push button input does not work in bistable mode Diode 1N4004 To be used only with power supply in DC ...

Page 6: ...tact NO Push Button PTE Enable relay for timed relay see chap 10 or as long as the contact is closed The Push button input does not work in bistable mode Control from dry contact NO Grey Yellow White Blue Red Black Transformer 12 24 V AC DC Push Button PTE ...

Page 7: ...if door open too long and or door forced see chap 10 5 CONNECTION DIAGRAM Brown Purple Black Red Grey Power supply 12 24 V DC Buzzer siren flash relay This output uses only DC current Position contact of the door closes the contact when the door is closed ...

Page 8: ... with the required function Users Programming and Cancellation Programming of a PIN code or a Card Tag Programming of Card Tag in succession Programming of Card Tag PIN User s Cancellation Advanced functions Relay 1 configuration Relay 2 configuration Doorbell button configuration Keypad backlight Buzzer sound volume Door open too long alarm Door forced alarm Max no of wrong attempts alarm Anti ta...

Page 9: ...ep Buttons Enter the new Master Code from 4 to 8 digits except 0 and 00000000 then press Enter the new Master Code again then press Enter a User ID from 1 to 999 then press 4 Yellow LED OR Blue LED Enter another function or press to exit from Programming mode 1 Yellow LED Yellow LED LED Audible beep Buttons 3 Yellow LED 9 1 ADDITION OF A PIN OR A CARD TAG Choose the relay associated to the User ID...

Page 10: ...ED Yellow LED 1 2 enables the function 1 5 enables the function 2 Enter User ID of the 1st user between 1 and 999 then press Yellow LED 3 Yellow LED Choose the relay you must associate to User ID 1 relay 1 a or 2 relay 2 or a 1 2 relay 1 and 2 simulta neously then press 4 OK Green LED 1 Beep Error Red LED 5 Beeps Read the Card Tag in succession then press 2 Enter a User ID from 1 to 999 then press...

Page 11: ...ow LED OR Blue LED Enter another function or press to exit from Programming mode The device must be in Programming mode see Chap 7 LED Audible beep Buttons 9 4 USER S CANCELLATION 1 Yellow LED 2 enables the function 3 Yellow LED OR Blue LED Enter another function or press to exit from Programming mode It is impossible to program the same user on more positions It is impossible to replace a user wi...

Page 12: ...r Red LED 5 Beeps OK 2 Beeps Error Red LED 5 Beeps Green LED OK 2 Beeps Error Red LED 5 Beeps Green LED OR OR 3 3 Yellow LED OR Blue LED Yellow LED OR Blue LED Enter other function or press to get out from Programming mode Enter another function or press to exit from Programming mode The device must be in Configuration mode see Chap 7 LED Audible beep Buttons 10 2 RELAY 2 CONFIGURATION 10 3 DOORBE...

Page 13: ... 2 Beeps Error 3 Beeps OK Green LED 2 Beeps Error 3 Beeps OK Green LED 1 Beep OR OR OR 3 Yellow LED OR Blue LED Enter another function or press to exit from Programming mode The device must be in Programming mode see Chap 7 1 Yellow LED 5 1 enables the function OK 2 Beeps Error Red LED 5 Beeps Green LED OK 2 Beeps Error Red LED 5 Beeps Green LED OK 2 Beeps Error Red LED 5 Beeps Green LED a In auto...

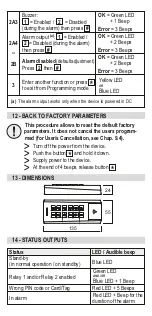
Page 14: ...GURATION The alarm for door open too long and door forced needs the connection of a door switch for ex magnetic contact between the brown wire D_IN and the grey wire GND This contact must be closed when the door is closed Interruptionof the alarm by simply closing the door a Card Tag reading or the entering of a valid PIN code 2A1 2A2 2A3 Enables the open door detection Press 1 then Enter the open...

Page 15: ...the door and waiting for the end of alarm duration or by a Card Tag reading or the entering of a valid PIN code 2A1 2A2 2A3 Enables open door forced detection Press 1 then Enter the alarm duration from 1 to 300 sec then press The device must be in Programming mode see Chap 7 1 Yellow LED 7 2 enables the function OK Green LED 1 Beep LED Audible beep Buttons OK 1 Beep Error 3 Beeps Green LED OK Gree...

Page 16: ...ed Press 1 then Anti tampering alarm enabled Press 1 then Enter the alarm duration from 1 to 300 sec then press Enter the duration of the alarm from 1 to 300 sec then press The device must be in Programming mode see Chap 7 The device must be in Programming mode see Chap 7 1 1 Yellow LED Yellow LED 7 3 enables the function 7 4 enables the function OK Green LED 1 Beep OK Green LED 1 Beep LED Audible...

Page 17: ...e device Push the button and hold it down Supply power to the device At theend of4 beeps release button 13 DIMENSIONS 55 24 135 14 STATUS OUTPUTS Relay 1 and or Relay 2 enabled Blue LED Red LED 5 Beeps Red LED Beep for the durationof the alarm LED Audible beep Status Stand by in normal operation on standby Wrong PIN code or Card Tag In alarm Green LED AND OR Blue LED 1 Beep Buzzer 1 Enabled 2 Disa...

Page 18: ...Brennero 177 B 46025 Poggio Rusco MN ITALY declares that the product MULTIFUNCTION KEYPAD DCD300 Code AU02201 is in conformity with the following Directives 2014 53 UE 2011 65 UE and that the following harmonised Standards have been applied EN 62368 1 2014 A11 2017 EN 62311 2008 ETSI EN 301 489 1 V2 2 3 2019 11 ETSI EN 301 489 3 V2 1 1 2019 03 EN 55032 2015 EN 55035 2017 ETSI EN 300 330 V2 1 1 201...

Reviews: