background image


CLEANING INSTRUCTIONS 

1.  Open the cover and put the parts, which need to be cleaned on the wash 

board. 

2.  Turn the main switch to position 1. 

3.  Clean manually using the spray gun. 

4.  Turn the main switch to position 0.  
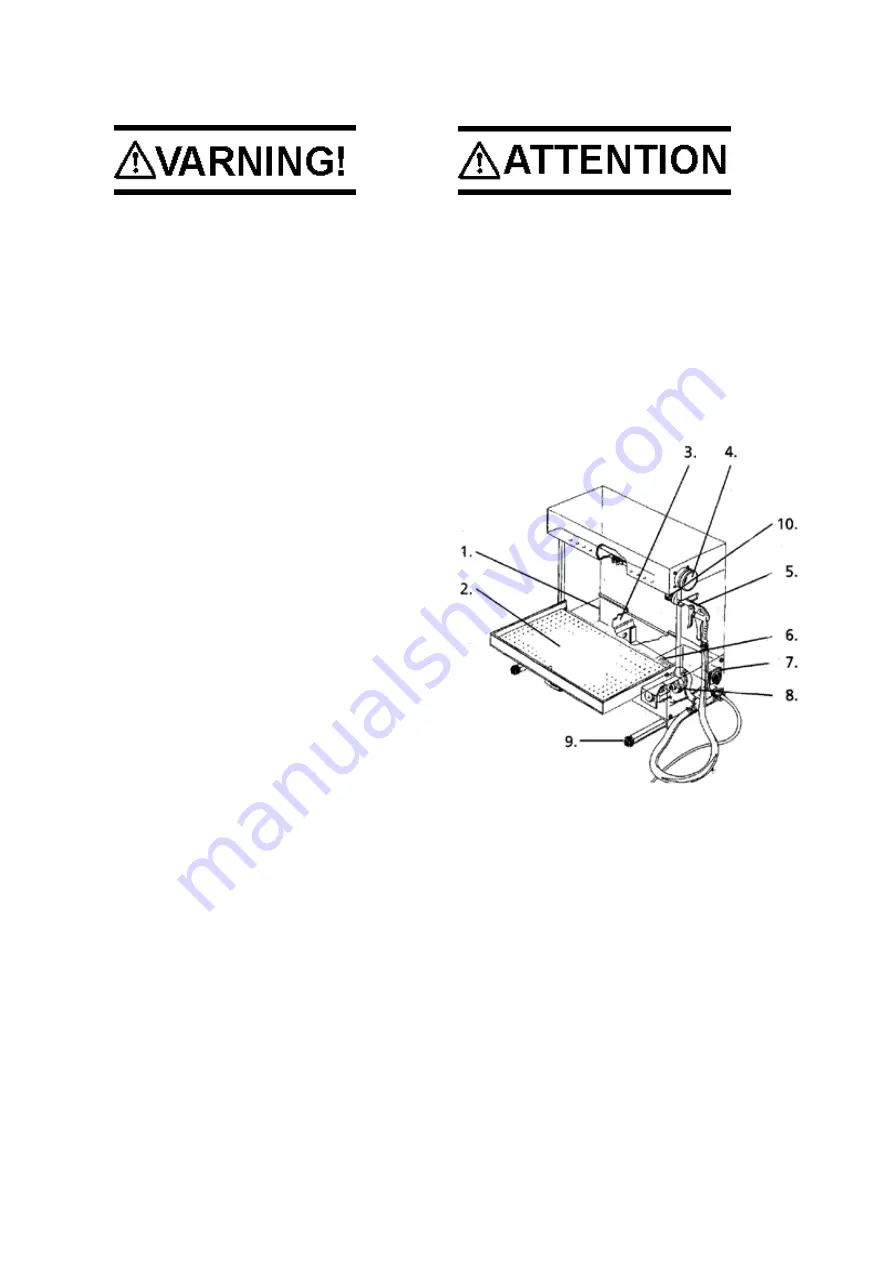


1.  Unloading plate 

2.  Wash board for manual cleaning 

3.  Sedimentation plate 

4.  Connection to ventilation system 

5.  Spray gun with hose 

6.  Net strainer 

7.  Main switch 

8. Pump 

9.  Adjustable leg 

10 Brush 


MAINTENANCE 

A bad cleaning result may be caused by: 

  The cleaning fluid needs to be changed. 

  Pump gasket needs to be replaced. 

  Pump needs to be replaced. 

A leakage is most likely caused by a damaged pump gasket.  


How to change the cleaning fluid 

1.  Unplug the machine from the power supply. 

2.   Remove the drainage plug from underneath the machine making sure to 

place a bucket or similar to collect the old fluid. 

3.  Pick up and clean the unloading plate, sedimentation plate and net strainer. 

4.  Put them back into place. Fill the tank with 8 litre fluid, low aromatic 

degreaser with flash point above 70°C. The level of the fluid must not 

exceed the inner unloading plate. 

When diluting degreaser make sure to 

add the water before the degreaser. 


  The liquids flash point 

must exceed 70

°

C. 

If not, it may cause a fire! 

  Do not place the cleaner in wet 

or humid rooms. 

This may cause flash over! 

6

Summary of Contents for Microclean

Page 1: ...actory tools and small parts Microclean Maxiclean Masterclean MANUAL Vaskemaskiner for maskin og motordeler Microclean Maxiclean Masterclean MANUAL Vaskemaskiner for maskin og motordeler Microclean Ma...

Page 2: ...FUNCTION 5 INSTALLATION 5 Assembly instructions 5 CLEANING INSTRUCTIONS 6 MAINTENANCE 6 How to change liquid 6 How to change pump gasket 7 How to change pump 7 How to change power cord SPARE PARTS 7 A...

Page 3: ...the cleaner if instructions are not followed Make sure to read the instruction manual before unpacking installing or using this cleaner Observe all safety issues Serious personal injury or damage to t...

Page 4: ...by skilled personnel The definition of skilled personnel is Personnel with the technical knowledge or enough experience to avoid the risks involved in working with electricity How to act in case of a...

Page 5: ...a workbench when placing it on a workbench pull out the adjustable legs 2 Make sure that the sedimentation plate is in place in the sedimentation tank 3 Put the unloading plate with the open slots to...

Page 6: ...to be replaced A leakage is most likely caused by a damaged pump gasket How to change the cleaning fluid 1 Unplug the machine from the power supply 2 Remove the drainage plug from underneath the mach...

Page 7: ...round plate and lift up the pump 5 Mount the new pump attach the hose and put the hose clip back on 6 Refill the tank See How to change the Fluid How to change the power cord Work on electrical equipm...

Page 8: ...TION Assembly instructions 1 Lay the cleaner on its back Mount the castors using the enclosed screws two for each castor 2 Make sure that the sedimentation box is located on the left hand side of the...

Page 9: ...Manual clean 1 In order to improve the cleaning result close the faucet 8 2 Put the parts that need to be cleaned on the wash board 3 Turn the main switch to position 1 4 Clean manually using the spr...

Page 10: ...liquid see How to change the liquid above 3 Unscrew the front plate and loosen the hose clip 4 Loosen the two screws underneath the ground plate and lift up the pump 5 Loosen the pump block and unscr...

Page 11: ...t 36 193 0001 Ventilation hose TECHNICAL SPECIFICATION Number of nozzles 3 Spray gun with brush 1 Pump capacity min 28 liter Tank volume 30 liter Max weight of parts to be cleaned 100 kg Cleaning area...

Page 12: ...ce preventing the liquid from leaking INSTALLATION Assembly instructions 1 Make sure that the sedimentation box is located inside the liquid tank 2 Put the unloading plate and the outflow plate on top...

Page 13: ...INSTRUCTIONS Automatic wash 1 Open the cover of the protective hood and place the parts on the unloading plate 2 Close the cover 3 If you wish to have the liquid sprayed only from above the part turn...

Page 14: ...e liquid see How to change the liquid above 3 Unscrew the front plate and loosen the hose clip 4 Loosen the two screws underneath the ground plate and lift up the pump 5 Loosen the pump block and unsc...

Page 15: ...001 Wash basket 250x120x90 mm 36 193 6001 Ventilation hose TECHNICAL SPECIFICATION No of nozzles 6 Spray gun with brush 1 Pumps 3 Pump capacity min 28 liter Tank volume 50 liter Max weight of parts to...

Page 16: ......

Reviews: