Appendix
GreatCut Plug-In A-6
GCC AASII System
Below is a step-by-step instruction of using the AAS function in GreatCut software through
CorelDRAW and Adobe Illustrator.
Edit your image in CorelDRAW
4-Point Positioning
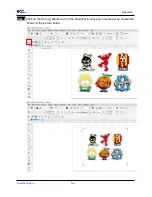
Step 1
Create a new file in CorelDRAW and click on the Create contour icon on the GreatCut
toolbar (it would appear automatically once CorelDRAW is open).
Step 2
Complete contour line settings (including contour offset value) and press Calculate to
confirm.
Summary of Contents for AFJ-24S
Page 1: ...V 2 2022 Aug http www GCCworld com AFJ 24S User Manual...
Page 12: ...AFJ 24S User Manual 12 RS232 cable 1 pc Installation guide 1 copy Media blocks 2 pcs...
Page 19: ...AFJ 24S User Manual 19 Download the driver according to the type of connection...
Page 44: ...AFJ 24S User Manual 44...
Page 142: ...Appendix GreatCut Plug In A 6...
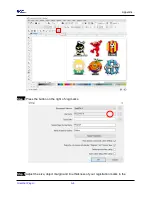
Page 166: ...Appendix GreatCut Plug In A 6 Step 5 Press the button on the right of Jog marks...
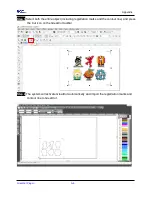
Page 182: ...Appendix GreatCut Plug In A 6 Step 11 Go to GreatCut window press Output button...
Page 183: ...Appendix GreatCut Plug In A 6...
Page 185: ...Appendix SignPal 12 Instruction A 7...
Page 198: ...Appendix SignPal Instruction A 6...
Page 200: ...Appendix SignPal Instruction A 6 4 Select File Document Setup in SignPal and select paper size...
Page 205: ...Appendix SignPal Instruction A 6...

