background image

LaserPro StellarMark CIIA-Li User Manual |    55 
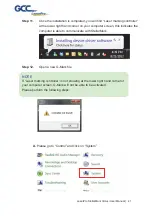
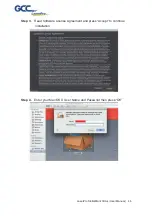
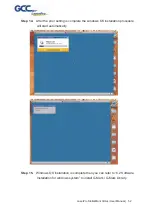
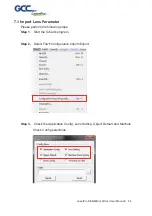
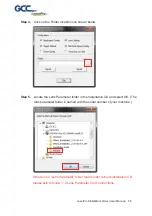
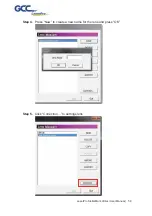
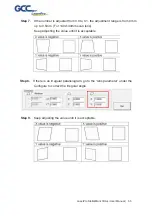
Step 4.   

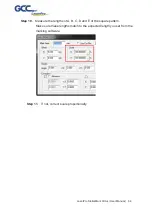
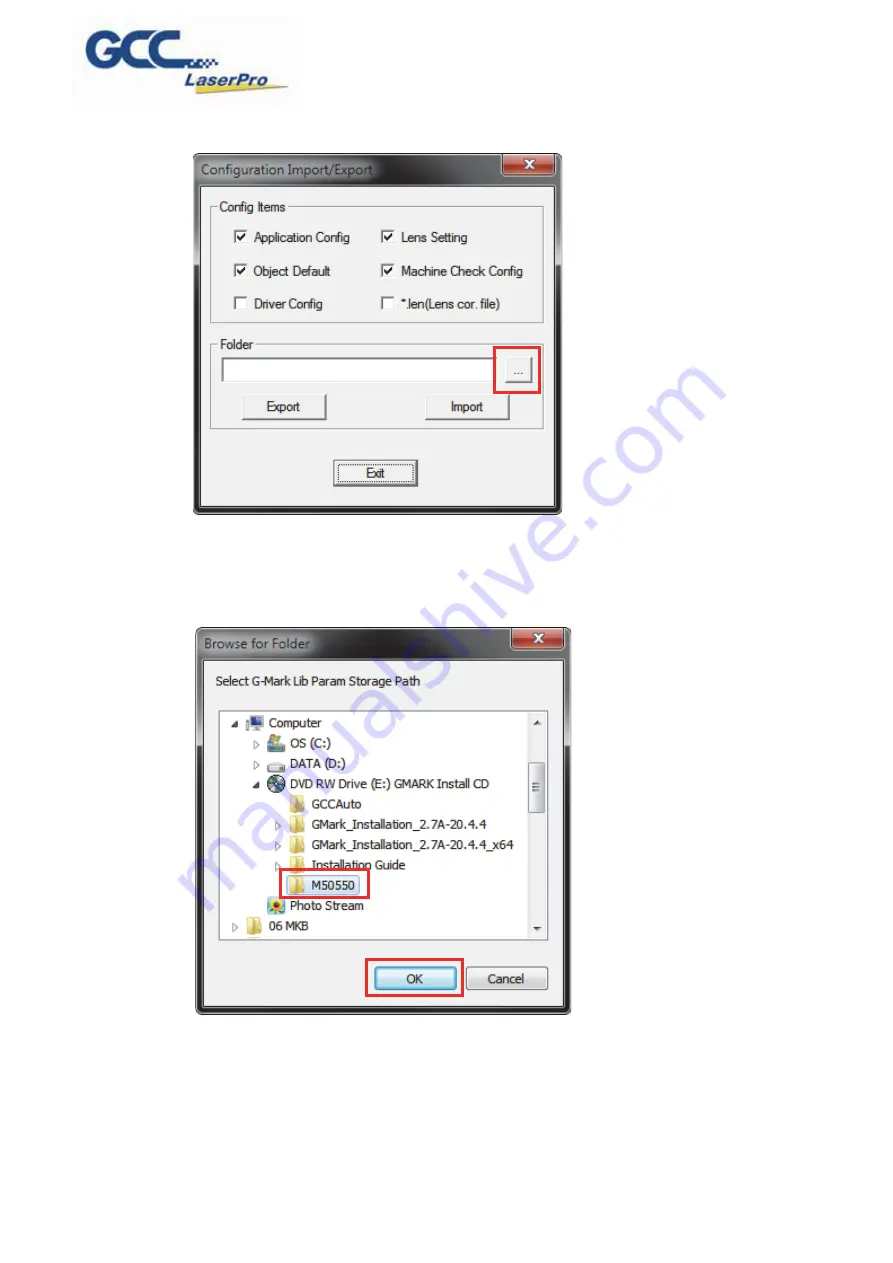
Click on the Folder location icon shown below. 


Step 5.   

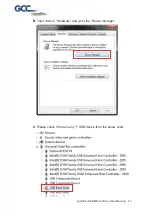
Locate the Lens Parameter folder in the Installation CD and select OK. (The 

lens parameter folder is named with the serial number of your machine.). 


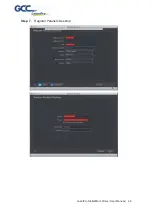
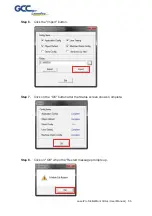
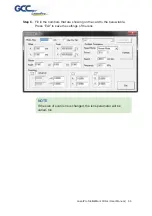
If there is no “Lens Parameter” folder found under G-Mark installation CD, 

please skip to follow ”7.2 Lens Parameter Card” instructions. 


Summary of Contents for LaserPro StellarMark CIIA-Li

Page 1: ...LaserPro StellarMark CIIA Li User Manual 1 4F No 236 Fude 2nd Rd Xizhi Dist New Taipei City 22151 Taiwan 886 2 6616 6692 Fax 886 2 2694 6875 StellarMark CIIA Li User Manual www delinit by...

Page 2: ...KER 14 3 2 MACHINE DIMENSION 16 CHAPTER 4 WORKING DISTANCE 18 4 1 RECOMMENDED WORKING DISTANCE 19 4 2 PYRAMID FOCUS TOOL 20 CHAPTER 5 MACHINE SETUP 21 5 1 POWERING UP THE MACHINE 22 5 2 POWER CABLE CO...

Page 3: ...LaserPro StellarMark CIIA Li User Manual 3 8 1 CLEANING THE LENSES 66 CHAPTER 9 APPENDIX 68...

Page 4: ...LaserPro StellarMark CIIA Li User Manual 4 Chapter 1 Safety Principles of CO2 Laser Safety Ratings The Safety Interlock System Safety Labels Safety Measures Operating Environment www delinit by...

Page 5: ...n the door is opened There are some magnets on the side of safety door which activate this safety mechanism Do not attempt to remove or modify these magnets or any other component of the safety interl...

Page 6: ...s label is located at the right back side of machine All the product information such as Serial Number Model Numbers Laser Power and Electric power can be found here Before requiring any tech support...

Page 7: ...CDRH Label This label indicates the class level of CDRH CE Label This label indicates the class level of CE Emergency Stop Label This label indicates the emergency stop button You can find this label...

Page 8: ...ople in the immediate area z Prior to operation carefully read and familiarize yourself with the warning labels located on both your laser system and in this manual z Never leave the machine unattende...

Page 9: ...y generate toxic fumes such as PVC and Teflon z Regularly clean and maintain your machine according to our cleaning and maintenance instructions Doing so will ensure a machine that will operate effect...

Page 10: ...is near the dew point z Setup the machine to be apart from the wall for at least 40cm 1 5 feet z Choose a flat surface that is not exposed to high levels of vibration z Be sure that your mounting pla...

Page 11: ...LaserPro StellarMark CIIA Li User Manual 11 Chapter 2 Unpacking Contents Unloading and Unpacking Contents and Accessories Checklist...

Page 12: ...Parameter Marking List 3 USB CABLE 1 M6 Screw Plastic Foot 4 Acrylic Bar Focus Tool for CIIA Li 010 050 Only 1 Nut M6xt5xS10 4 2 1 Unpacking and Unloading The StellarMark CIIA Li is shipped in one cr...

Page 13: ...LaserPro StellarMark CIIA Li User Manual 13 Chapter 3 Mechanical Overview Laser Marker Machine Dimension...

Page 14: ...ar with the machine s features and components You should also make note of the new features that have been developed exclusively for the StellarMark 3 1 Laser Marker 3 1 1 LED Panel There are 3 LED li...

Page 15: ...he laser is power on and the green LED light is on The StellarMark gives you the choice of 4 scan lens sizes to best suit your marking applications The smaller filed size scan lens will produce a smal...

Page 16: ...on NOTE The scan lens is very fragile and careful while the cleaning and installing Defective or unworkable due to abuse mishandling misuse accident alteration negligence improper installation deficie...

Page 17: ...LaserPro StellarMark CIIA Li User Manual 17...

Page 18: ...LaserPro StellarMark CIIA Li User Manual 18 Chapter 4 Working Distance Recommended Working Distance Pyramid Focus Tool...

Page 19: ...ommended as below Scan Lens 10 x 10 mm 50 x 50 mm 70 x 70 mm 140 x 140 mm A Focus Tool Length 26 1 mm 65 1 mm 91 1 mm 196 5 2 mm NOTE In order to achieve the best output quality the working distance m...

Page 20: ...arker and let the to be marked material touches the bottom screw of Pyramid Ruler the distance between the two is the best working distance With this tool you can always have the best working distance...

Page 21: ...LaserPro StellarMark CIIA Li User Manual 21 Chapter 5 Machine Setup Powering Up the Machine Power Cable Connection I O Definitions I O Installation...

Page 22: ...Connect the female end of the power cord into the machine s power cable inlet located on the left side of the control box 5 2 Power Cable Connection Step 1 Connect the laser marker power cable to the...

Page 23: ...LaserPro StellarMark CIIA Li User Manual 23 Step 2 Connect the D_SUB cable 25pin 15pin between the PCI card and the laser marker Step 3 Turn on the master power for laser Marker...

Page 24: ...y for software installation NOTE Every time you turn off the power you are required to re start G Mark Advance marking software because the connection between computer and control unit is disconnected...

Page 25: ...LaserPro StellarMark CIIA Li User Manual 25 5 3 I O interface Definitions...

Page 26: ...LaserPro StellarMark CIIA Li User Manual 26 Jumper Settings Functions...

Page 27: ...LaserPro StellarMark CIIA Li User Manual 27 Pin Layout Connection J18 Start Functions of Start i e J18 Pin 2 1 2 Short Positive level trigger for Start 2 3 Short Negative level trigger for Start...

Page 28: ...t Negative level trigger for Stop Pin Layout Connection J11 PGM Ready J5 J9 Functions of PGM Ready i e J11 Pin 2 1 2 Short 1 2 Short 1 2 Short 1 PGM Ready logic low 0 as G Mark initiated 2 PGM Ready l...

Page 29: ...0 as laser marking activated 4 Marking End logic high 1 as laser marking completed 5 Marking End logic low 0 as G Mark quitted Pin Layout Connection J12 Mark Ready J6 J10 Functions of Mark Ready i e...

Page 30: ...rom the accessory box 2 Remove the PMC2 card from the computer if it is already installed PMC2 Signal Trace Board Assembly PMC2 Signal Trace Board Assembly Simple Cattle Horn Female 2 10P to Simple Ca...

Page 31: ...Pro StellarMark CIIA Li User Manual 31 3 Connect the two 26 Pin Cables to the JF2 and JF4 slots of the PMC2 board 4 Connect the two 20 Pin Cables to the JF6 and JF8 slots of the PMC2 board JF2 JF4 JF8...

Page 32: ...32 5 Connect the other side of the 26 Pin cables to the JF2 and JF4 slots on the PMC2 Signal Trace Board Assembly 6 Connect the other end of the 20 pin cables to the JF6 and JF8 slots of the PMC2 Sig...

Page 33: ...e PMC2 board and PMC2 Signal Trace Board Assembly Completed 8 Insert the PMC2 into a PCI slot on the computer and assemble the PMC2 Signal Trace Board Assembly to the computer 9 Connect a D Sub 25 pin...

Page 34: ...LaserPro StellarMark CIIA Li User Manual 34 10 Connect the D Sub 25 pin cable to the I O interface 11 Installation completed...

Page 35: ...LaserPro StellarMark CIIA Li User Manual 35 Chapter 6 Software Setup Recommended Computer Configuration Software Installation for Windows System Software Installation for MAC System...

Page 36: ...m 1GHz or above DRAM 1GB RAM or above CDROM One CD ROM disk drive HDD 500 MB of free hard drive space SVGA Super VGA display 1204 x 768 min resolution Interface PC or Laptop G Mark Library marking sof...

Page 37: ...StellarMark CIIA Li User Manual 37 Step 3 Click on 32 bit or 64 bit version from the menu of the G Mark installation CD depending on your operating system Step 4 Set the destination directory and cli...

Page 38: ...LaserPro StellarMark CIIA Li User Manual 38 Step 5 Select Next Step 6 Installing Step 7 At 95 completion of the installation the ModelManger window will show up...

Page 39: ...LaserPro StellarMark CIIA Li User Manual 39 Step 8 Select your series model type...

Page 40: ...LaserPro StellarMark CIIA Li User Manual 40 Step 9 Click OK Step 10 Click Finish to complete the installation...

Page 41: ...corner on your computer screen this indicates the computer is able to communicate with StellarMark Step 12 Open a new G Mark file A Please go to Control and click on System NOTE If Laser marking contr...

Page 42: ...LaserPro StellarMark CIIA Li User Manual 42 B Then click on Hardware and go to the Device manager C Please check if there is any USB device from the below chart...

Page 43: ...LaserPro StellarMark CIIA Li User Manual 43 D Then click on USB Driver and click on right mouse button and update the driver E Click on Browse my computer for driver software...

Page 44: ...LaserPro StellarMark CIIA Li User Manual 44 F Key in the specific path C Program Files G Mark Lib Drivers MC1 Then press Next G Press Finish and now you can activate the G Mark software...

Page 45: ...llarMark machines by purchasing the Parallels Desktop software which allows you to install Windows OS in MAC computers and run Windows based software under MAC computer and output with G Mark Step 1 P...

Page 46: ...LaserPro StellarMark CIIA Li User Manual 46 Step 3 Read Software License Agreement and press Accept to continue installation Step 4 Enter your Mac OS X User Name and Password then press OK...

Page 47: ...LaserPro StellarMark CIIA Li User Manual 47 Step 5 Press Active Step 6 Press OK when activation is complete...

Page 48: ...LaserPro StellarMark CIIA Li User Manual 48 Step 7 Register Parallels Desktop...

Page 49: ...LaserPro StellarMark CIIA Li User Manual 49 Step 8 Press Register and OK to complete the installation of Parallels Desktop Step 9 Open Parallels Desktop in the Applications folder then choose File New...

Page 50: ...LaserPro StellarMark CIIA Li User Manual 50 Step 10 Press Install Windows from DVD or image file then press continue to install windows OS Step 11 Select CD ROM drive with the Windows installation CD...

Page 51: ...LaserPro StellarMark CIIA Li User Manual 51 Step 12 Enter the Windows OS product key Step 13 Select how you would like to run your Windows program...

Page 52: ...p 14 After the prior setting is complete the windows OS installation procedure will start automatically Step 15 Windows OS installation is complete then you can refer to 6 2 Software Installation for...

Page 53: ...LaserPro StellarMark CIIA Li User Manual 53 Chapter 7 Lens Adjustment Import Lens Parameter Lens Parameter Card Lens Parameter Adjustment...

Page 54: ...4 7 1 Import Lens Parameter Please perform the following steps Step 1 Start the G Mark program Step 2 Select File Configuration Import Export Step 3 Check the Application Config Lens Setting Object De...

Page 55: ...n below Step 5 Locate the Lens Parameter folder in the Installation CD and select OK The lens parameter folder is named with the serial number of your machine If there is no Lens Parameter folder foun...

Page 56: ...LaserPro StellarMark CIIA Li User Manual 56 Step 6 Click the Import button Step 7 Click on the OK button after the Status screen shows Complete Step 8 Click on OK when the Restart message prompts up...

Page 57: ...ick on the Work Area Tab under the Property Table after G Mark restarts Step 10 The Lens parameter can be found in the Lens list Named with the serial number of your machine Step 11 Click on Apply aft...

Page 58: ...achine and the marking software must be adjusted to match each other Or the marking lines will be distorted or will have an improper scale of the marking content Step 1 Take out the lens parameter car...

Page 59: ...LaserPro StellarMark CIIA Li User Manual 59 Step 4 Press New to create a new name for the lens and press OK Step 5 Click Correction to settings lens...

Page 60: ...CIIA Li User Manual 60 Step 6 Fill in the numbers that are showing on the card to the below table Press Exit to save the settings of the lens NOTE If the size of scan lens is changed the lens paramete...

Page 61: ...perform the following steps to find the appropriate lens parameter when changing a different scan field of scan lens Step 1 Create new name for the new lens Step 2 Change the mark area and press Exit...

Page 62: ...p 5 If the figure becomes protuberant in X axis the X value will need to be Increased like 0 002 while if now it become indentation the X value will have to be reduced to as 0 0014 Keep adjusting the...

Page 63: ...the adjustment range is from 0mm up to 0 5mm For 140x140mm scan lens Keep adjusting the value until it is acceptable Step 8 If there is an irregular parallelogram go to the lens parameter under the Co...

Page 64: ...CIIA Li User Manual 64 Step 10 Measure the lengths of A B C D and E of the square pattern Make sure these lengths match to the expected length you set from the marking software Step 11 If not correct...

Page 65: ...LaserPro StellarMark CIIA Li User Manual 65 Chapter 8 Basic Maintenance Cleaning the Lenses...

Page 66: ...esidue marks z To clean light residue marks apply some lens cleaner on each side of the lens Use a new lint free cloth to remove the lens cleaner Make sure that the cloth only travels in one direction...

Page 67: ...les proper connections and any abnormalities that could have an effect on marking performance and or user safety Be sure that the StellarMark is properly secured and mounted NOTE Never touch the scan...

Page 68: ...LaserPro StellarMark CIIA Li User Manual 68 Chapter 9 Appendix StellarMark CIIA LI Specification Sheet...

Page 69: ...arker Dimensions L x W x H 560 x 184 x 320 mm 620 x 200 x 150 mm 630 2 x 255 x 150 mm 620 x 200 x 150 mm 1410 x 260 x 210 mm Control Unit Dimensions L x W x H N A 500 x 420 x 192 4 mm 485 x 650 x 180...

Reviews: