background image

- 9 -  

October 17

th

, 2019 


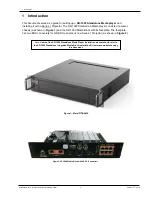
Installation Manual for SR-1000 Standalone Media Player 


3. Hardware Installation & Setup 


3  Hardware Installation & Setup 

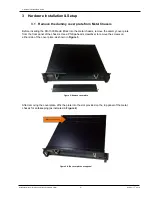
3.1  Remove the dummy cover plate from Metal Chassis 

Before inserting the SR-1000 Media Block into the metal chassis, remove the dummy cover plate 
from the front panel of the chassis. Use a Phillips-head screwdriver to remove the screws on 
either side of the cover plate, as shown in

 Figure 3

. 


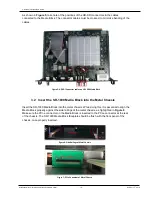
After removing the cover plate, affix the plate into the slot provided on the top panel of the metal 
chassis for safekeeping (as indicated i

Figure 4

) 


Figure 3: Remove cover plate


Figure 4: Affix cover plate on top panel 


Summary of Contents for SR-1000 STANDALONE INTEGRATED MEDIA BLOCK

Page 1: ...INSTALLATION MANUAL FOR SR 1000 STANDALONE MEDIA PLAYER For use with Series 1 Projectors Version 7 90 October 17th 2019...

Page 2: ...ist 7 3 Hardware Installation Setup 9 3 1 Remove the dummy cover plate from Metal Chassis 9 3 2 Insert the SR 1000 Media Block into the Metal Chassis 10 3 3 Connecting the SR 1000 with the Projector 1...

Page 3: ...in this manual are subject to change without notice due to continuous product development and improvements In no other event shall GDC Technology Limited be liable for any loss of profit or any other...

Page 4: ...rict Shenzhen China Tel 86 755 8608 6000 C Esteve Terradas n 27 esc D Despacho 1 08023 Barcelona Spain Tel 34 93 159 51 75 Peru Lima USA Los Angeles Brazil S o Paulo Singapore Calle Manuel Miota 170 M...

Page 5: ...Kyobashi Chuo Bldg 1 14 7 Kyobashi Chuo ku Tokyo 104 0031 Japan Tel 81 3 5524 2607 B 207 208 Everest Chambers Andheri Kurla Road Marol Andheri East Mumbai 400 059 India Tel 91 22 4044 0500 S de R L d...

Page 6: ...yer consists of a metal chassis as shown in Figure 1 and the SR 1000 Media Block with its faceplate The faceplate has two BNC connectors for HD SDI connections to a Series 1 Projector as shown in Figu...

Page 7: ...e Media Player 1 Introduction 1 1 Power Environmental Requirements Environmental Operating temperature 0 C to 40 C 32 F to 104 F Operating humidity 20 to 90 non condensing Operating altitude 10 000ft...

Page 8: ...Player 2 Packing List 2 Packing List Contents of the SR 1000 Standalone Media Player package are as listed below SR 1000 Standalone Media Player Packing List Sr No Description Quantity Actual Photogra...

Page 9: ...Standalone Media Player 2 Packing List 4 International Standard Power Cord 1 5 RJ45 AES Audio Cable 1 6 RJ45 GPIO Cables 2 7 Network Cable 1 8 RJ45 to DB25 Audio Converter 1 Subject to actual configu...

Page 10: ...ia Block into the metal chassis remove the dummy cover plate from the front panel of the chassis Use a Phillips head screwdriver to remove the screws on either side of the cover plate as shown in Figu...

Page 11: ...nsert the SR 1000 Media Block into the metal chassis While doing this it is essential to align the Media Block properly against the side railings of the metal chassis as highlighted in Figure 8 Make s...

Page 12: ...OUT2 from the Media Block to input B on the Link Decryptor A network connection is required from either the Media Block s ETH1 or ETH2 to the Projector s network port Connect a network cable between t...

Page 13: ...t PSD Pe using the eSATA cable provided in the Enterprise Storage Portable Storage box For more information regarding the SR 1000 s Network Storage setup please refer to the SR 1000 Installation Manua...

Page 14: ...he metal chassis the other end to a recommended power outlet Switch the Power button on the front panel of the chassis to ON position Once the Media Block boots up the WebUI Interface of the SR 1000 c...

Page 15: ...en select the Playback tab 3 Under the Projector section enter the IP Address of the Projector click on the Save button Set the correct macro video input to Projector is SDI on the Projector and turn...

Page 16: ...1000 Standalone Media Player 6 Converting SR 1000 from SDI Mode to IMB Mode It is possible to convert a SR 1000 in S1 mode to IMB mode so that it be used with Series 2 Series 3 Projectors Please cont...

Page 17: ...i Spain Barcelona B 207 208 Everest Chambers C Esteve Terradas Andheri Kurla Road Marol Andheri East n 27 esc D Despacho 1 Mumbai 400 059 India 08023 Barcelona Spain Tel 91 22 4044 0500 Tel 34 93 159...

Reviews: