GE Multilin
C60 Breaker Protection System
5-47
5 SETTINGS
5.2 PRODUCT SETUP
5
c) TRIP AND ALARM LEDS
PATH: SETTINGS
Ö
PRODUCT SETUP
ÖØ
USER-PROGRAMMABLE LEDS
ÖØ
TRIP & ALARM LEDS
The trip and alarm LEDs are in the first LED column (enhanced faceplate) and on LED panel 1 (standard faceplate). Each
indicator can be programmed to become illuminated when the selected FlexLogic™ operand is in the logic 1 state.
d) USER-PROGRAMMABLE LED 1(48)
PATH: SETTINGS
Ö
PRODUCT SETUP
ÖØ
USER-PROGRAMMABLE LEDS
ÖØ
USER-PROGRAMMABLE LED 1(48)
There are 48 amber LEDs across the relay faceplate LED panels. Each of these indicators can be programmed to illumi-
nate when the selected FlexLogic™ operand is in the logic 1 state.
For the standard faceplate, the LEDs are located as follows.
•
LED Panel 2: user-programmable LEDs 1 through 24
•
LED Panel 3: user programmable LEDs 25 through 48
For the enhanced faceplate, the LEDs are located as follows.
•
LED column 2: user-programmable LEDs 1 through 12
•
LED column 3: user-programmable LEDs 13 through 24
•
LED column 4: user-programmable LEDs 25 through 36
•
LED column 5: user-programmable LEDs 37 through 48
Refer to the
LED indicators
section in chapter 4 for additional information on the location of these indexed LEDs.
The user-programmable LED settings select the FlexLogic™ operands that control the LEDs. If the
LED 1 TYPE
setting is
“Self-Reset” (the default setting), the LED illumination will track the state of the selected LED operand. If the
LED 1 TYPE
set-
ting is “Latched”, the LED, once lit, remains so until reset by the faceplate RESET button, from a remote device via a com-
munications channel, or from any programmed operand, even if the LED operand state de-asserts.
TRIP & ALARM LEDS
TRIP LED INPUT:
Off
Range: FlexLogic™ operand
MESSAGE
ALARM LED INPUT:
Off
Range: FlexLogic™ operand
USER-PROGRAMMABLE
LED 1
LED 1 OPERAND:
Off
Range: FlexLogic™ operand
MESSAGE
LED 1 TYPE:
Self-Reset
Range: Self-Reset, Latched
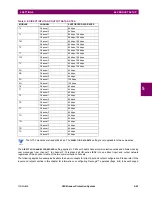
Table 5–4: RECOMMENDED SETTINGS FOR USER-PROGRAMMABLE LEDS
SETTING
PARAMETER
SETTING
PARAMETER
LED 1 operand
SETTING GROUP ACT 1
LED 13 operand
Off
LED 2 operand
SETTING GROUP ACT 2
LED 14 operand
BREAKER 2 OPEN
LED 3 operand
SETTING GROUP ACT 3
LED 15 operand
BREAKER 2 CLOSED
LED 4 operand
SETTING GROUP ACT 4
LED 16 operand
BREAKER 2 TROUBLE
LED 5 operand
SETTING GROUP ACT 5
LED 17 operand
SYNC 1 SYNC OP
LED 6 operand
SETTING GROUP ACT 6
LED 18 operand
SYNC 2 SYNC OP
LED 7 operand
Off
LED 19 operand
Off
LED 8 operand
Off
LED 20 operand
Off
LED 9 operand
BREAKER 1 OPEN
LED 21 operand
AR ENABLED
LED 10 operand
BREAKER 1 CLOSED
LED 22 operand
AR DISABLED
LED 11 operand
BREAKER 1 TROUBLE
LED 23 operand
AR RIP
LED 12 operand
Off
LED 24 operand
AR LO
Summary of Contents for C60 UR series
Page 2: ......
Page 4: ......
Page 11: ...GE Multilin C60 Breaker Protection System xi TABLE OF CONTENTS INDEX...
Page 12: ...xii C60 Breaker Protection System GE Multilin TABLE OF CONTENTS...
Page 32: ...1 20 C60 Breaker Protection System GE Multilin 1 5 USING THE RELAY 1 GETTING STARTED 1...
Page 50: ...2 18 C60 Breaker Protection System GE Multilin 2 2 SPECIFICATIONS 2 PRODUCT DESCRIPTION 2...
Page 128: ...4 30 C60 Breaker Protection System GE Multilin 4 3 FACEPLATE INTERFACE 4 HUMAN INTERFACES 4...
Page 394: ...9 4 C60 Breaker Protection System GE Multilin 9 1 FAULT LOCATOR 9 THEORY OF OPERATION 9...
Page 516: ...D 10 C60 Breaker Protection System GE Multilin D 1 OVERVIEW APPENDIXD D...
Page 528: ...E 12 C60 Breaker Protection System GE Multilin E 2 DNP POINT LISTS APPENDIXE E...


