background image

12

INSTALLATION REQUIREMENTS

IMPORTANT…Please Read Carefully

How to Connect Electricity

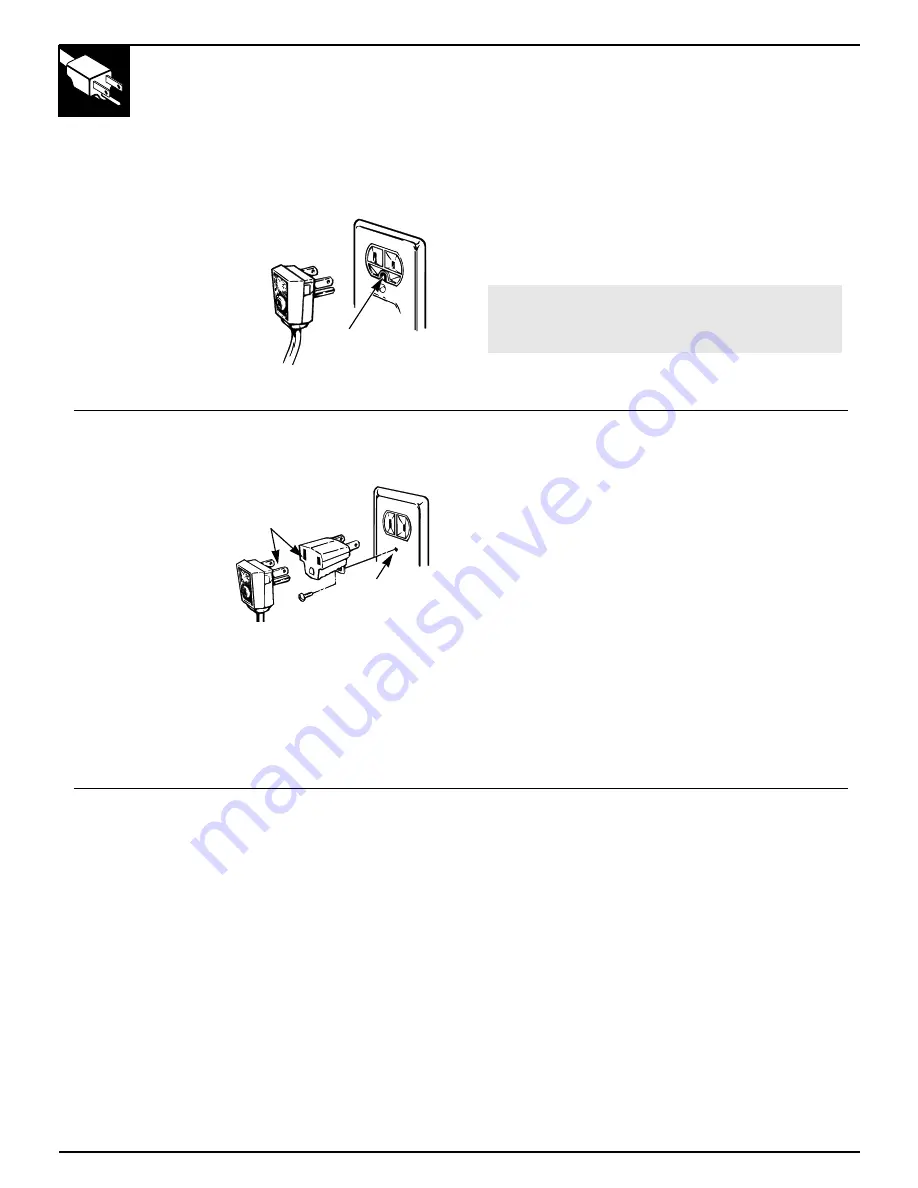
For personal safety, this appliance must
be properly grounded.

The power cord of this
appliance is equipped
with a three-prong
(grounding) plug which
mates with a standard
three-prong (grounding)
wall outlet to minimize
the possibility of electric
shock hazard from 
this appliance.

Have the wall outlet and circuit checked by a qualified
electrician to make sure the outlet is properly grounded.

If you have only a standard two-prong wall outlet, 
it is your personal responsibility and obligation to
have it replaced with a properly grounded three-
prong wall outlet.

DO NOT, UNDER ANY CIRCUMSTANCES,
CUT OR REMOVE THE THIRD (GROUNDING)
PRONG FROM THE POWER CORD.

Preferred method

Insure proper
grounding exists
before use.

Use of Adapter Plug

Because of potential 
safety hazards under
certain conditions,
we strongly
recommend against
use of an adapter
plug. However, if
you still elect to use
an adapter, where
local codes permit, 
a TEMPORARY CONNECTION may be made to 
a properly grounded two-prong wall outlet by use 
of a UL-listed adapter available at most local
hardware stores.

The larger slot in the adapter must be aligned with the
larger slot in the wall outlet to provide proper polarity
in the connection of the power cord.

CAUTION: Attaching the adapter ground terminal to
the wall outlet cover screw does not ground the
appliance unless the cover screw is metal, and not
insulated, and the wall outlet is grounded through the
house wiring. You should have the circuit checked by
a qualified electrician to make sure the outlet is
properly grounded.

When disconnecting the power cord from the
adapter, 
always hold the adapter with one hand while
pulling the power cord plug with the other hand. If
this is not done, the adapter ground terminal is very
likely to break with repeated use.

Should the adapter ground terminal break, DO
NOT USE the appliance until a proper ground has
again been established.

Electrical Requirements

Use of Extension Cords

The refrigerator should always be plugged into its
own individual electrical outlet 
which has a voltage
rating that matches the rating plate.

This provides the best performance and also prevents
overloading house wiring circuits, which could cause
a fire hazard from overheating wires.

Because of potential safety hazards under certain
conditions, we strongly recommend against the use of
an extension cord. However, if you still elect to use an
extension cord, it is absolutely necessary that it be a
UL-listed 3-wire grounding type appliance extension
cord having a grounding type plug and outlet and that
the electrical rating of the cord be 15 amperes
(minimum) and 120 volts.

Temporary method

(Adapter plugs not
permitted in Canada.)

Align large prongs/slots.

Insure proper
grounding and firm
connection exists
before use.

Summary of Contents for 14

Page 1: ...nd Refrigerator 10 Cleaning Outside and Inside 9 Drawer and Cover Removal 10 16 Light Bulb Replacement 10 Under Refrigerator 9 Problem Solver 19 20 Normal Operating Sounds 19 More questions call GE An...

Page 2: ...ces page in the back of this guide We re proud of our service and want you to be pleased If for some reason you are not happy with the service you receive here are three steps to follow for further he...

Page 3: ...mechanism or with the heating element that releases the cubes Do not place fingers or hands on the automatic ice making mechanism while the refrigerator is plugged in Don t refreeze frozen foods which...

Page 4: ...replace select desired shelf height With shelf front raised slightly hook the bracket s top lug into the track then lower the shelf onto the support NOTE The shelf to the right of the track is design...

Page 5: ...ght ends from holes in the cabinet wall 3 Lower right side of shelf move shelf to the right and take it out To replace the step shelf 1 With shelf tilted as shown fit left ends of shelf into holes in...

Page 6: ...erries Peas green Asparagus Corn Plums Beets Currants Radishes topped Greens Rhubarb Blueberries leafy Spinach Carrots Lettuce Tomatoes Celery Parsley ripe As in any refrigerated storage area it is re...

Page 7: ...is to be removed for a period of time Going away on vacation Turning the temperature control to the OFF position If ice is not used often old cubes will become cloudy and taste stale and will shrink E...

Page 8: ...reserve the natural moisture and freshness of produce Covering vegetables with a moist towel helps maintain crispness As a further aid to freshness prepackaged vegetables can be stored in their origin...

Page 9: ...rol back on For best results use a brush specially designed for this purpose It is available at most appliance part stores This easy cleaning operation should be done at least once a year continued ne...

Page 10: ...ator counter clockwise until the rollers support the refrigerator then pull the refrigerator straight out and return it to position by pushing it straight in Moving your refrigerator in a side directi...

Page 11: ...to add an icemaker later the icemaker will have to be connected to a cold water line There should be sufficient tubing for the icemaker from the cold water supply to allow moving the refrigerator out...

Page 12: ...ng the adapter ground terminal to the wall outlet cover screw does not ground the appliance unless the cover screw is metal and not insulated and the wall outlet is grounded through the house wiring Y...

Page 13: ...ts to avoid using them in the wrong places When reinstalling door hinges be sure to use the same number of shims and washers as were originally used IMPORTANT Once you begin do not move the cabinet un...

Page 14: ...e side 4 REVERSE CABINET HARDWARE 1 Transfer the bottom hinge to the left a Remove the base grille if your refrigerator has one Grasp it at the bottom and pull it straight out b Using a Torxdriver rem...

Page 15: ...of the door b Remove the handle c Remove the screw from the right top edge of the door and insert it into the handle screw hole on the left side d Transfer the door stop as shown at left TOP BOTTOM RE...

Page 16: ...COVERED SNACKS DRAWER on some models For convenient access to the Snacks drawer after reversing the door swing you can move the drawer to the other side of the cabinet 1 Slide the drawer out and remov...

Page 17: ...self piercing valve Copper tubing 1 4 outer diameter to connect the refrigerator to the water supply Be sure both ends of the tubing are cut square To determine how much copper tubing you need measure...

Page 18: ...E Tighten any connections that leak 7 MOVE THE REFRIGERATOR BACK TO THE WALL Arrange the coil of copper tubing so that it does not vibrate against the back of the refrigerator or against the wall 10 S...

Page 19: ...SE THIS PROBLEM SOLVER Water Line Installation The Problem Solver NORMAL OPERATING SOUNDS These sounds are normal and do not indicate a need for service The new high efficiency compressor runs faster...

Page 20: ...ft ajar OF ICE CUBES Turn temperature control to colder setting ICE CUBES HAVE Old cubes need to be discarded ODOR TASTE Ice storage bin needs to be emptied and washed Unsealed packages in refrigerato...

Page 21: ...NOTES 21 Problem Solver...

Page 22: ...22 NOTES...

Page 23: ...ur call and your question will be answered promptly and courteously And you can call any time GE Answer Center service is open 24 hours a day 7 days a week Parts and Accessories 800 626 2002 Individua...

Page 24: ...ting the product please contact your dealer or our Consumer Affairs office at the address below or call toll free GE Answer Center 800 626 2000 consumer information service Improper installation If yo...

Reviews: