3 SETUP AND USE
g
GE Power Management
62
3.10 Unbalance Setpoints
Unbalanced three phase supply voltages are a major cause of induction motor thermal damage. Unbalance can be
caused by a variety of factors and is common in industrial environments. Causes can include increased resistance
in one phase due to pitted or faulty contactors, transformer faults and unequal tap settings, or non-uniformly
distributed three phase loads. The incoming supply to a plant may be balanced but varying single phase loads
within the plant can cause voltage unbalance at the motor terminals. The most serious case of unbalance is single
phasing which is the complete loss of one phase of the incoming supply. This can be caused by a utility supply
problem or by a blown fuse in one phase and can seriously damage a three phase motor.
Unbalance at the motor terminals means an increase in the applied negative sequence voltage. This results in a
large increase in the negative sequence current drawn by the motor due to the relatively small negative sequence
impedance of the rotor. This current is normally at about twice the power supply frequency and produces a torque in
the opposite direction to the desired motor output. For small unbalances the overall output torque will remain
constant, but the motor will be developing a large positive torque to overcome the negative sequence torque. These
opposing torques and the high negative sequence current produce much higher rotor losses and consequently
greatly increased rotor heating effects. Stator heating is increased as well, but to a much smaller extent. The
amount of unbalance that a given motor can tolerate is therefore dependent on the rotor design and heat dissipation
characteristics.
Persistent, minor voltage unbalance can thus lead to rotor thermal damage while severe unbalance such as single
phasing can very quickly lead to a motor burnout.
For phase currents above 100% FLC, the 169 relay calculates the ratio of the negative to positive sequence currents
(In/Ip) and uses this ratio in two separate protective functions . It is used to bias the thermal memory of the relay
which represents the thermal capacity of the motor as a whole (this can be enabled in SETPOINTS mode, page 5,
169 Plus only), and it is used for separate unbalance protection. The method of determining In/Ip is independent of
actual line frequency or phase current lead/lag characteristics, and when enabled is used with the In/Ip ratio to bias
the thermal memory (see section 3.20). This negative sequence unbalance method provides readings similar to the
NEMA unbalance calculation but gives more realistic results for the thermal effect of unbalance on the motor. For
phase currents below 100% FLC, the relay calculates the ratio of In to full load current (In/IFLC) and uses this to
provide protection. This avoids nuisance trips due to relatively high levels of In with lower levels of Ip that may
create high U/B levels at low loads.
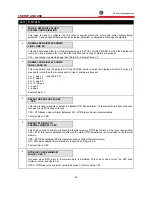
For separate unbalance protection, trip and alarm In/Ip ratios may be chosen along with appropriate persistence
times (time delays) in SETPOINTS mode, page 1. If no separate unbalance protection is desired the trip and alarm
levels should be set to "OFF". The delay times will then be disregarded by the relay. Above 100% FLC, if an
unbalance of more than 30% persists for more than 4 seconds, a "SINGLE PHASE TRIP" will result. Below 100%
FLC, if motor load is >25%, and any one phase reads zero, this will also be considered a single phase condition.
Note: If the "UNBALANCE TRIP LEVEL" is set to "OFF" single phase protection will be turned off.
Summary of Contents for 169
Page 12: ......
Page 14: ...2 INSTALLATION g GE Power Management 8 Figure 2 2 CT Dimensions ...
Page 17: ...2 INSTALLATION g GE Power Management 11 Figure 2 4 Relay Wiring Diagram AC control power ...
Page 19: ...2 INSTALLATION g GE Power Management 13 Figure 2 6 Relay Wiring Diagram Two Phase CTs ...
Page 20: ...2 INSTALLATION g GE Power Management 14 Figure 2 7 Relay Wiring Diagram DC Control Power ...
Page 28: ...2 INSTALLATION g GE Power Management 22 Figure 2 10 169 Drawout Relay Physical Dimensions ...
Page 29: ...2 INSTALLATION g GE Power Management 23 Figure 2 11 169 Drawout Relay Mounting ...
Page 31: ...3 SETUP AND USE g GE Power Management 25 Figure 3 1 Front Panel Controls and Indicators ...
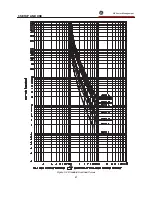
Page 73: ...3 SETUP AND USE g GE Power Management 67 Figure 3 2 Standard Overload Curves ...
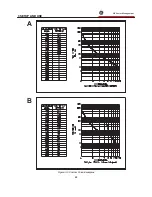
Page 74: ...3 SETUP AND USE g GE Power Management 68 A B Figure 3 3 Custom Curve Examples ...
Page 88: ...5 THEORY OF OPERATION g GE Power Management 82 Figure 5 1 Hardware Block Diagram ...
Page 90: ...5 THEORY OF OPERATION g GE Power Management 84 Figure 5 2 Firmware Block Diagram ...

