background image

1

T

ABLE


OF

 C

ONTENTS

T

ABLE


OF

 C

ONTENTS

............................................................................................. 1

I

NTRODUCTION

..................................................................................................... 4

B

EFORE

 Y

OU

 B

EGIN

.............................................................................................. 5

P

ARTS

 C

HECKLIST

............................................................................................. 5

M

ODULAR

 J

ACK

 R

EQUIREMENTS

......................................................................... 6

G

ETTING

 S

TARTED

............................................................................................ 6

I

NSTALLATION

....................................................................................................... 7

D

ESKTOP

 I

NSTALLATION

.................................................................................. 7

W

ALL

 M

OUNT

 I

NSTALLATION

.......................................................................... 9

S

ETTING

 U

P

 Y

OUR

 S

TATION

 A

DDRESS

............................................................... 11

C

HANGING


THE

 P

HONE

TO


A

 2-9450 M

ODEL

............................................................................... 13

S

YSTEM

 V

ERIFICATION

..................................................................................... 14

O

THER

 S

TATIONS

........................................................................................ 14

Y

OUR

 S

TATION

........................................................................................... 14

C

LOCK

 S

ETUP

................................................................................................ 15

P

ROGRAMMING


THE

 H

OUR

 F

ORMAT

................................................................ 15

S

ETTING


THE

 T

IME

....................................................................................... 15

H

EADSET

....................................................................................................... 15

B

ASIC

 O

PERATION

............................................................................................... 16

M

AKING

 O

UTSIDE

 C

ALLS

................................................................................. 16

U

SING


THE

 H

ANDSET

................................................................................... 16

U

SING


THE

 S

PEAKERPHONE

........................................................................... 16

U

SING


THE

 H

EADSET

................................................................................... 17

R

ECEIVING

 I

NCOMING

 C

ALLS

............................................................................. 17

U

SING


THE

 H

ANDSET

................................................................................... 17

U

SING


THE

 S

PEAKERPHONE

........................................................................... 17

U

SING


THE

 H

EADSET

................................................................................... 18

S

WITCHING

 B

ETWEEN

 U

SING


THE

 S

PEAKERPHONE

, H

ANDSET

AND

 H

EADSET

......... 18

T

IMER

........................................................................................................... 18

M

UTE

........................................................................................................... 19

D

O

 N

OT

 D

ISTURB

........................................................................................... 19

H

OLD

............................................................................................................ 20

P

LACING


A

 C

ALL


ON

 H

OLD

............................................................................ 20

P

ICKING

 U

P


A

 C

ALL


ON

 H

OLD

....................................................................... 20

F

LASH

........................................................................................................... 20

T

EMPORARY

 T

ONE

.......................................................................................... 20

R

EDIAL

.......................................................................................................... 21

Summary of Contents for 2-9451

Page 1: ...ATIONS 14 YOUR STATION 14 CLOCK SETUP 15 PROGRAMMING THE HOUR FORMAT 15 SETTING THE TIME 15 HEADSET 15 BASIC OPERATION 16 MAKING OUTSIDE CALLS 16 USING THE HANDSET 16 USING THE SPEAKERPHONE 16 USING T...

Page 2: ...INTERCOM 26 INTERCOMING A STATION 26 OVERRIDING A STATION USING DO NOT DISTURB 27 RECEIVING AN INTERCOM 27 PAGING ALL STATIONS 27 PAGING A GROUP 28 DISABLING OR ENABLING PAGE 28 MEMORY 29 STORING A NU...

Page 3: ...ELECTRIC SHOCK DO NOT REMOVE COVER O R B A C K N O U S E R SERVICEABLE PARTS IN SIDE REFER SERVICING TO QUALIFIED SERVICE PERSONNEL SPECIAL FEATURES 35 ADJUSTING THE RINGERS 35 ADJUSTING THE CONTRAST...

Page 4: ...es and to serve up to 16 station users In an installed system your phone provides such features as 32 memory locations busy redial hold conference call intercom call transfer LCD display and speakerph...

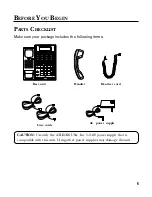
Page 5: ...L FLASH PAUSE TRANSFER CONF CALL PRIVACY LINE 4 LINE 3 LINE 2 LINE 1 INTERCOM VOLUME HEADSET MUTE SPEAKERPHONE HOLD PAGE WXYZ 9 MNO 6 DEF 3 TUV 8 JKL 5 ABC 2 OPER0 PQRS7 GHI 4 1 TONE Handset cord Hand...

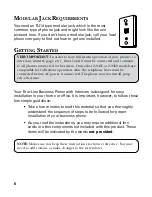
Page 6: ...few simple guidelines Take a few minutes to read this material so that you thoroughly understand the sequence of steps to be followed for proper installation of your business phone As you read the in...

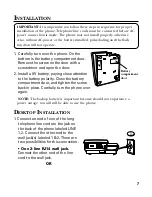
Page 7: ...door with a screwdriver and open the door 2 Install a 9V battery paying close attention to the battery polarity Close the battery compartment door and tighten the screw back in place Carefully turn th...

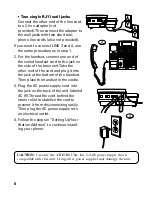
Page 8: ...onnect the adapter to the wall jacks with two short tele phone line cords also not provided If you want to connect LINE 3 and 4 use the same procedure as in step 1 2 For the handset connect one end of...

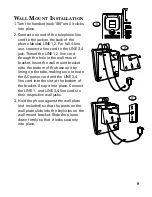
Page 9: ...ert the wall mount bracket onto the bottom of the base unit by lining up the tabs making sure to route the AC power cord and the LINE 3 4 line cord into the slot at the bottom of the bracket Snap it i...

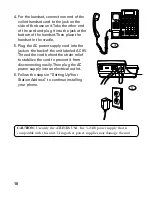
Page 10: ...t from disconnecting easily Then plug the AC power supply into an electrical outlet 6 Follow the steps in Setting UpYour Station Address to continue installing your phone STORE IN TIMER TIME SET MEMO...

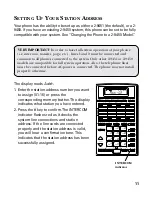
Page 11: ...s is valid you will hear a confirmation tone This indicates that the station address has been successfully assigned VERY IMPORTANT In order to have full system operation of your phone i e intercom tra...

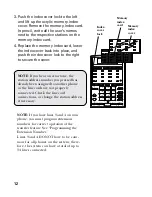
Page 12: ...nge the station address if necessary 3 Push the index cover lock to the left and lift up the acrylic memory index cover Remove the memory index card In pencil write all the user s names next to the re...

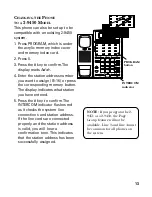
Page 13: ...ks the system line connections and station address If the line cords are connected properly and the station address is valid you will hear a confirmation tone This indicates that the station address h...

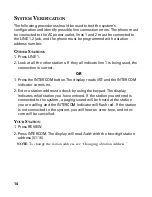
Page 14: ...t OR 1 Press the INTERCOM button The display reads INT and the INTERCOM indicator comes on 2 Enter a station address to check by using the keypad The display indicates what station you have entered If...

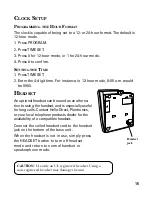
Page 15: ...ptional headset can be used as an alterna tive to using the handset and is especially useful for long calls Contact Hello Direct Plantronics or your local telephone products dealer for the availabilit...

Page 16: ...ill select an open line 2 Wait for a dial tone 3 Dial a phone number 4 Hang up the handset when finished USING THE SPEAKERPHONE 1 Press the SPEAKERPHONE button and the phone will select an open line 2...

Page 17: ...ton is pressed RECEIVING INCOMING CALLS USING THE HANDSET When the phone rings the corresponding line s indicator flashes rapidly 1 Pick up the handset The line is automatically selected 2 When you ar...

Page 18: ...G THE SPEAKERPHONE HANDSET AND HEADSET To switch to the speakerphone press SPEAKERPHONE The speakerphone indicator will come on To switch to the handset pick up the handset The speakerphone or headset...

Page 19: ...t at individual telephones to disable silence an incoming ring signal intercom or page To program the duration of Do Not Disturb see Adjusting Do Not Disturb 1 While the phone is not in use press PRIV...

Page 20: ...OTE The call on hold can be picked up at any station using this procedure FLASH Use the FLASH button to activate custom calling services such as call waiting or call transfer which are available throu...

Page 21: ...FER 1 Press REVIEW 2 Press REDIAL The last number stored in the redial buffer shows on the display AUTOMATIC BUSY REDIAL If the phone number dialed is busy your telephone can automatically redial the...

Page 22: ...n the line pressTRANSFER 2 Within 5 seconds of pressingTRANSFER press the 2 digit station location button 01 16 or memory button where you wish to transfer the call The line s indicator blinks yellow...

Page 23: ...lay RECEIVING A TRANSFER FROM ANOTHER STATION If a call is being transferred to your station you will hear a different ring sound The indicator of the line being transferred to you flashes yellow To a...

Page 24: ...VACY again or hang up NOTE If you put a call on hold while in Privacy no one but you can access the line on hold VOLUME The ringer speaker and handset headset volumes can be set independently with the...

Page 25: ...is in use press the VOLUME up or down buttons to the desired volume The phone will store the setting once the button is released NOTE The handset and headset volumes will return to the default settin...

Page 26: ...hone nor the headset can be in use for this feature to work INTERCOMING A STATION 1 If the INTERCOM indicator is red it is in use Wait until the indicator goes out 2 Press INTERCOM The indicator will...

Page 27: ...ss LOWER then PRIVACY The intercom will then ring at the desired station NOTE This only overrides the privacy at the station you are trying to reach All other stations using DND will be unaffected REC...

Page 28: ...this mode After 30 seconds the page will be cancelled 7 When finished hang up NOTE To program your own page group number see Programming Your Page Group Also phones which have the page function disabl...

Page 29: ...in upper memory simply press the memory location button If you want to store it in lower memory press the LOWER button The red indicator comes on Press the memory location button where you want to sto...

Page 30: ...tion stored in one of the locations to be linked For example Memory Location Local access number of long 6 distance company Authorization code ID 7 Where entire sequence is to be stored 8 including lo...

Page 31: ...line STORING A FLASH Use the FLASH button to insert a flash into your stored numbers for special features from your telephone company which may require it SPECIAL MEMORY STORAGE INFORMATION If more t...

Page 32: ...process allows you to dial a succession of stored numbers from separate memory locations This is useful when you must dial several sequences of numbers such as with frequent calls via a telephone com...

Page 33: ...RING A MEMO With this feature you are able to temporarily store a number into memory up to 30 digits even while you are on the phone 1 Press MEMO 2 Enter the phone number you want to store using the k...

Page 34: ...that person to fax something to you change the DATA PORT switch to LINE 2 or LINE 3 and give the person the phone number for line 2 or line 3 Your fax machine now can receive calls on line 2 or line 3...

Page 35: ...ent ringer sounds 0 disables 4 Press to confirm NOTE The line indicators will still continue to flash for incoming calls even with the ringer disabled ADJUSTING THE CONTRAST OF THE DISPLAY 1 Press STO...

Page 36: ...5 Press to confirm NOTE To change the priority line repeat the same process but choose a different line in step 4 PROGRAMMING THE PAUSE DURATION 1 Press PROGRAM 2 Press PAUSE 3 Press the amount for t...

Page 37: ...NG A PAGE GROUP Your station can be assigned to one of a total of 9 groups for the paging functions Each station in a page group must be programmed as follows 1 Press PROGRAM 2 Press PAGE PAGE shows o...

Page 38: ...the time between call attempts is set for 30 seconds but can be adjusted in 10 second increments between 0 and 90 seconds 1 Press PROGRAM 2 Press BUSY REDIAL 3 Press the keypad digit 0 9 to set the de...

Page 39: ...COM 4 Press the digit for the desired default mode Press 1 for automatic intercom operation during intercom or 0 for manual intercom operation 5 Press to confirm CHANGING A STATION ADDRESS 1 Press PRO...

Page 40: ...ot be compatible with your local dialing service Disconnect the phone from the wall jack and connect another phone to the same jack If there is no dial tone in the second phone the problem might be yo...

Page 41: ...needs replacing or is not installed blinks or is solid Intercom does not Make sure lines 1 and 2 are connected properly and function correctly common to all phones on the system Make sure all station...

Page 42: ...ill still be able to use the phone 1 Carefully turn over the phone On the bottom is the battery compartment door Remove the screw on the door with a screwdriver 2 Open the door and remove the old batt...

Page 43: ...trical noise for example motors or fluorescent lamps DO NOT expose to direct sunlight or moisture Avoid dropping the handset as well as other rough treatment to the phone Clean the phone with a soft c...

Page 44: ...o obtain service refer to the warranty included in this guide or call Consumer Information at 1 800 448 0329 Or refer inquiries to ATLINKS USA Inc Manager Consumer Relations P O Box 1976 Indianapolis...

Page 45: ...13 Cleaning the Phone 43 Clock Setup 15 Conference 25 D DATA PORT jack 34 Desktop Installation 7 Do Not Disturb 19 F Flash 20 G General Product Care 43 H Headset 15 Hold 20 I Installation 7 Intercom...

Page 46: ...tery 42 S Service 44 Setting Auto Intercom 39 Setting the Priority Line 36 Setting UpYour Station Address 11 Special Features 35 System Verification 14 T Timer 18 TONE Button 20 Transfer 22 Troublesho...

Page 47: ...modified or incorporated into other products Products purchased or serviced outside the USA Acts of nature such as but not limited to lightning damage Product Registration Please complete and mail th...

Page 48: ...Model 29451 15339430 Rev 3 E S 01 43 Printed in China ATLINKS USA Inc 10330 North Meridian Street Indianapolis IN 46290 2001 ATLINKS USA Inc Trademark s Registered Marca s Registrada s...

Page 49: ...D E INSTALACI N DE AUD FONOS 15 OPERACI N B SICA 16 PARA HACER LLAMADAS HACIA AFUERA 16 USO DEL AURICULAR 16 USO DEL ALTAVOZ 16 USO DE LOS AUD FONOS 17 PARA RECIBIR LLAMADAS 17 USO DEL AURICULAR 17 US...

Page 50: ...ADOR VOCEAR 28 MEMORIA 28 PARA ALMACENAR UN N MERO 29 PARA CAMBIAR UN N MERO ALMACENADO 29 PARA ALMACENAR UNA CADENA DE N MEROS 30 PARA ALMACENAR EL LTIMO N MERO DISCADO 31 PARA ALMACENAR UNA PAUSA 31...

Page 51: ...PARA PREVENIR EL RIESGO DE UNFUEGO O DE UNA SACUDIDA ELECTRICA NO EXPONGA ESTE APARATO A LA LLUVIA O A LA HUMEDAD VEA ADVERTENCIA EN LA PARTE POSTERIOR BASE DEL PRODUCTO ATTENTION RIESGODESACUDIDA EL...

Page 52: ...staciones En un sistema instalado su tel fono es capaz de ofrecerle funciones como 32 localizaciones de memoria rediscado de n mero ocupado espera llamada de conferencia interfono transferencia de lla...

Page 53: ...SFER CONF CALL PRIVACY LINE 4 LINE 3 LINE 2 LINE 1 INTERCOM VOLUME HEADSET MUTE SPEAKERPHONE HOLD PAGE WXYZ 9 MNO 6 DEF 3 TUV 8 JKL 5 ABC 2 OPER0 PQRS7 GHI 4 1 TONE Cable del auricular Auricular Base...

Page 54: ...dicaciones Tome unos minutos para leer este material para que usted entienda perfectamente la secuencia en los pasos a seguir para la instalaci n adecuada de su tel fono de negocios Cuando lea las ins...

Page 55: ...to de la bater a Quite el tornillo de la puerta con un destornillador y abra la puerta 2 Instale una bater a de 9V poniendo atenci n a la polaridad de la bater a Cierre la puerta del compartimento de...

Page 56: ...auricular conecte un extremo del cable espiral en el contacto al costado de la base del aparato Tome el otro extremo del cable y con ctelo en el enchufe en la parte de abajo del auricular Despu s col...

Page 57: ...arte de abajo de la base del aparato alineando las leng etas y asegur ndose de guiar el cable de corriente y el cable telef nico marcado LINE 3 4 a trav s de la ranura en la parte de abajo de la placa...

Page 58: ...ar que se desconecte facilmente Despu s conecte el cable de corriente AC en un contacto el ctrico 6 Siga los pasos en la secci n de Para programar la direcci n de su estaci n para continuar instalando...

Page 59: ...s la que usted ha inscrito 2 Oprima la tecla para confirmar El indicador del interfono INTERCOM parpadear en verde y rojo mientras verifica las conecciones de los cables de l neas y la direcci n de la...

Page 60: ...e la estaci n si fuera necesario 3 Oprima el seguro de la cubierta del ndice hacia la izquierda y levante la cubierta de acr lico del ndice de la memoria Quite la tarjeta del ndice de memoria Con l pi...

Page 61: ...cciones de las l neas telef nicas y las direcciones de las estaciones Si los cables de las l neas telef nicas est n conectados adecuadamente y la direcci n de la estaci n es v lida usted escuchar un t...

Page 62: ...ono INTERCOM El visor muestra INT y el indicador de interfono se enciende 2 Inscriba una direcci n de estaci n para verificar usando el teclado El visor indicar a cu l estaci n usted ha entrado Si la...

Page 63: ...onos opcionales se pueden usar como alternativa al auricular y es especialmente til para llamadas largas Cheque con Hello Direct Plantronics o un representante de productos telef nicos para ver si tie...

Page 64: ...2 Espere al tono de marcar 3 Marque el n mero telef nico 4 Cuelgue el auricular una vez que ha terminado USO DEL ALTAVOZ 1 Oprima el bot n del altavoz SPEAKERPHONE y el tel fono seleccionar una l nea...

Page 65: ...n de aud fonos PARA RECIBIR LLAMADAS USO DEL AURICULAR Cuando el tel fono timbra el indicador de la l nea correspondiente parpadea rapidamente 1 Levante el auricular La l nea es seleccionada automatic...

Page 66: ...USO ALTERNO DE ALTAVOZ AURICULAR Y AUD FONOS Para usar el altavoz oprima el bot n SPEAKERPHONE El indicador del altavoz se encender Para cambiar a auricular levante el auricular La funci n del altavo...

Page 67: ...fono o localizador Para programar la duraci n de la funci n de No Molestar vea la secci n Ajuste de la funci n de No Molestar 1 Mientras el tel fono no est en uso oprima el bot n PRIVACY El indicador...

Page 68: ...de centelleo FLASH para activar los servicios especiales al cliente como llamada en espera o transferencia de llamadas las cuales son disponibles a trav s de su compa a de larga distancia TONO TEMPORA...

Page 69: ...ma REDIAL El ltimo n mero almacenado en el amortiguador de rediscado se muestra en el visor REDISCADO AUTOM TICO DE N MERO OCUPADO Si el n mero telef nico discado est ocupado su tel fono puede automat...

Page 70: ...ersona que llama en la l nea oprima TRANSFER 2 Dentro de 5 segundos despu s de oprimir TRANSFER oprima el n mero de la localizaci n de la estaci n 01 16 o el bot n de memoria a donde usted desea trans...

Page 71: ...e tono diferente El indicador de la l nea que se le est transfiriendo parpadear en amarillo Para contestar esa llamada oprima el bot n de esa l nea Si usted est en otra l nea cuando esta llamada le es...

Page 72: ...a su gusto Para volver al programa pre establecido oprima ambos botones para aumentar o disminuir el volumen simultaneamente Hay 15 diferentes programaciones posibles para cada modalidad Un tono le i...

Page 73: ...nea que usted quiera Si usted ya tiene a alguien en la l nea siga al paso 2 2 Oprima HOLD 3 Haga una llamada desde otra l nea 4 Oprima CONFERENCE 5 Hable con las dos personas NOTA Si usted tiene a m...

Page 74: ...u indicador del interfono parpadear en rojo Si la estaci n que usted ha llamado no contesta en 90 segundos la funci n del interfono ser cancelada Cuando la persona que usted quer a llamar contesta el...

Page 75: ...lguien est tratando de comunicarse por interfono con usted El visor tambi n indicar Int seguido de la direcci n de la estaci n que est intentando comunicarse con usted Oprima INTERCOM Levante el auric...

Page 76: ...llos que est n en modalidad de No Molestar no pueden ser voceados La funci n del localizador PAGE unicamente puede llevarse a cabo desde el auricular o aud fonos PARA ACTIVAR O DESACTIVAR EL LOCALIZAD...

Page 77: ...n n mero de la persona que usted ha almacenado en esta localizaci n en el espacio correspondiente en la tarjeta del ndice de la memoria 6 Repita los pasos 1 5 para cada n mero adicional que usted quie...

Page 78: ...n mero de larga distancia Para almacenar 1 Oprima STORE IN 2 Oprima la localizaci n de la memoria 6 3 Oprima PAUSE 4 Oprima la localizaci n de la memoria 7 5 Oprima PAUSE 6 Inscriba el n mero de larga...

Page 79: ...que le ofrece su compa a telef nica en sus n meros almacenados INFORMACI N ESPECIAL DEL ALMACENAMIENTO DE MEMORIA Si se intenta almacenar un n mero de m s de 30 d gitos se escuchar un tono de error y...

Page 80: ...entes localizaciones de la memoria Esto es til cuando usted tiene que marcar varias secuencias de n meros como llamadas frecuentes a su compa a de llamadas de larga distancia Por ejemplo Localizaci n...

Page 81: ...ADO Con esta funci n usted puede temporalmente almacenar un n mero en la memoria hasta de 30 d gitos incluso cuando usted est en el tel fono 1 Oprima MEMO 2 Inscriba el n mero telef nico que usted qui...

Page 82: ...l nea 4 y quiere que esa persona le mande un fax cambie el selector del Puerto de Informaci n a la l nea 2 o l nea 3 y de a la persona el n mero telef nico de la l nea 2 o 3 Su m quina de fax puede a...

Page 83: ...DEL VISOR 1 Oprima STORE IN 2 Oprima el bot n para aumentar el volumen VOLUME up para aumentar el contraste y el bot n para disminuir el volumen VOL UME down para disminuirlo 3 Oprima para confirmar N...

Page 84: ...r el tono de marcar aut m tico 4 Oprima para confirmar PROGRAMACI N DE LA DURACI N DE LA FUNCI N ESPECIAL EN FLASH 1 Oprima PROGRAM 2 Oprima FLASH 3 Oprima la duraci n 0 9 que desee 1 100 ms 9 900ms L...

Page 85: ...r NOTA El n mero pre programado como localizador de grupo es el 0 si otro d gito no ha sido asignado PROGRAMACI N DE LA MODALIDAD DE DISCADO PULSO TONO 1 Oprima PROGRAM 2 Oprima La tecla del asterisco...

Page 86: ...REDIAL 3 Oprima el d gito en el teclado de 0 9 para programar el intervalo deseado correspondiente a 0 90 segundos 4 Oprima para confirmar AJUSTE DEL TIEMPO DE ESPERA PARA DETECTAR TONO DE OCUPADO Th...

Page 87: ...el d gito para la modalidad deseada Oprima 1 para la operaci n autom tica de interfono durante funci n de interfono o 0 para operaci n manual de interfono 5 Oprima para confirmar PARA CAMBIAR LA DIRE...

Page 88: ...so o tono puede ser no compatibles con su servicio de discado local Desconecte al aparato de la pared y conecte otro aparato al mismo contacto Si no hay tono de marcar en el segundo aparato el problem...

Page 89: ...anece encendido El interfono no funciona Aseg rese de que las l neas 1 y 2 est conectadas correctamente adecuadamente y son comunes de todos los aparatos del sistema Aseg rese de que todas las direcci...

Page 90: ...el fono 1 Cuidadosamente voltee el tel fono En la parte de abajo est la puerta del compartimento de la bater a Quite el tornillo de la puerta con un destornillador 2 Abra la puerta y saque la bater a...

Page 91: ...itivos que generen interferencia el ctrica ejemplo motores o l mparas fluorescentes No lo exponga a la luz solar directa o a la humedad No deje caer la extensi n m vil y no maltrate el tel fono Limpie...

Page 92: ...operar este producto Para recibir instrucciones sobre c mo obtener servicios de mantenimiento por favor consulte la garant a incluida en esta Gu a o llame a Informaci n para el Usuario 1 800 448 0329...

Page 93: ...s Especiales 35 G Garant a limitada 47 Gu a para soluci n de problemas 40 I Informaci n especial del almacenamiento de memoria 31 Instalaci n 7 Instalaci n de la l nea prioritaria 35 Instalaci n sobre...

Page 94: ...en una localizac 33 Para revisar un recado 33 Para usar el localizador voceador en todas las e 27 Para usar el localizador voceador en un grupo 27 Privac a 23 Programaci n de la duraci n de la funci...

Page 95: ...de los Estados Unidos Desastres naturales por ejemplo y sin limitarse a ellos da os por rel mpagos Registro del Producto Por favor llene y env e por correo laTarjeta de Registro del Producto que se e...

Page 96: ...Modelo 29451 15339430 Rev 3 E S 01 43 Impreso en China ATLINKS USA Inc 10330 North Meridian Street Indianapolis IN 46290 2001 ATLINKS USA Inc Trademark s Registered Marca s Registrada s...

Reviews: