background image

38


7/28/2011 

With hub removed, Coarse Filter can now be removed 

Summary of Contents for 2011 E - Star

Page 1: ...Dishwasher Training 2011 New Door Configuration 2011 E Star ...

Page 2: ... on Plastic Tubs Top controls new console and tactile UI for control Locking connectors on harnesses Pocket handle and towel bar handle models Racking improvements upper rack slides tine spacing improvements Gray tubs and inner doors New Product Entry level Top Controls on SS Tubs Top controls new console and tactile UI same as above Limited pocket handle models Current front control New pocket ha...

Page 3: ...r the interpretation of this information nor can it assume any liability in connection with its use WARNING To avoid personal injury disconnect power before servicing this product If electrical power is required for diagnosis or test purposes disconnect the power immediately after performing the necessary checks RECONNECT ALL GROUNDING DEVICES If grounding wires screws straps clips nuts or washers...

Page 4: ... safety glasses with side shields safety gloves steel toe shoes for all repairs Dyneema Cut Resistant Glove Steel Toe Shoes Plano Safety Glasses VR Gloves provide shock protection Prescription Safety Glasses Safety Glasses must be compliant with ANSI Z87 1 2003 ...

Page 5: ...5 7 28 2011 Front Control Top Control ...

Page 6: ...6 7 28 2011 New Door components Tactile Control Buttons Vent Pocket Door Handle and Front Light Indicator Lens ...

Page 7: ...08V GLD4968V GLD4500V GLD4550V GLD4560V GLD5606V GLD5656V GLD5666V GLD4604V GLD4644V GLD4664V GLD5706V GLD5756V GLD5766V GLC5604V GLD5808V GLD5868V GLD5604V GLD5654V GLD5664V GLD7706V GLD7766V GLD5600V GLD5660V GLD7708V GLD7768V GLD7806V GLD7866V GDET106V GDWT166V ...

Page 8: ...3 8 3 gallons 54 143 minutes Light 7 6 10 5 gallons 46 88 Minutes Min low soil Max high soil and all options selected 35 minute heated dry in Normal Wash 45 minute dry in Auto Sanitize and Light Wash Steam Option adds 15 minutes to cycle Some models do not have an Auto Cycle Use and Care shows Minimum Times No Enhancements ...

Page 9: ...Light 7 6 10 5 gallons 46 88 Minutes China Crystal 9 2 gallons 41 minutes Timed Cycle Rinsed Only 1 2 gallons 7 minutes Min low soil Max high soil and all options selected 35 minute heated dry in Normal Wash 45 minute dry in Auto Sanitize and Light Wash Steam Option adds 15 minutes to cycle Some models do not have an this Cycle Use and Care shows Minimum Times No Enhancements ...

Page 10: ...sh Wash Wash Wash Wash Wash Wash Rinse Water Valve seconds 63 17 17 63 21 63 21 21 63 23 23 Circulation minutes 5 5 5 15 2 10 15 30 2 3 10 Heater minutes 17 7 10 15 30 8 5 Drain seconds 7 7 75 10 75 10 10 75 11 11 105 35 minute heated dry in Normal Wash 45 minute dry in Auto Note depending on Turbidity Response it is possible the cycle could skip from the first Pre Wash to the Main Wash and then t...

Page 11: ...11 7 28 2011 Mini Manual Location Plastic Tub ...

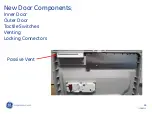
Page 12: ...12 7 28 2011 Passive Vent No Fan or damper ...

Page 13: ...13 7 28 2011 Indicator Lamp Lens Solid Amber when running Solid Green when Clean ...

Page 14: ...14 7 28 2011 Improved Racks Rollers and Tracks Plastic tub ...

Page 15: ...15 7 28 2011 New rollers on Rack New end caps notice new tab ...

Page 16: ...16 7 28 2011 Push Tab to center to remove ...

Page 17: ...17 7 28 2011 ...

Page 18: ...18 7 28 2011 Track Rear Cap and Roller Stud on tub ...

Page 19: ...19 7 28 2011 Door Strike Catch is non adjustable ...

Page 20: ...20 7 28 2011 Tub TCO location 1 shot with Manual reset Trip at 189 with manual reset ...

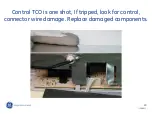
Page 21: ...21 7 28 2011 Tub TCO is resettable if tripped Reset TCO replace the control ...

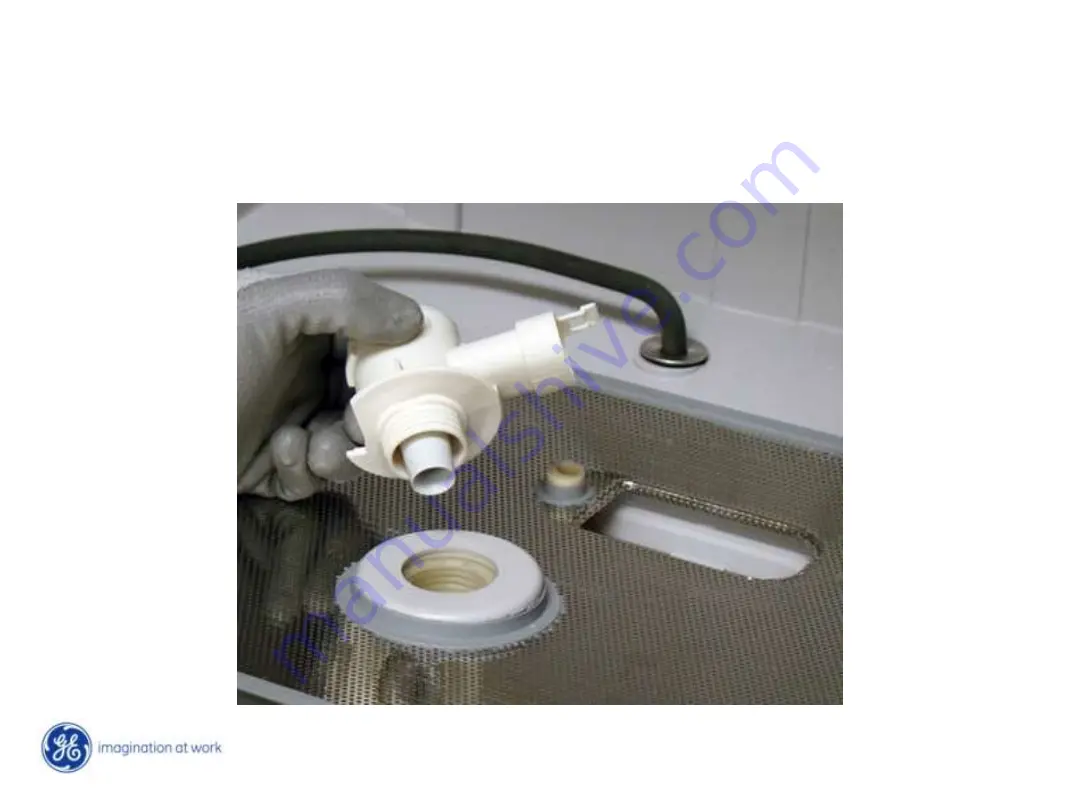
Page 22: ...22 7 28 2011 Fill hose should be inserted 1 1 2 inches ...

Page 23: ...23 7 28 2011 Fill Funnel inside tub ...

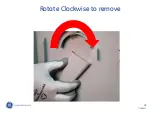
Page 24: ...24 7 28 2011 Rotate Clockwise to remove ...

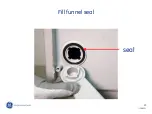
Page 25: ...25 7 28 2011 Fill funnel seal seal ...

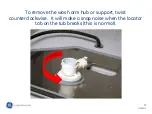
Page 26: ...26 7 28 2011 Turn Counterclockwise and lift to remove wash arm ...

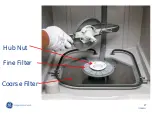
Page 27: ...27 7 28 2011 Coarse Filter Fine Filter Hub Nut ...

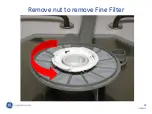
Page 28: ...28 7 28 2011 Remove nut to remove Fine Filter ...

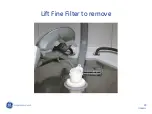
Page 29: ...29 7 28 2011 Lift Fine Filter to remove ...

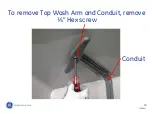
Page 30: ...30 7 28 2011 To remove Top Wash Arm and Conduit remove Hex screw Conduit ...

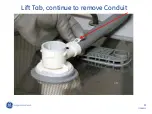
Page 31: ...31 7 28 2011 Lift Tab continue to remove Conduit ...

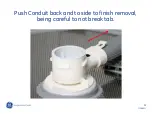
Page 32: ...32 7 28 2011 Push Conduit back and to side to finish removal being careful to not break tab ...

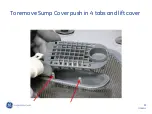
Page 33: ...33 7 28 2011 To remove Sump Cover push in 4 tabs and lift cover ...

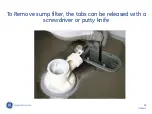
Page 34: ...34 7 28 2011 To Remove sump filter the tabs can be released with a screwdriver or putty knife ...

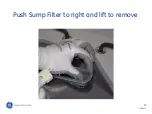
Page 35: ...35 7 28 2011 Push Sump Filter to right and lift to remove ...

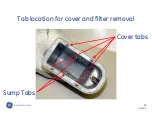
Page 36: ...36 7 28 2011 Tab location for cover and filter removal Cover tabs Sump Tabs ...

Page 37: ...37 7 28 2011 To remove the wash arm hub or support twist counterclockwise It will make a snap noise when the locator tab on the tub breaks this is normal ...

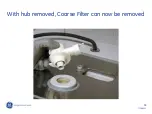
Page 38: ...38 7 28 2011 With hub removed Coarse Filter can now be removed ...

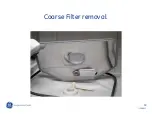
Page 39: ...39 7 28 2011 Coarse Filter removal ...

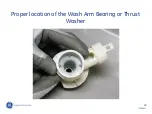
Page 40: ...40 7 28 2011 Proper location of the Wash Arm Bearing or Thrust Washer ...

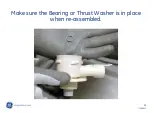
Page 41: ...41 7 28 2011 Make sure the Bearing or Thrust Washer is in place when re assembled ...

Page 42: ...42 7 28 2011 Overfill System will only cut voltage to Water Valve To remove cover unscrew Screw and lift Cover ...

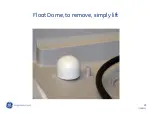
Page 43: ...43 7 28 2011 Float Dome to remove simply lift ...

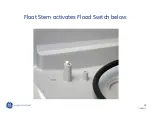
Page 44: ...44 7 28 2011 Float Stem activates Flood Switch below ...

Page 45: ...45 7 28 2011 Inner door removal 2 machine screws located at hinge 6 screws top part of inner door 2 screws at bottom of door ...

Page 46: ...46 7 28 2011 New Door Components Inner Door Outer Door Tactile Switches Venting Locking Connectors Passive Vent ...

Page 47: ...47 7 28 2011 New Top Control Inner Door configuration Console Vent Tactile Switch Vinyl Shield Cover Door Switch Assembly ...

Page 48: ...48 7 28 2011 Vinyl Shield will only have to be removed if console is replaced it can be folded up to access control Vinyl Shield MUST be in place ...

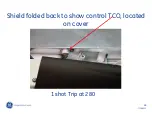
Page 49: ...49 7 28 2011 Shield folded back to show control TCO located on cover 1 shot Trip at 280 ...

Page 50: ...50 7 28 2011 Control TCO is one shot If tripped look for control connector wire damage Replace damaged components ...

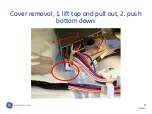
Page 51: ...51 7 28 2011 Cover removal 1 lift top and pull out 2 push bottom down 1 2 ...

Page 52: ...52 7 28 2011 To remove control board remove 1 screw in center of board and release tabs Notice locking connectors Tabs Screw ...

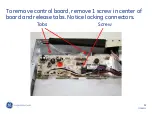
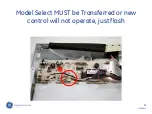
Page 53: ...53 7 28 2011 Model Select MUST be Transferred or new control will not operate just flash ...

Page 54: ...54 7 28 2011 Insulator between control board and console Must be installed ...

Page 55: ...55 7 28 2011 Pocket Handle has 4 screws control board must be removed to access screw under control ...

Page 56: ...56 7 28 2011 Handle can now be removed from the front ...

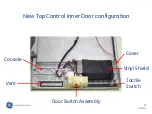
Page 57: ...57 7 28 2011 Tactile switch has 2 screws securing switch to console ...

Page 58: ...58 7 28 2011 Switch has a silicone pad to protect from moisture and buttons Wire harness must be removed from control board ...

Page 59: ...59 7 28 2011 Buttons and Silicone Pad come as an assembly ...

Page 60: ...60 7 28 2011 Notice buttons are keyed they fit one way ...

Page 61: ...61 7 28 2011 Indicator light on front panel Solid Amber when unit is operating Solid Green when cycle ended and dishes are clean ...

Page 62: ...62 7 28 2011 To Remove Door Switch assembly unscrew 2 screws Insulator MUST be used ...

Page 63: ...63 7 28 2011 Door Switch Assembly held in place with bracket and 2 screws Insulator must be in place previous slide ...

Page 64: ...64 7 28 2011 Door Switch comes as an assembly 2 switches and bracket actuator ...

Page 65: ...65 7 28 2011 When replacing Front Panel Console or Light Lens the Vent will have to be removed and replaced double back tape cannot be reused New vent will come with Console and Lens as a Kit vent ...

Page 66: ...66 7 28 2011 Pry the old vent louver off of the outer door ...

Page 67: ...67 7 28 2011 Remove any excess adhesive from the outer door Dispose old vent ...

Page 68: ...68 7 28 2011 Install new vent on clean panel ...

Page 69: ...69 7 28 2011 Console can be removed when Control Pocket Handle and Vent have been removed ...

Page 70: ...70 7 28 2011 Console removed ...

Page 71: ...71 7 28 2011 Lens Adhered with double back tape Console must be removed to access lens ...

Page 72: ...tall sump filter and cover 11 Confirm Calrod is operating properly If not check connections and TCO If TCO is open suspect control problem 12 Close detergent cup and use Service Mode to verify the lid opens 13 Inlet water temperature should be at least 120 degrees F 14 Turn on dishwasher and fill check for correct water level 15 Test water hardness with WD01X10295 or WX5X370 test strip Adjust dete...

Page 73: ...73 7 28 2011 Correct water level Main wash is suggested time to check for proper level ...

Page 74: ...74 7 28 2011 ...

Page 75: ...75 7 28 2011 ...

Page 76: ...76 7 28 2011 Schematic ...

Page 77: ...l enter into the TEST CALIBRATION mode at first power up The door must be closed and latched WAIT until the second fill approximately 6 minutes from power up to cancel cycle by pressing the Start Reset pad The dishwasher will be ready to operate after the pump out ...

Page 78: ...78 7 28 2011 SS units have different Racking and Inner Door Vent Tactile Switch Assembly and Vent on outer door is the same as on Plastic Tub ...

Page 79: ...79 7 28 2011 Mini Manual Location Stainless Tub ...

Page 80: ...80 7 28 2011 Tub TCO is located Front Center behind cross member If it is open replace the control TCO Trips at 165 auto reset at 150 ...

Page 81: ...81 7 28 2011 SS Upper rack slide Upper rack extended outward Front view with rack pushed in NOTE Removing front end caps will not release rack ...

Page 82: ...82 7 28 2011 Upper rack slide To remove upper rack assembly press down to disengage lever on left side and up on the right side Right side Pull rack assembly forward and out ...

Page 83: ...83 7 28 2011 Door catch is non adjustable ...

Page 84: ...84 7 28 2011 Door separated there are no hangers to balance the door as on previous models ...

Page 85: ...85 7 28 2011 Inner door components Vent Control cover and door switch different compared to plastic tub ...

Page 86: ...86 7 28 2011 Console Component View To remove Console Handle and Vent must be removed Handle Screws Vent Door Switch TCO Control and cover Tactile Switch 1 shot Trip at 280 ...

Page 87: ...87 7 28 2011 Single door switch breaks line side ...

Page 88: ...88 7 28 2011 Vent on SS units is different than Plastic Tubs Correct install is critical for proper operation It is possible to install the vent incorrectly ...

Page 89: ...89 7 28 2011 The vent is keyed but in the middle The vent can be installed incorrectly ...

Page 90: ...90 7 28 2011 SS Vent correctly installed Correct positioning ...

Page 91: ...91 7 28 2011 Incorrect position no airflow no dry poor dry and leaks out bottom of door Incorrect position ...

Page 92: ...ump filter and cover 11 Confirm Calrod is operating properly If not check connections and TCO If TCO is open suspect control problem 12 Close detergent cup and use Service Mode to verify the lid opens 13 Inlet water temperature should be at least 120 degrees F 14 Turn on dishwasher and fill check for correct water level 15 Test water hardness with WD01X10295 or WX5X370 test strip Adjust detergent ...

Page 93: ...93 7 28 2011 Correct water level Main wash is suggested time to check for proper level 1st fill is 63 seconds there is a partial drain and fill before main wash ...

Page 94: ...94 7 28 2011 Service Mode SS ...

Page 95: ...95 7 28 2011 SS Schematic ...

Page 96: ......

Reviews: