


18
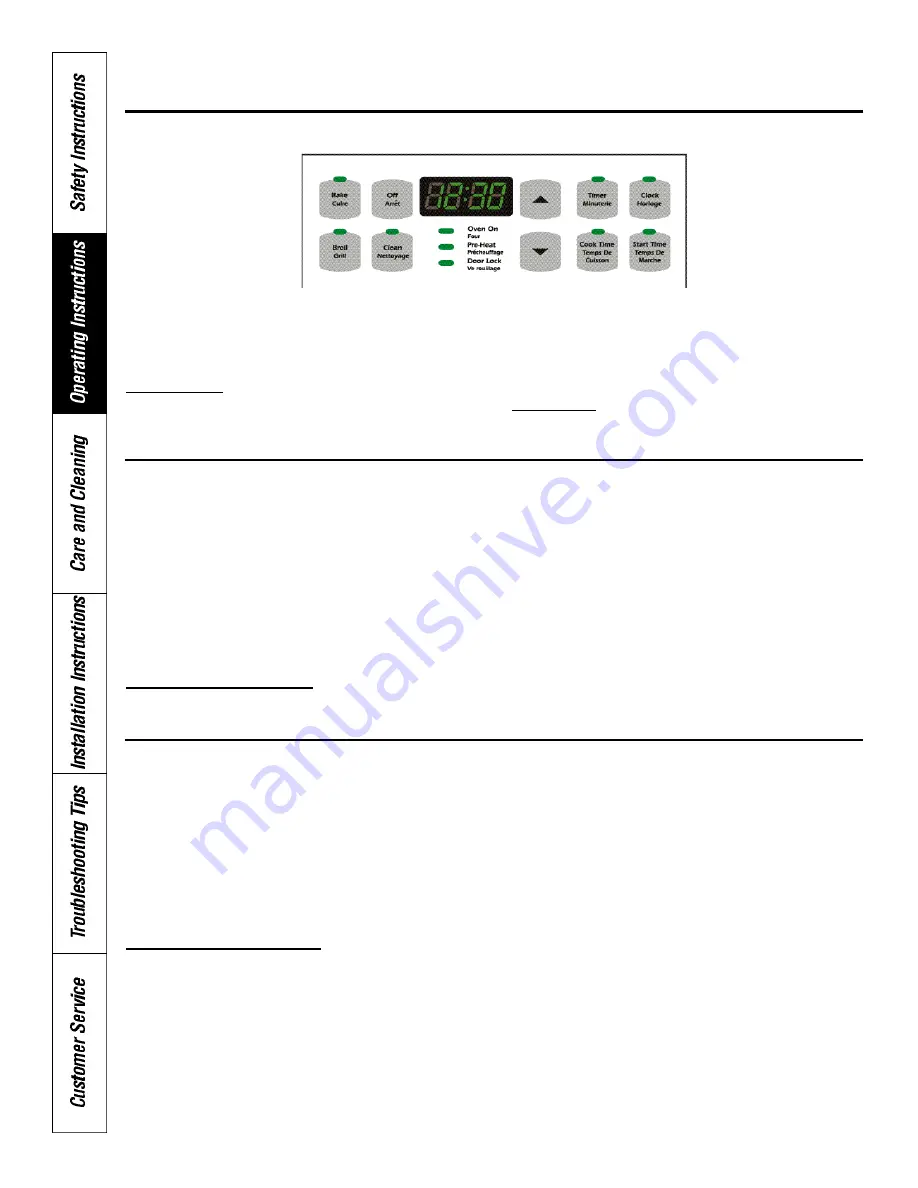
Oven Controls (Self-Clean)
Operating Instructions for Self-Clean Electronic Range Control
Clock
The clock tells the time of day and must be set to the
correct time for the automatic oven timing functions to
work properly. The clock cannot be set during a timed
baking or self-clean cycle.
To set the clock
1. Press the CLOCK button. (The green indicator will
start flashing, and a time with a flashing colon will
appear in the display, i.e. “12:00”.)
2. Press the UP/DOWN ARROW buttons until the
correct time is set. i.e. “12:30”.
3. Five seconds after the
UP/DOWN ARROW
button has
been pressed for the last time, the indicator light and
the colon will stop flashing, and the clock will be set.
Power failure
If the display is flashing
“ 1 2 : 0 0 ” ,
there has been a power failure.
Reset the clock to the correct time as described above.
Minute Timer
You may set the
MINUTE TIMER
to time cooking or other
household activities for up to 11 hours and 59 minutes.
The timer counts down (with the colon flashing), one
minute at a time until the last minute is reached. It then
beeps and counts down in seconds (without the colon
flashing) for the last minute. When the display reaches
“0:00”
, the timer will display
‘END’
and beep once,
followed by one beep every 30 seconds for the next 10
minutes (or until the
TIMER
button is pressed). The ‘beep
every 30 seconds feature’can be cancelled as described
under SPECIAL FEATURES OF THE OVEN CONTROL.
How to set the MINUTE TIMER
1. Press the
TIMER
button. (The green indicator light will
start flashing and
“0:00”
will appear in the display.)
2. Press the
UP/DOWN ARROW
buttons to enter the
desired time (i.e. 1:30 for one hour and 30 minutes
countdown).
3. Five seconds after the
UP/DOWN ARROW
buttons have
been pressed for the last time, the countdown will
begin (and the indicator light will stop flashing).
4. When the countdown time reaches
“0:00”
, the timer
will beep and
“END”
will be displayed.
5. Press the
TIMER
button to cancel the beeping, and
return to the clock display.
6. To cancel the timer before the set time is up, press the
DOWN ARROW
button until
“0:00”
is displayed. (After
five seconds, the control will return to the clock
display.)
Baking
The oven can be set to bake at temperatures between
170˚F and 550˚F (80˚C and 290˚C). When the oven
reaches the selected temperature, the control will beep
indicating the oven has been pre-heated. The control will
maintain this temperature until the baking operation is
cancelled by pressing the
OFF
button. An automatic shut-
off of the oven after 12 hours of cooking can be selected
as described under SPECIAL FEATURES OF THE
OVEN CONTROL.
Do not lock the oven door during baking or broiling.
How to set your oven for baking
1. Press the
BAKE
button. (The green
‘BAKE’
indicator
light will start flashing and
“000”
will be displayed.)
NOTE: “000”
will not be displayed, and the control cannot
be set for baking if the self-clean latch has been moved
to the right (the locked position).
2. Press the
UP/DOWN ARROW
buttons. (
“350”
will be
displayed.)
3. Continue to press the
UP/DOWN ARROW
buttons until
the desired baking temperature is shown (i.e. 375).
4. Five seconds after the
UP/DOWN ARROW
buttons have
been pressed for the last time, the indicator light will
stop flashing, the red
“OVEN ON”
light will come on,
and the red pre-heat light will come on.
5. When the oven reaches the selected temperature (i.e.
375), the control will beep once to indicate that the
oven has been pre-heated and the pre-heat light will go
out.
6. To change the selected oven temperature during
baking, simple press the
UP/DOWN ARROW
buttons
until the new desired temperature is reached.
7. To display the current time during baking, press the
CLOCK
button. Press the
BAKE
button to return to the
oven temperature display.
8. To set the minute timer during baking, press the
TIMER
button to display
“0:00”
and a flashing timer
indicating light. Press the
UP/DOWN ARROW
buttons
to enter the desired time.
9. Press
OFF
when baking is done. (The clock display
will return, and the green
BAKE
indicator light and the
“OVEN ON”
light will go out.)
Summary of Contents for 30M06AAG
Page 3: ...3 ...
Page 4: ...4 ...
Page 8: ...8 ...
Page 23: ...23 ...
Page 24: ...Care and Cleaning of the Stove con t 24 ...
Page 25: ...25 ...
Page 32: ...32 NOTES ...


