24
This remote provides the capability of setting associations be-
tween various Z-Wave devices like a motion sensor and a light
switch. In this example, the motion sensor is the “source”, or
controlling device, and the light switch is the destination or device
being controlled. Once the association is created, the motion sen-
sor can transmit a command to the light to turn on when motion is
detected and to turn off after a specified period of inactivity.
Please note that support for association varies by manufacturer.
• GE Z-Wave lighting controls cannot be the source/controlling
device however, they can be the destination device (one GE light
switch cannot be setup to control another GE light switch but a
motion sensor can be setup to control a GE light switch).
• Some devices may provide different capabilities based on their
“group” settings. As an example, a battery powered door/win-
dow sensor could be associated:
• To a light switch in group 1. It would then transmit On/Off
commands to the switch when it is activated.
• To a controller in group 2 to send battery level status or alarm/
tamper alerts.
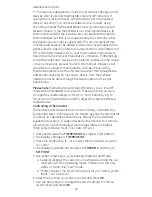
To Create an Association:
1. Enter
SETUP and select ASSOCIATE.
2. Press
OK. The screen will display ADD.
3. Press
OK. The screen will display GROUP 1. (Refer to the source
device instructions for supported groups and functions).
4. Use the arrow keys to select the appropriate Group.
5. Press
OK. The screen will display BUTTON DES.
6. Press the button on the destination/controlled device (example:
light switch). The screen will change to
BUTTON SOU.
7. Press the button on the source device (example: motion sensor).
The screen will briefly display
SUCCESS and then the remote will
go back to the main association menu.
To Remove an Association:
1. Enter
SETUP and select ASSOCIATE.
2. Press
OK. The screen will display ADD.
3. Use either arrow key to select
REMOVE.
4. Press
OK. The screen will display GROUP 1. (Refer to the source
device instructions for supported groups and functions).
5. Use the arrow keys to select the appropriate Group.
6. Press
OK. The screen will display BUTTON DES.
Associate
Add
Remove


