3
Dialog RF Electronic Thermostat Installation Instructions
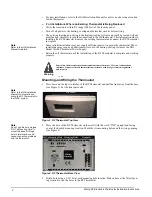
4. Install the two wall anchors supplied.
5. Mount the base to the wall using the two #6 x 1/2” self-tapping screws supplied. Make
sure all screws are secured tightly so their heads do not touch any electronic components
on the thermostat circuit board.
6. Place the antenna through the Wiring Opening and dangle it within the wall behind the
thermostat.
7. Wire the thermostat per the HAI Installation Manual.
8. Reattach the thermostat to the base.
Power Up
When powered up and working correctly the thermostat will alternately display the ambient
room temperature and briefly display an outside temperature of 0°F (-18°C). This indicates
the RF transceiver is operating properly.
Note
Refer to your HAI Installation
Manual for thermostat pro-
gramming instructions
If the thermostat display is dark, check the thermostat wiring and power supply. If the ther-
mostat doesn’t briefly flash the outside temperature of 0°F (-18°C), go into installer setup
mode and verify the thermostat’s internal address (field 00) = 1 and the communications
mode (field 01) = 0 (300 Baud) as described in the “Setting the Address and Baud Rate in
Installer Setup Mode” section of the HAI Installation Manual.
The thermostat address will need to be set to 1 and the baud rate set to 300 baud.
¾
Enter Installer Setup Mode:
1. Press the Mode button until the display reads “OFF”.
2. Wait 10 seconds, press the Prog key three times (day will flash).
3. Press the Fan key.
¾
Setting the Address and Baud Rate:
The item number displays “00” (internal address) and the value blinks and displays “1”.
1. Item 00 (Address) is already set to 1 as the default. No more action is needed. If the value
is not “1”, use the Up or Down arrow keys to change the value to “1”.
2. Press the > key to move to item 01.
3. Using the up and down arrow keys to set item 01 (comm mode) to 0 (300 baud).
4. Press Fan to exit the installer setup.
The installer setup mode can also be used to set options such as Celsius or Fahrenheit and 12
or 24-hour times. Refer to your HAI Installation Manual for information on parameters such
as heating and cooling anticipation.
Programming
To learn the thermostat into the security system, put the security panel into learn mode and
set it up to learn the thermostat. Unplug the thermostat from the base plate, wait a few sec-
onds and plug the thermostat back into the base plate. The thermostat transmits an enrollment
packet on power up. Verify the security panel receives the enrollment packet and learns in the
thermostat. If the security panel fails to learn the thermostat, repeat the process.
For information on learning, programming and using the thermostat to operate the heating
and cooling system please refer to your HAI User’s Manual (13R00-1) or HAI Installation
Manual (13I00-1).
For information on learning, testing and operating the thermostat with the alarm system, refer
to your Simon 3 Installation Instructions.
Testing
Note
The thermostat has a
method to cancel the com-
pressor startup protection
delay for convenience during
installation testing. Refer to
the HAI Installation Manual
for more information.
1. Double check wiring, making sure there are no stray wires or wire strands at the connec-
tions.
2. Press the Fan key. The fan should come on. Press the fan key again. The fan should turn
off.
3. Set the mode to “HEAT”. Use the up arrow key to raise the temperature setting above the
current temperature. Ensure that the heater unit turns on. Set the mode to “OFF”. Ensure
that the heat unit turns off.


