background image

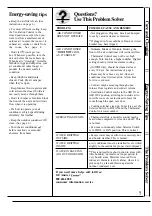
 tips

 Keep the air filter clean. (See

instructions on page 6.)

 For most efficient cooling, keep

the Ventilation Control in the
closed position except when you
want to allow a small amount of
outdoor air to enter the room or to
exhaust air, smoke or odors from
the room. See page 4.

. Don’t let 

 room get too

hot. Whenever possible, turn the
unit on before the room heats up.
When heat is “stored 

up” in walls,

furniture, rugs and draperies, 

your

air conditioner takes longer to
produce the desired comfort
condition.

● 

Keep 

windows and doors

closed. Cool, dry air escapes
when they’re open.

. Keep furnace floor registers and
cold air returns closed. Cold air

can easily escape through them.

● 

Don’t let drapes or furniture block

the front of the unit and restrict air
flow when it is operating.

● 

It’s best 

to operate your air

conditioner at high 

speed during

extremely hot weather.

● 

Keep the outdoor condenser 

clean. (See page 6.)

● 

Turn the air conditioner 

before vacations or extended
absences from home.

PROBLEM

AIR CONDITIONER
DOES NOT OPERATE

AIR CONDITIONER


 COOL

AS IT SHOULD”

OPERATING SOUNDS

WATER DRIPPING
OUTSIDE

WATER DRIPPING
INSIDE

WATER IN BASE PAN
(ON OUTDOOR SIDE)

POSSIBLE CAUSE AND REMEDY

● 

Not plugged in. Plug may have been bumped

loose by vacuum cleaner or furniture.

 If plugged in, fuse could have blown or circuit

breaker may have tripped.

 blinds or furniture blocking the

front of the air conditioner will restrict airflow.

. Thermostat Control may not be set high

enough. Turn knob to a higher number. Highest
setting should provide maximum cooling.

● 

Air 

 dirty, should be cleaned at least

every 30 days. See instructions on page 6.

● 

Room may have been very hot -when air

conditioner was first turned on. Allow time
for it to cool down.

● 

Cold air maybe escaping through open

furnace floor registers and cold air returns.

● 

Ventilation Control maybe in the AIR IN or

AIR OUT position, allowing hot outside air to
enter the room or cool inside air to leave the
room through the open vent door.

● 

Cooling coils have iced up. To melt ice, set the

Selector Switch to HI FAN and the Thermostat
Control to a lower number.

● 

Thermostat click, a metallic sound, maybe

heard when compressor cycles on and off. This

is normal.

● 

Fan runs continuously when Selector Switch

is in COOL or FAN position. This is normal.

● 

Excess water may overflow in excessively hot

and humid weather. This is normal.

 Air conditioner must be installed level or tilted

slightly to the outside for proper water disposal.

 This is normal for a short period in areas with

little humidity; normal for a longer period in
very humid areas. Moisture removed from
indoor air drains to rear of cabinet, where it is
picked up by a fan and thrown against the

outdoor condenser coil.

If you need more help.. call, toll free:
GE Answer 
800.626.2000
consumer information service

7

Summary of Contents for ACV24D

Page 1: ...ety Instructions 2 Care and Cleaning 6 User Maintenance Instructions 6 Air Filter 6 Warranty Back Cover Condenser Coils 6 Grilles Cabinet 6 Consumer Services 15 Control Settings 4 Electrical Requirements 3 Energy Saving Tips 7 Extension Cords 3 Grounding 3 GEAmwer Centerm Installation Instructions 8 14 80 626 2000 GEAppiances ...

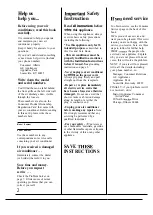
Page 2: ... and Care Book This air conditioner must be properly instilled in accordance with the Instillation Instructions before it is used See grounding instructions on page 3 Never unplug your air conditioner by ptiling on the power cord Always grip plug firmly and pull straight out from the receptacle Repair or replace immediately all electric service cords that have become frayed or otherwise damaged Do...

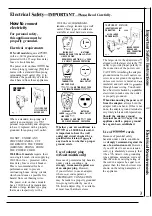
Page 3: ...Whether your air conditioner is a U5 volt or a 230 208 volt unit it is important to have the wall outlet and circuit checked by a qualified electrician if tbere is any doubt as to whether a proper ground exists Use of adapter plug U5 volt modek only Because of potential safety hazards under certain conditions we strongly recommend against use of an adapter plug However if you still elect to use an...

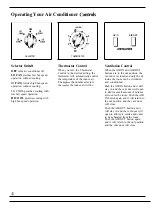
Page 4: ... AIR OUT buttons are in the out position the thermostat will automatically control vent door is closed and only the air the temperature of the indoor air inside the room can be circulated The higher the number selected and conditioned the co ler the indoor air will be Push the AIR IN button and it will stay in and the vent door will open to allow a small amount of outdoor air to enter the room Pus...

Page 5: ...on During the cooler evening hours we recommend that you set the Selector Switch at LO COOL for quieter operation and the Thermostat Control at mid range 4 or 5 For extreme temperatures For greatest economy and best performance we suggest you set the Selector Switch at HI COOL in extremely hot weather For ventilation Whether the controls are set for cooling or fan only operation setting the Ventil...

Page 6: ...from the atmosphere To remove the filter If extremely soiled they may need Grasp the tab at the bottom of the to be steam cleaned a service avtiable unit and pull downward through your GE service outlet Clean the filter with a vacuum cleaner to remove light dust Wash the filter in lukewarm soapy water and rinse in clear water to remove sticky dust When replacing the filter be sure the word FRONT i...

Page 7: ...lown or circuit breaker may have tripped Cumins blinds or furniture blocking the front of the air conditioner will restrict airflow Thermostat Control may not be set high enough Turn knob to a higher number Highest setting should provide maximum cooling Air filter dirty should be cleaned at least every 30 days See instructions on page 6 Room may have been very hot when air conditioner was first tu...

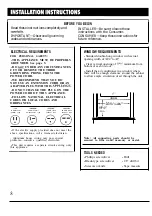
Page 8: ...MP circuit 20 AMP circuit 15 AMP circuit 30 AMP circuit parallel type perpendicular type tandem type tandem type If the electric supply provided does not meet the above specifications all a licensed electrician Aluminum house wiring may pose special problems consult a qualified electrician This unit requires a separate circuit serving only this appliance WINDOW REQUIREMENTS Standard double hung wi...

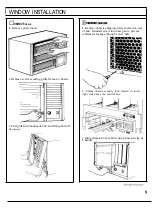
Page 9: ... of unit and lift up and off of binet EPREPARE cHAssIs 1 Remove chassis shipping screw located on rear of unit Reinstall screw into base pan to prevent condensate leakage through screw hole 2 Unlock chassis security lock located in lower right side above the control box 3 Slide chassis from cabinet using base pan lip as a handle 9 ...

Page 10: ...pper Top channel I guide 1 VL b Drain holes in rear Bottom track 5 Fit lower halves of U shaped sliders into bottom track Pivot assembly forward toward sash o Sash i 1 Upper guide INDOOR SIDE Bottom track 6 Holding upper guide at approximate sash center slide left and right hand sliders into window sash tracks 7 Lower window sash behind upper guide Center upper guide at sash centerline Be sure sas...

Page 11: ...t the foam sash gap gasket to the correct window width and stuff it between the top of the lower sash and the glass pane of the upper sash to provide a seal ATTACH WINDOW FILLER PAMELS CABINET N E Window filler panel assemblies are built into U shaped slider assemblies 1 Expand both filler panel assemblies toward sides of binet 2 Fasten side flanges of filler panel assemblies to sides of abinet us...

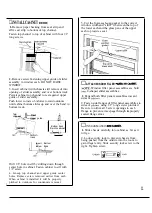
Page 12: ... exit bottom left corner Replace escutcheon Use pliers to snap out plastic offset in bottom left corner of grille 4 With main switch in off position insert power cord into properly grounded electriml outlet See page 3 SPECIAl INSTALLATIONS To overcome storm windcw interference attach a 2 wide wood strip to the stool with either nails or screws Strip should be as long as window opening and flush wi...

Page 13: ...blocks above opening s Flashing aluminum or galvanized steel pREpAREwALLOPENING 1 Determine size of opening Measure width and height of cabinet and add 1 8 to each dimension HEIGHT 2 Choose the wall opening lomtion Be sure a power receptacle is or will be installed nearby 3 Make the opening Frame it to support the weight of the air conditioner Add metal flashing over bottom of frame opening and 1 ...

Page 14: ...e of flashing a piece of aluminum or galvanized steel available at most hardware stores will further prevent moisture from getting into interior walls 5 Install wood trim molding obtained locally around roomside projection of cabinet if desired SLIDE CHASSIS INmCABINET Lift the chassis and carefully slide it into cabinet Do not push on controls or finned coils Make sure chassis is firmly seated to...

Page 15: ...own appliances can have needed parts or accessories sent direcdy to tieir home free of shipping charge The GE parts system provides access to over 47 000 parts and d GE Genuine Renewal Parts are fully warranted WSA MasteKard and Discover cards are accepted User maintenance instructions contained in this booMet cover proce dures intended to be performed by any user Other servicing genedy shodd be r...

Page 16: ...ARE SERVICE WHAT IS NOT COVERED Service trips to teach you how to use the product Read your Use and Care material If you then have any questions about operating the product please contact your dealer or our Consumer Affairs office at the address below or call toll free GE Answer Center 800 626 2000 consumer information service Improper installation If vou have an installation p oblem or if the air...

Reviews: