background image

Consumer Support

Troubleshooting Tips

Operating Instructions

Safety Instructions

Troubleshooting Tips

Care and Cleaning

Safety Instructions

Operating Instructions

6

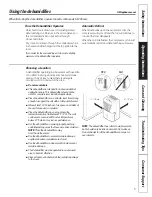
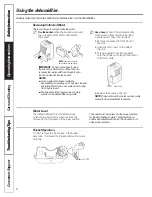
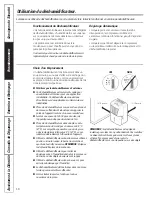
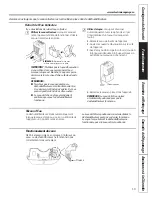
There are 2 ways to remove collected water:


 Use the bucket.

 When the bucket is removed, 

the unit will shut off. Empty and replace  

the bucket. 

IMPORTANT: 

Do not use the hose if using 

the bucket to collect water. When the hose  

is connected, water will flow through it onto  

the floor instead of into the bucket.

NOTES: 


Do not remove the bucket while the 

dehumidifier is operating or if it has just stopped 

operating. This might cause some water to drip 

from the drain pan.


The bucket must be in place and securely 

seated for the dehumidifier to operate.


 Use a hose.

 Water can be automatically 

emptied into a floor drain by attaching  

a garden water hose (not included).

1.

  Remove the bucket from the front of 

the unit. 

2.

  Open the drain cover on the side of 

the unit.

3.

  Thread a garden hose (not supplied) 

onto the nozzle, cut to length, and lead it  

to the floor drain.

4.

  Replace the bucket in the unit.

NOTE: 

The bucket must be in place and securely 

seated for the dehumidifier to operate.

Always make sure the water bucket is locked into place on the dehumidifier.

Water Level

The dehumidifier will turn off automatically  

when the bucket is full, or when the bucket is 

removed or not replaced in the proper position. 

The bucket must be replaced in the proper position  

for the dehumidifier to work. The light will be on  

and the dehumidifier will not run if the bucket is not  

in the proper position. 

Using the dehumidifier. 

Removing Collected Water

NOTE:

 Support bucket with 

both hands when emptying. 

Side of unit

Bucket Operation

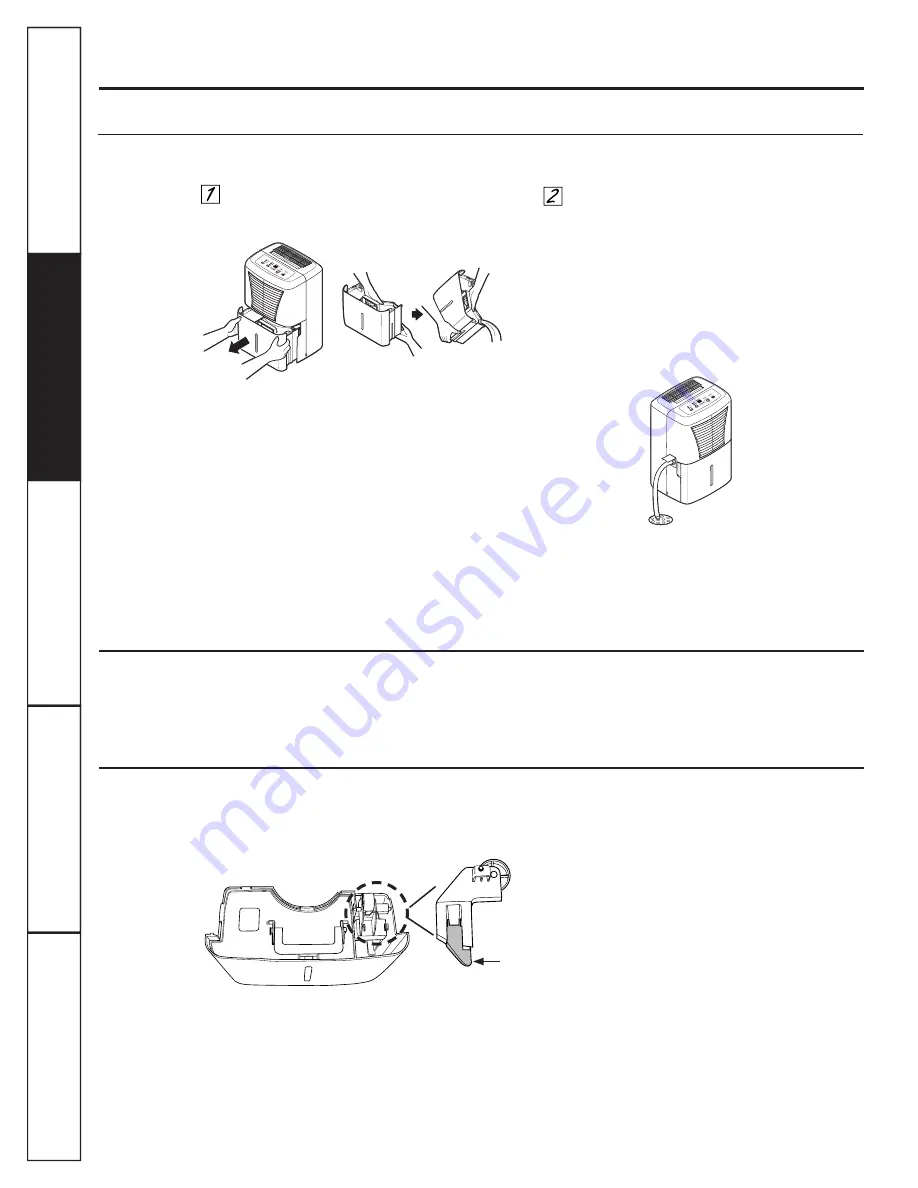
DO NOT remove the foam piece in the bucket 

assembly.  If removed the Dehumidifier will not work 

properly. 

Foam

Summary of Contents for ADER65LP

Page 1: ...r Customers in the U S A 12 EnErgy Star labeled product As an EnErgy Star partner GE has determined that this product meets the EnErgy Star guidelines for energy efficiency GEAppliances com Dehumidifi...

Page 2: ...n old product with refrigerants check with the company handling disposal about what to do Do not use outdoors This dehumidifier is intended for indoor residential applications only This dehumidifier s...

Page 3: ...READ AND FOLLOW THIS SAFETY INFORMATION CAREFULLY SAVE THESE INSTRUCTIONS GEAppliances com WARNING RISK OF FIRE Could cause serious injury or death DO NOT use an extension cord with this Dehumidifier...

Page 4: ...an control to High for maximum moisture removal When the humidity has been reduced and quiet operation is preferred set the fan control to Medium or Low Delay Off While the dehumidifier is in operatio...

Page 5: ...ing areas that have excessive moisture NOTE Place the dehumidifier away from the clothes dryer Use the dehumidifier to prevent moisture damage anywhere books or valuables are stored Use the dehumidifi...

Page 6: ...a garden water hose not included 1 Remove the bucket from the front of the unit 2 Open the drain cover on the side of the unit 3 Thread a garden hose not supplied onto the nozzle cut to length and lea...

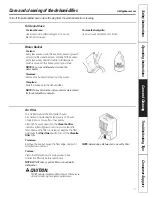
Page 7: ...r To replace Slide the bucket into the dehumidifier NOTE The bucket must be in place and securely seated for the dehumidifier to operate Air Filter The air filter behind the front grille should be che...

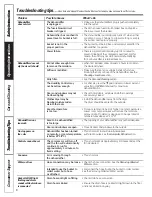
Page 8: ...ed tightly are securely closed Clothes dryer may be Install the dehumidifier away from the dryer blowing moisture laden The dryer should be vented to the outside air into the room Room temperature Moi...

Page 9: ...9 Customer Service Troubleshooting Tips Operating Instructions Safety Instructions Installation Instructions Notes GEAppliances com...

Page 10: ...10 Consumer Support Troubleshooting Tips Operating Instructions Safety Instructions Troubleshooting Tips Care and Cleaning Safety Instructions Operating Instructions Notes...

Page 11: ...11 Customer Service Troubleshooting Tips Operating Instructions Safety Instructions Installation Instructions Notes GEAppliances com...

Page 12: ...after delivery What Is Not Covered This warranty is extended to the original purchaser and any succeeding owner for products purchased for home use within the USA Some states do not allow the exclusi...

Page 13: ...e use within Canada Some provinces do not allow the exclusion or limitation of incidental or consequential damages so the above exclusion may not apply to you This warranty gives you specific legal ri...

Page 14: ...antie 24 Enregistrement du titre de propri t 21 22 Inscrivez ici les num ros de mod le et de s rie Num ro de mod le _______________ Num ro de S rie ________________ Vous les trouverez sur une tiquette...

Page 15: ...fiez la proc dure suivre aupr s de la compagnie responsable de l limination n N utilisez pas le d shumidificateur l ext rieur n Ce d shumidificateur est seulement con u pour une utilisation l int rieu...

Page 16: ...et Nettoyage Consignes de S curit IMPORTANTES CONSIGNES DE S CURIT VEUILLEZ LIRE TOUTES LES CONSIGNES AVANT UTILISATION AVERTISSEMENT RISQUE D INCENDIE Peut occasionner des blessures graves ou la mort...

Page 17: ...z sur cette touche pour choisir une vitesse de ventilation lev e Moyenne ou Basse R glez la vitesse du ventilateur sur lev e pour une limination maximale de l humidit Une fois que l humidit a t r duit...

Page 18: ...it excessive REMARQUE Eloignez le d shumidificateur de la s cheuse n Utilisez le d shumidificateur pour viter les dommages dus l humidit dans toutes les pi ces o des livres ou des objets de valeurs so...

Page 19: ...yau d arrosage non fourni coup la longueur ad quate la buse et placez son extr mit au niveau du siphon de sol 4 Remettez le seau en place dans l appareil REMARQUE Le seau doit tre en place et solideme...

Page 20: ...Filtre Air Le filtre air derri re la grille avant doit tre v rifi et nettoy au bout de 250 heures de fonctionnement ou plus souvent si n cessaire Apr s 250 heures de fonctionnement le voyant Clean the...

Page 21: ...21 Note www electromenagersge ca Assistance la Client le Conseils de D pannage Fonctionnement Consignes de S curit Entretien et Nettoyage...

Page 22: ...22 Note Assistance la Client le Conseils de D pannage Fonctionnement Safety Instructions Entretien et Nettoyage Consignes de S curit...

Page 23: ...portes fen tres et autres sont peut tre pas ferm es ouvertures sont correctement ferm es correctement La s cheuse envoie peut tre Eloignez le d shumidificateur de la s cheuse L air un air charg d humi...

Page 24: ...tique dans Canada Dans certaines provinces il est interdit d exclure ou de limiter les dommages directs ou indirects Il est alors possible que les limitations ou exclusions ci dessus ne s appliquent p...

Page 25: ...ires www electromenagersge ca Ceux qui d sirent r parer eux m mes leurs lectrom nagers peuvent recevoir pi ces et accessoires directement la maison cartes VISA MasterCard et Discover accept es Les pro...

Page 26: ...2 Soluci n de problemas 33 Ayuda al cliente Ayuda al cliente 35 Garant a 34 Producto con la etiqueta EnErgy Star Como un asociado de EnErgy Star GE ha determinado que este producto cumple con las gu a...

Page 27: ...paraci n o limpiar n GE no est no apoya que se le proporcione ning n servicio al deshumedificador Vehementemente recomendamos que usted no intente proporcionar servicio al deshumedificador usted mismo...

Page 28: ...dos tomas es su responsabilidad y obligaci n personal hacer que dicho tomacorriente sea reemplazado por uno de tres tomas con conexi n a tierra El deshumedificador deber a siempre estar conectado a un...

Page 29: ...la velocidad del ventilador en alta High medio Medium o bajo Low Coloque el control del ventilador a alta High velocidad para lograr remover la mayor cantidad de humedad Cuando la humedad haya sido re...

Page 30: ...dad excesiva NOTA Coloque el deshumedificador lejos la secadora de ropa n Use el deshumedificador para evitar da os causados por la humedad en lugares donde guarde libros o art culos de valor n Use el...

Page 31: ...ire el balde con el deshumedificador en funcionamiento o si reci n se apag Esto puede hacer que el agua gotee del recipiente de drenaje n El tanque debe estar en su lugar y bien sujeto para que el des...

Page 32: ...bien sujeto para que el deshumedificador funcione Filtro de aire El filtro de aire detr s de la rejilla frontal debe inspeccionarse y limpiarse por lo menos cada 250 horas o m s a menudo si fuese nec...

Page 33: ...ventanas y otras aberturas est n cerradas completamente est n cerradas completamente El secador de ropa podr a estar Instale el deshumedificador lejos de la secadora de ropa generando aire h medo en...

Page 34: ...o que no est cubierto Esta garant a se extiende al comprador original y cualquier comprador posterior de productos comprados para uso residencial dentro de Estados Unidos Algunos estados no permiten l...

Page 35: ...a personas con dificultades auditivas favor de llamar al 800 TDD GEAC 800 833 4322 Piezas y accesorios GEAppliances com Aquellos individuos con la calificaci n necesaria para reparar sus propios elect...

Page 36: ...Suite 310 1 Factory Lane Moncton N B E1C 9M3 Parts and Accessories In the U S A GEAppliances com Individuals qualified to service their own appliances can have parts or accessories sent directly to th...

Reviews: