background image

6

49-5000627   Rev. 0

INSTRUCCIONES DE OPERACIÓN

Instrucciones de instalación

NOTA: Esto es solo para modelos de 22 y 35 pinta.

  Antes 

de enchufar el deshumidificador, retire las ruedas de la 
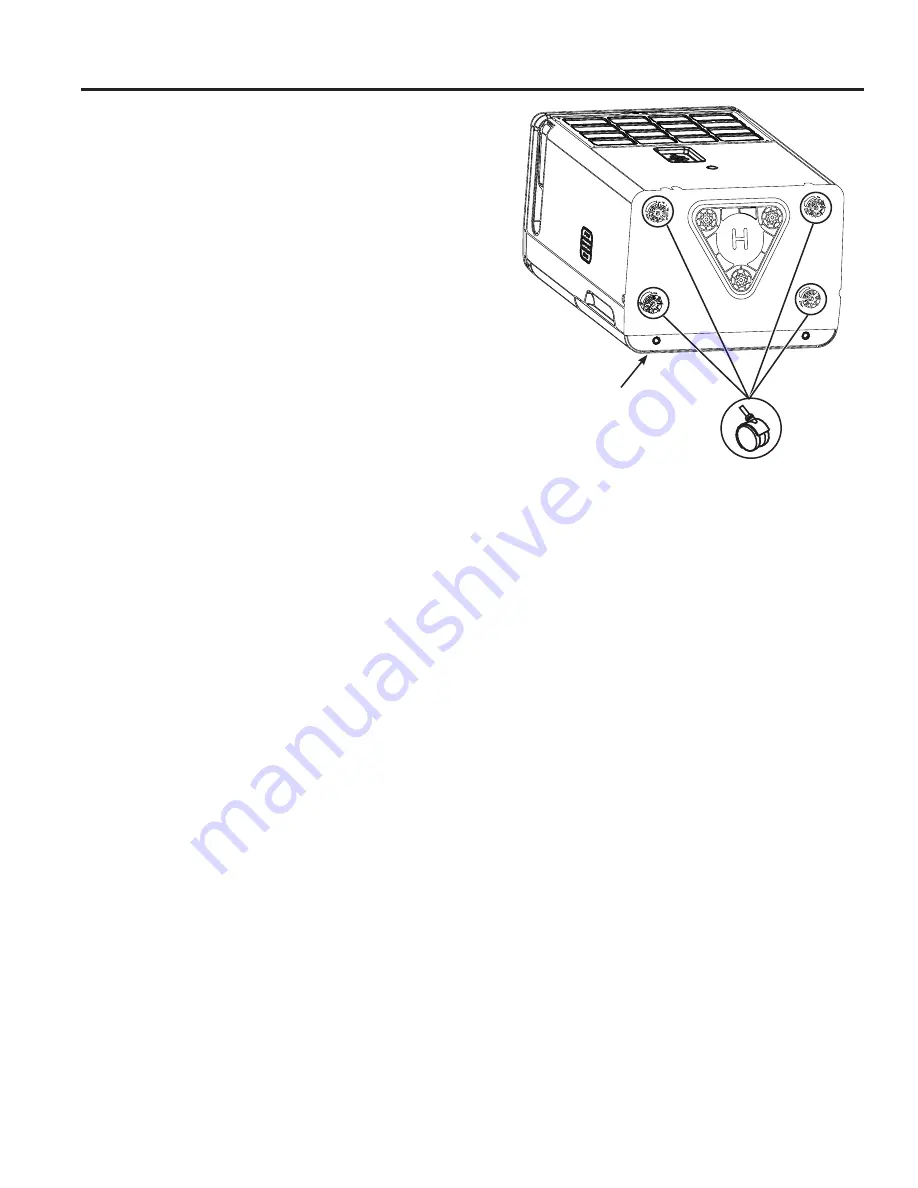
cubeta e instálelas como se muestra a continuación.

Instalar las ruedas

5HWLUHODVUXHGDVGHODEROVDFRQFLQWDDGKHVLYDHQHO

interior de la tapa del cubo de agua.

2.  Coloque con cuidado el deshumidificador en la parte 

delantera o trasera.

6LJXLHQGRODVIOHFKDVHQODEDVHGHVOLFHODVUXHGDVHQ

su lugar.

&RORTXHODXQLGDGHQSRVLFLyQYHUWLFDO\HVSHUHKRUD

antes de usarla.

El deshumidificador 

está en su frente

Summary of Contents for ADHR22

Page 1: ...EHUMIDIFIER 49 5000627 Rev 0 10 21 GEA ADHR22 ADHR35 ADHR50 SAFETY INFORMATION 3 OPERATING INSTRUCTIONS Controls 4 Other Features 5 Installation Instructions 6 How the Dehumidifier Operates 7 Automatic Defrost 7 Choosing a Location 7 Removing Collected Water 8 Water Level 8 Bucket Operation 8 CARE AND CLEANING Grille and Case 9 Water Bucket 9 Air Filter 9 TROUBLESHOOTING TIPS 10 CONSUMER SUPPORT L...

Page 2: ...es into every GE Appliances product and we think you will too Among other things registration of your appliance ensures that we can deliver important product information and warranty details when you need them Register your GE appliance now online Helpful websites and phone numbers are available in the Consumer Support section of this Owner s Manual You may also mail in the pre printed registratio...

Page 3: ...prior to product disposal If you are getting rid of an old product with refrigerants check with the company handling disposal about what to do Do not use outdoors This dehumidifier is intended for indoor residential applications only This dehumidifier should not be used for commercial or industrial applications These R410A Dehumidifier Systems require contractors and technicians to use tools equip...

Page 4: ...e dehumidifier set the humidity control to 45 or 50 Allow at least 24 hours for the dehumidifier to achieve the humidity level If you still have damper air than desired set the humidity level to a lower setting or select Nonstop for maximum dehumidification 5 Filter Timer After 250 hours of operation the Clean the Filter indicator light will glow to remind you to clean the filter Remove the filter...

Page 5: ...ition NOTE The fan and compressor will stop running as soon as the bucket is removed The alarm will sound if the bucket is not replaced in the proper position after 3 minutes Auto Defrost When frost builds up on the evaporator coils the compressor will cycle off and the fan will continue to run until the frost disappears Power Outage In the case of a power outage or interruption the unit will auto...

Page 6: ...w Installing the Casters 1 Remove the 4 casters from the bag taped to the inside of the water bucket lid 2 Carefully lay the dehumidifier down on it s front or back 3 Following the arrows on the base slide the 4 casters into place 4 Place the unit upright and wait 1 hour before use Installation Instructions Dehumidifier is on it s front OPERATING INSTRUCTIONS ...

Page 7: ...ehumidifier to prevent moisture damage anywhere books or valuables are stored Use the dehumidifier in a basement to help prevent moisture damage The dehumidifier must be operated in an enclosed area to be most effective Close all doors windows and other outside openings to the room NOTE The dehumidifier has casters to aid placement but it should only be rolled on smooth flat surfaces Do not attemp...

Page 8: ...mpty and replace the bucket IMPORTANT Do not use the hose if using the bucket to collect water When the hose is connected water will flow through it onto the floor instead of into the bucket NOTES Do not remove the bucket while the dehumidifier is operating or if it has just stopped operating This might cause some water to drip from the drain pan The bucket must be in place and securely seated for...

Page 9: ...hout a filter because dirt and lint will clog the unit and reduce performance Grille and Case To clean the case Use water and a mild detergent Do not use bleach or abrasives To clean the rear grille Use a vacuum attachment or brush Water Bucket To clean Every few weeks clean the bucket to prevent growth of mold mildew and bacteria Partially fill the bucket with clean water and add a little mild de...

Page 10: ...a lower percent value or at the Nonstop setting for maximum dehumidification Doors and windows may not be closed tightly Check that all doors windows and other openings are securely closed Clothes dryer may be blowing moisure laden air into the room Install the dehumidifier away from the dyer The dryer should be vented to the outside Room temperature is too low Moisture removal is best at higher r...

Page 11: ...ible for providing adequate electrical connecting facilities Ŷ DLOXUH RI WKH SURGXFW UHVXOWLQJ IURP PRGLILFDWLRQV to the product or due to unreasonable use including failure to provide reasonable and necessary maintenan e Ŷ 5HSODFHPHQW RI KRXVH IXVHV RU UHVHWWLQJ RI FLUFXLW breakers Ŷ DLOXUH GXH WR FRUURVLRQ RQ PRGHOV QRW FRUURVLRQ protected Ŷ DPDJH WR WKH SURGXFW FDXVHG E LPSURSHU SRZHU supply vo...

Page 12: ...can purchase it on line anytime GE Appliances Services will still be there after your warranty expires In the US GEAppliances com extended warranty or call 800 626 2224 during normal business hours Parts and Accessories Individuals qualified to service their own appliances can have parts or accessories sent directly to their homes VISA MasterCard and Discover cards are accepted Order on line today...

Page 13: ... 49 5000627 Rev 0 10 21 GEA ADHR22 ADHR35 ADHR50 INFORMACIÓN DE SEGURIDAD 3 INSTRUCCIONES DE OPERACIÓN Controles 4 Otras funciones 5 Instrucciones de instalación 6 Cómo funciona el deshumedificador 7 Descongelado automático 7 Selección del lugar adecuad 7 Cómo desechar el agua acumulada 8 Nivel de agua 8 Funcionamiento del Balde 8 CUIDADO Y LIMPIEZA Rejilla y gabinete 9 Tanque de agua 9 Filtre de ...

Page 14: ...s y creemos que usted también Entre otras cosas el registro de su electrodoméstico asegura que podamos entregarle información importante del producto y detalles de la garantía cuando los necesite Registre su electrodoméstico GE ahora a través de Internet Sitios Web y números telefónicos útiles están disponibles en la sección de Soporte para el Consumidor de este Manual del Propietario También pued...

Page 15: ...LRQHV UHVLGHQFLDOHV GH LQWHULRU 1R GHEH XVDUVH SDUD aplicaciones comerciales ni industriales Ŷ VWRV 6LVWHPDV HVKXPHGLILFDGRUHV 5 UHTXLHUHQ que los contratistas y técnicos utilicen herramientas equipamiento y normas de seguridad aprobadas para VX XVR FRQ HVWH UHIULJHUDQWH 12 XWLOLFH HTXLSDPLHQWR certificado sólo para refrigerante R22 Ŷ VWH HOHFWURGRPpVWLFR SXHGH VHU XVDGR SRU SHUVRQDV FRQ capacidad...

Page 16: ...GLILFDGRU D y 3HUPLWD TXH WUDQVFXUUDQ SRU OR PHQRV KRUDV SDUD TXH HO deshumedificador alcance el nivel de humedad Si el aire aún está más húmedo de lo deseado ajuste el nivel de humedad a un nivel menor o seleccione el botón de IXQFLRQDPLHQWR FRQWLQXR 1RQVWRS SDUD REWHQHU XQD máxima deshumidificación 5 Temporizador del filtro Filter Timer HVSXpV GH KRUDV GH RSHUDFLyQ VH HQFHQGHUi OD OX LQGLFDGRUD ...

Page 17: ...a si el interruptor del control del nivel de agua no es reiniciado NOTA El ventilador y el compresor dejarán de funcionar tan SURQWR FRPR VH UHWLUH HO EDOGH D DODUPD VRQDUi VL HO EDOGH no se vuelve a colocar en la posición correcta después de 3 minutos Descongelado automático AUTO DEFROST Cuando se acumule escarcha en los serpentines evaporadores el compresor se apagará y el ventilador continuará ...

Page 18: ...instálelas como se muestra a continuación Instalar las ruedas 5HWLUH ODV UXHGDV GH OD EROVD FRQ FLQWD DGKHVLYD HQ HO interior de la tapa del cubo de agua 2 Coloque con cuidado el deshumidificador en la parte delantera o trasera 6LJXLHQGR ODV IOHFKDV HQ OD EDVH GHVOLFH ODV UXHGDV HQ su lugar RORTXH OD XQLGDG HQ SRVLFLyQ YHUWLFDO HVSHUH KRUD antes de usarla El deshumidificador está en su frente ...

Page 19: ...mente para aplicaciones residenciales GH LQWHULRU 1R GHEH XVDUVH SDUD DSOLFDFLRQHV FRPHUFLDOHV ni industriales Ŷ Coloque el deshumedificador en un piso firme y nivelado que sea lo suficientemente fuerte para soportar la unidad cuando la cubeta esté llena de agua Ŷ HMH SRU OR PHQRV SXOJDGDV GH HVSDFLR OLEUH DOUHGHGRU de la unidad para que exista una buena circulación de aire Ŷ Coloque el deshumedif...

Page 20: ...GDG 2 Abra la tapa de drenaje sobre el lado de 3 Enrosque una manguera de jardín no suministrada sobre la boquilla y asegúrese de que se encuentre bien ajustada Corte la misma de acuerdo a la longitud y condúzcala hasta el drenaje del piso 9XHOYD D FRORFDU HO WDQTXH HQ OD XQLGDG NOTA El tanque debe estar en su lugar y bien sujeto para que el deshumedificador funcione Siempre cerciórese de que la t...

Page 21: ... VLQ el filtro debido a que la suciedad y las pelusas lo obstruirán y reducirán su rendimiento Rejilla y gabinete Para limpiar el gabinete 8VH DJXD XQ GHWHUJHQWH GH EDMD FRQFHQWUDFLyQ 1R XVH blanqueador ni limpiadores abrasivos Para limpiar la rejilla superior o trasera 8VH XQD DVSLUDGRUD FRQ DFFHVRULR GH FHSLOOR VXDYH o un cepillo de mano Tanque de agua Para limpiar Después de algunas semanas lim...

Page 22: ...VWRS SDUD obtener una máxima deshumidificación Las puertas y ventanas no están cerradas completamente Revise que todas las puertas ventanas y otras aberturas están cerradas completamente El secador de ropa podría estar generando aire húmedo en el recinto Instale el deshumedificador lejos de la secadora de ropa El secador debe desechar el aire hacia el exterior La temperatura del recinto está demas...

Page 23: ...endo la falta de mantenimiento razonable o necesario Ŷ 5HHPSOD R GH IXVLEOHV GHO KRJDU R UHLQLFLR GH disyuntores Ŷ DOODV FRPR FRQVHFXHQFLD GH FRUURVLyQ HQ PRGHORV sin protección contra ésta Ŷ DxRV RFDVLRQDGRV VREUH HO SURGXFWR SRU QLYHO de suministro de voltaje inadecuado accidente incendio inundaciones o catástrofes naturales Ŷ DxRV FRQVHFXHQWHV R LQFLGHQWDOHV FDXVDGRV SRU posibles defectos del a...

Page 24: ...VWi YLJHQWH D SXHGH DGTXLULU HQ FXDOTXLHU PRPHQWR D WUDYpV GH QWHUQHW RV 6HUYLFLRV GH SSOLDQFHV D Q HVWDUiQ DOOt FXDQGR VX JDUDQWtD FDGXTXH Q 88 GEAppliances com extended warranty R OODPH DO GXUDQWH el horario comercial habitual Piezas y Accesorios Individuos calificados para realizar el servicio técnico de sus propios electrodomésticos podrán solicitar el envío de piezas o DFFHVRULRV GLUHFWDPHQWH...

Reviews: