background image

4

49-5000764   Rev. 0

OPERA

TING INSTRUCTIONS

Controls

Controls

NOTE: 

 When the bucket is full or removed, the controls 

cannot be set.

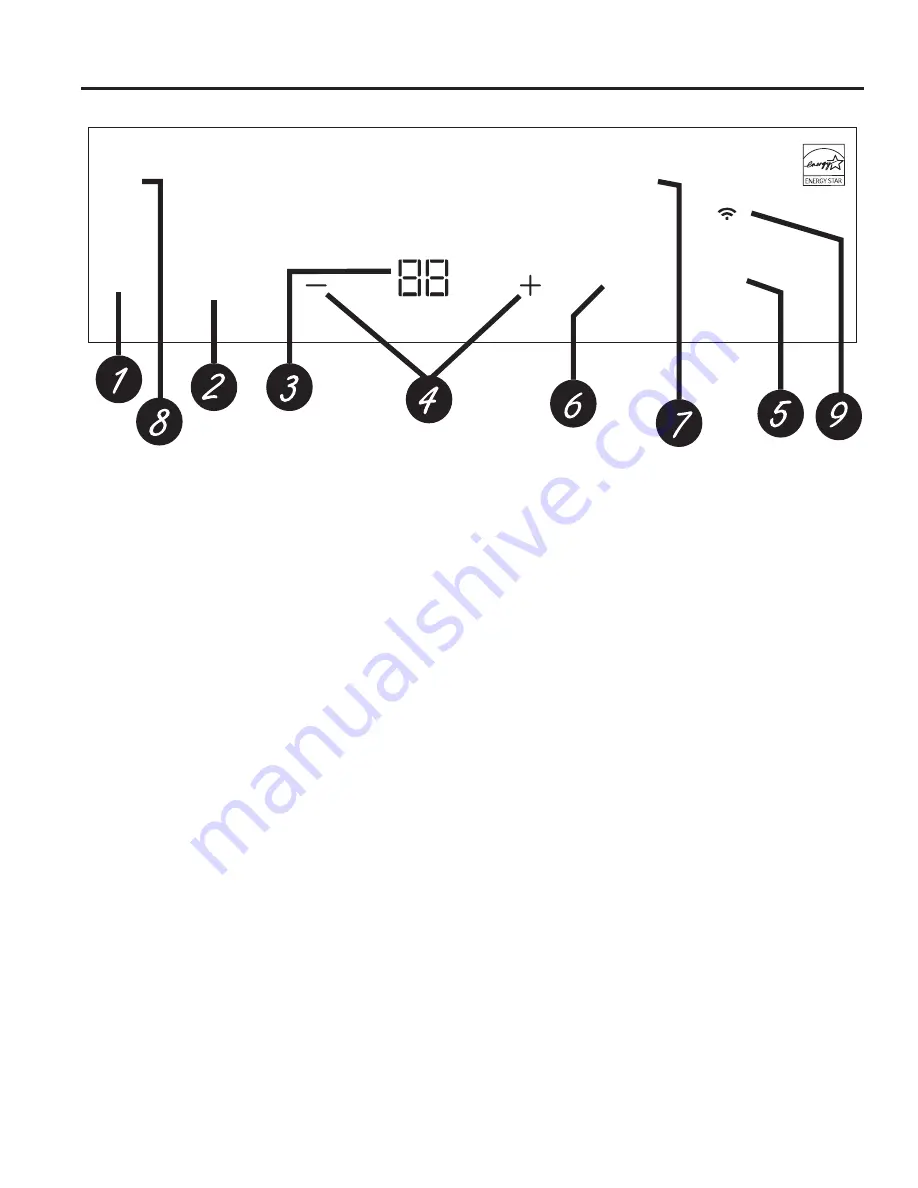
1.  Power Pad

Press to turn the dehumidifier on and off. 

NOTE:

 Turning off the power by pressing the Power button 

does NOT disconnect the appliance from power supply.

2.  Fan Speed Pad

Controls the fan speed.
Press to select either 

High, Low, or Smart Dry

 fan speed.

Set the fan control to High for maximum moisture removal. 
When the humidity has been reduced and quiet operation is 
preferred, set the fan control to Low. Smart Dry compares 
the set humidity level with the actual humidity and adjusts 
the fan speed automatically.

3.   Display

Shows the set % humidity level while setting, then shows the 
actual (+/– 5% accuracy) room % humidity level.

4.    Humidity Set Control Pads

The humidity level can be set within a range of 35% 
RH (Relative Humidity) to 80% RH (Relative Humidity) in 5% 
increments or in Nonstop mode for continuous operation.  To 
set the unit for continuous operation, press the

 “–” 

pad until 

the “Nonstop” indicator light is illuminated.

NOTE

:  If Nonstop is selected, the dehumidifier will operate 

continuously at its maximum dehumidification settings if 
attached to a hose to drain or until the bucket is full. For 
drier air, press the 

“–”

 pad and set to a lower percent value 

(%). For damper air, press the 

“+”

 pad and set to a higher 

percent value (%). When you first use the dehumidifier, 
set the humidity control to 45% or 50%. Allow at least 24 
hours for the dehumidifier to achieve the humidity level. 
If you still have damper air than desired, set the humidity 
level to a lower setting or select Nonstop for maximum 
dehumidification.

5.  Filter Reset

After 250 hours of operation, the Clean the Filter indicator 
light will glow to remind you to clean the filter. Remove the 
filter and clean it. 

Press and hold 

Filter

 button for 3 seconds to reset the filter 

reminder. See the Care and Cleaning section.

6.  Timer Off

While the dehumidifier is operating, press the 

Timer 

button.

Press the

 “+” / “–”

 buttons to select the number of hours 

you want the dehumidifier to continue to operate before 
turning Off.

NOTE:

 After displaying the time, the Display will revert to 

showing the current humidity after 5 seconds have passed.  
Pressing the 

Timer 

button will display the number of hours 

left on the Timer.

Timer On

While the dehumidifier is off, press the 

Timer

 button. 

Press the 

“+” / “–”

 buttons to select the number of hours 

you want the dehumidifier to remain off before turning On.

NOTE:

 The display will show the number of hours left until 

the dehumidifier turns on.

To cancel the Timer:

Press the 

Timer

 button once, the hours remaining on the 

Timer will appear on the display.  Press the 

Timer 

button 

against and the Timer will be cancelled.

7. Pump (on some models)

Activates the internal pump.  Press 

Timer

 for 3 seconds 

to activate the internal pump for automatic removal of 
condensate.  The 

Pump On

 light will remain illuminated after 

3 seconds.  Press 

Timer

 again for 3 seconds to deactivate 

the pump.  Before turning on the pump, ensure the included 
hose is connected.

8. Empty Indicator

The “Empty” indicator will blink when the bucket is ready 
to be emptied, or when the bucket is removed and/or not 
replaced in the proper position.

9.   WiFi  (on some models)

Hold the 

Filter Reset

 button for 3 seconds to enable 

connection of the dehumidifier to home WiFi .
Download SmartHQ App for details at:

GEAppliances.com/connect.

Appearance may vary by model.

Low

On

High

On

Off

Empty

Smart Dry

Nonstop

Humidity %

Fan 

Speeds

Timer

Power

Filter

Hold 3 Sec For

WiFi 

Filter

Reset

Pump On

Hold 3 Sec For

Pump

Summary of Contents for ADYR22

Page 1: ...FETY INFORMATION 3 OPERATING INSTRUCTIONS Controls 4 Other Features 5 How the Dehumidifier Operates 5 Choosing a Location 6 Water Level 6 Bucket Operation 6 Removing Collected Water 6 CARE AND CLEANIN...

Page 2: ...s into every GE Appliances product and we think you will too Among other things registration of your appliance ensures that we can deliver important product information and warranty details when you n...

Page 3: ...vision or instruction concerning use of the appliance in a safe way and understand the hazards involved WARNING USE OF EXTENSION CORDS RISK OF FIRE Could cause serious injury or death 2 127 XVH DQ H W...

Page 4: ...n the Clean the Filter indicator light will glow to remind you to clean the filter Remove the filter and clean it Press and hold Filter button for 3 seconds to reset the filter reminder See the Care a...

Page 5: ...he frost disappears When the coil is defrosted the compressor or fan will automatically restart and dehumidifying will resume Power Outage In the case of a power outage or interruption the unit will a...

Page 6: ...e covered with frost at temperatures below 41 F which may reduce performance The suggested range of relative humidity is between 40 and 50 Use the dehumidifier in cooking laundry and dishwashing areas...

Page 7: ...d for the dehumidifier to operate The garden hose must run down from the dehumidifier to the floor drain Use the internal pump on some models Water can be automatically emptied into a remote location...

Page 8: ...out a filter because dirt and lint will clog the unit and reduce performance Grille and Case To clean the case Use water and a mild detergent Do not use bleach or abrasives To clean the rear grille Us...

Page 9: ...away from the dyer The dryer should be vented to the outside Room temperature is too low Moisture removal is best at higher room temperatures Lower room temperatures will reduce the moisture removal...

Page 10: ...liance Statement This device complies with Part 15 of the FCC Rules Operation is subject to the following two conditions 1 This device may not cause harmful interference 2 This device must accept any...

Page 11: ...oviding adequate electrical connecting facilities Failure of the product resulting from modifications to the product or due to unreasonable use including failure to provide reasonable and necessary ma...

Page 12: ...ranty expires In the US GEAppliances com extended warranty or call 800 626 2224 during normal business hours Remote Connectivity For assistance with wireless network connectivity for models with remot...

Page 13: ...s 5 C mo funciona el deshumedificador 5 Selecci n del lugar adecuad 6 C mo desechar el agua acumulada 6 Nivel de agua 6 Funcionamiento del Balde 6 CUIDADO Y LIMPIEZA Rejilla y gabinete 8 Tanque de agu...

Page 14: ...y creemos que usted tambi n Entre otras cosas el registro de su electrodom stico asegura que podamos entregarle informaci n importante del producto y detalles de la garant a cuando los necesite Regis...

Page 15: ...uso de este electrodom stico de una forma segura y entienden los riesgos involucrados ADVERTENCIA USO DE PROLONGADORES RIESGO DE INCENDIO Podr a ocasionar lesiones graves o la muerte 12 XVH SURORQJDGR...

Page 16: ...Reinicio del Filtro HVSXpV GH KRUDV GH RSHUDFLyQ VH HQFHQGHUi OD OX indicadora de Clean the Filter para recordarle que debe limpiar el filtro Quite el filtro y l mpielo Mantenga presionado el bot n d...

Page 17: ...y el ventilador continuar funcionando hasta que la escarcha desaparezca Mientras se descongele la bobina el compresor o ventilador se reiniciar de forma autom tica y el deshumidificador se reiniciar P...

Page 18: ...XHGH reducir su rendimiento O UDQJR VXJHULGR R OD KXPHGDG UHODWLYD HVWi HQWUH 8VH HO GHVKXPHGLILFDGRU HQ iUHDV FRPR OD FRFLQD FXDUWRV de lavado ba os y en reas donde exista humedad excesiva NOTA Coloq...

Page 19: ...estar en su lugar y bien sujeto para TXH HO GHVKXPHGLILFDGRU IXQFLRQH D PDQJXHUD GH MDUGtQ GHEH correr desde el deshumidificador hasta el desag e del piso Use la bomba interna en algunos modelos El ag...

Page 20: ...LQ el filtro debido a que la suciedad y las pelusas lo obstruir n y reducir n su rendimiento Rejilla y gabinete Para limpiar el gabinete 8VH DJXD XQ GHWHUJHQWH GH EDMD FRQFHQWUDFLyQ 1R use blanqueador...

Page 21: ...a del recinto est demasiado baja D GHVKXPHGLILFDFLyQ HV PHMRU D WHPSHUDWXUDV DPELHQWH altas Temperaturas bajas causan bajo rendimiento de deshumedificaci n Modelos est n dise ada para funcionar a WHPS...

Page 22: ...io que intente corregir la interferencia a trav s de una o m s de las siguientes medidas Reoriente o reubique la antena receptora Aumente la separaci n entre el equipo y el receptor Conecte el equipo...

Page 23: ...o posee la capacidad adecuada contacte a su vendedor minorista o instalador Usted es responsable de brindar instalaciones de conexi n el ctrica adecuadas DOOD GHO SURGXFWR FRPR UHVXOWDGR GH PRGLILFDFL...

Page 24: ...OLDQFHV D Q HVWDUiQ DOOt FXDQGR VX JDUDQWtD FDGXTXH Q 88 GEAppliances com extended warranty R OODPH DO GXUDQWH el horario comercial habitual Conectividad Remota Para solicitar asistencia con la conect...

Reviews: