


49-5000084
5
USO DEL
ACONDICIONADOR DE
A
IRE
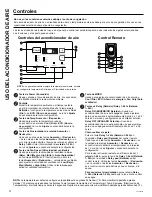
Controles
Control Remoto
Ŷ 3DUDJDUDQWL]DUXQDRSHUDFLyQDSURSLDGDRULHQWHHOFRQWURO
remoto hacia el receptor de señal del acondicionador de
aire.
Ŷ&HUFLyUHVHGHTXHQRKD\DQDGDHQWUHHODFRQGLFLRQDGRUGH
aire y el control remoto que pueda bloquear la señal.
Ŷ(OUHFHSWRUGHVHxDOWLHQHXQUDQJRPi[LPRGHSLHV
Ŷ&HUFLyUHVHGHTXHODVEDWHUtDVVHDQIUHVFDV\VHLQVWDOHQ
correctamente según se indica en el control remoto.
Ŷ(OFRQWUROUHPRWRFXHQWDFRQXQLPiQTXHSHUPLWHDGKHULUORD
superficies metálicas.
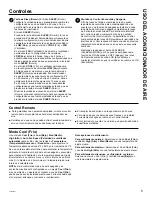
Modo Cool (Frío)
8VHHOPRGR
Cool (Frío)
a
Low (Bajo), Med (Medio),
High (Alto)
o
Auto Fan Speed (Velocidad de ventilador
automática)
SDUDHQIULDU8VHODVWHFODVGH
Temperature
(Temperatura) A / Reducción –
para ajustar a la
WHPSHUDWXUDGHVHDGDHQWUH)\)HQLQFUHPHQWRVGH)
Se usa un termostato electrónico para mantener la temperatura
ambiente. El compresor hará ciclo entre apagado y encendido
para mantener la habitación a la temperatura deseada. Ajuste
el termostato a un número menor y el aire interno se enfriará
más. Si lo ajusta a un número mayor, la temperatura del aire
interno se calentará más.
NOTA:
si el acondicionador de aire está apagado y se
enciende mientras está configurado en un ajuste
Cool (Frío)
o
si se cambia de un ajuste de ventilador a uno de
Cool (Frío),
puede que pasen aproximadamente unos 3 minutos hasta que
el compresor arranque y comience el enfriamiento.
Descripciones de enfriamiento
Para enfriamiento normal—
Seleccione el modo
Cool (Frío)
y
ventilador
High (Alto)
o
Med (Medio)
con una temperatura de
ajuste media.
Para enfriamiento máximo—
Seleccione el modo
Cool (Frío)
y ventilador
High (Alto)
con una temperatura de ajuste menor.
Para enfriamiento silencioso y enfriamiento nocturno—
6HOHFFLRQHHOPRGR&RRO)UtR\YHQWLODGRU
Low (Bajo)
con
una temperatura de ajuste media.
Tecla de Sleep (Dormir)
El modo
SLEEP
'RUPLU
configura la unidad para que gradualmente cambie las
FRQILJXUDFLRQHVHQXQSHUtRGRGHKRUDVDILQGH
permitir cierto incremento de eficiencia energética durante
las horas de inactividad.
El modo
SLEEP
'RUPLU
Presione la tecla del modo
SLEEP
'RUPLU\ODOX]VH
encenderá. El indicador del ventilador permanecerá en
la misma configuración, pero el acondicionador de aire
cambiará automáticamente la velocidad del ventilador
a
LOW
%DMR\DVHDHQHOPRGR
COOL
)UtRR
FAN
9HQWLODGRU
En el modo
FAN
9HQWLODGRU~QLFDPHQWHHOYHQWLODGRU
permanecerá en la configuración de velocidad
LOW
%DMRGXUDQWHKRUDV/XHJRGHKRUDVHO
acondicionador de aire reanudará las configuraciones que
fueron ajustadas antes de que se presionara la tecla del
modo
SLEEP
'RUPLU
En el modo
COOL
)UtRHOYHQWLODGRUSHUPDQHFHUi
en la configuración de velocidad
LOW
%DMRGXUDQWH
KRUDVGHVGHHOPRPHQWRHQTXHODWHFODGHOPRGR
SLEEP
'RUPLUVHDSUHVLRQDGD(ODFRQGLFLRQDGRU
GHDLUHWDPELpQHOHYDUiHOSXQWRGHFRQILJXUDFLyQ)
HQPLQXWRV\)PiVHQRWURVPLQXWRVGRQGH
permanecerá durante las siguientes 7 horas. Luego
GHKRUDVHODFRQGLFLRQDGRUGHDLUHUHDQXGDUiODV
configuraciones que fueron ajustadas antes de que se
presionara la tecla del modo
SLEEP
'RUPLU
Mientras la unidad se encuentre en el modo
SLEEP
'RUPLUSUHVLRQDUFXDOTXLHUWHFODKDUiTXHUHJUHVHDODV
configuraciones que fueron ajustadas antes de que se
presionara la tecla del modo
SLEEP
'RUPLU
Pantalla de Control Encendida y Apagada
A fin de reducir el brillo durante las horas de sueño,
la pantalla de control de este acondicionador de aire
cuenta con una función de apagado automático, donde
la pantalla de control se apagará completamente luego
de 5 minutos de inactividad. Para iluminar la interface
del control, presione cualquier botón de la pantalla
de control o del control remoto. La pantalla de control
LOXPLQDUiWRGDVODVOXFHV/('SUHYLDPHQWHLOXPLQDGDV/D
interface de control responderá ahora cuando se presione
cualquier botón indicado una vez que éste se encuentre
iluminado.
0DQWHQJDSUHVLRQDGRHOERWyQ)$102'(
9HQWLODGRU02'2SRUVHJXQGRVSDUDSDVDUHVWD
IXQFLyQGH21(QFHQGHUD2))$SDJDU/DVOXFHV
/('SHUPDQHFHUiQDKRUDHQ21(QFHQGLGRHQ
FXDOTXLHUPRPHQWRHQTXHODXQLGDGVHHQFXHQWUHHQ21
(QFHQGLGR


