


•
Initialization of the adjustable frequency drive to
restore factory default settings does not change
data stored in the keypad memory
WARNING
UNINTENDED START!
When the adjustable frequency drive is connected to AC
line power, the motor may start at any time. The
adjustable frequency drive, motor, and any driven
equipment must be in operational readiness. Failure to be
in operational readiness when the adjustable frequency
drive is connected to AC line power could result in death,
serious injury, or equipment or property damage.
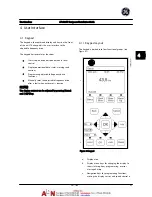
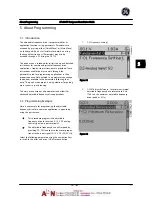
4.2.1 Uploading Data to the Keypad
1.
Press [Off] to stop the motor before uploading or
downloading data.
2.
Go to
K-50 Keypad Copy
.
3.
Press [OK].
4.
Select
All to keypad
.
5.
Press [OK]. A progress bar shows the uploading
process.
6.
Press [Hand] or [Auto] to return to normal
operation.
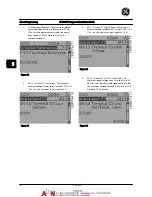
4.2.2 Downloading Data from the Keypad
1.
Press [Off] to stop the motor before uploading or
downloading data.
2.
Go to
K-50 Keypad Copy
.
3.
Press [OK].
4.
Select
All from keypad
.
5.
Press [OK]. A progress bar shows the
downloading process.
6.
Press [Hand] or [Auto] to return to normal
operation.
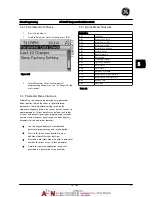
4.3 Restoring Default Settings
CAUTION
Initialization restores the unit to factory default settings.
Any programming, motor data, localization, and
monitoring records will be lost. Uploading data to the
keypad provides a backup before initialization.
Restoring the adjustable frequency drive parameter
settings back to default values is done by initialization of
the adjustable frequency drive. Initialization can be
through
H-03 Restore Factory Settings
or manually.
•
Initialization using
H-03 Restore Factory Settings
does not change adjustable frequency drive data
such as operating hours, serial communication
selections, personal menu settings, fault log,
alarm log, and other monitoring functions
•
Using
H-03 Restore Factory Settings
is generally
recommended.
•
Manual initialization erases all motor,
programming, localization, and monitoring data
and restores factory default settings.
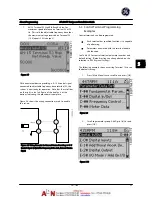
4.3.1 Recommended Initialization
1.
Press [Main Menu] twice to access parameters.
2.
Scroll to
H-03 Restore Factory Settings
.
3.
Press [OK].
4.
Scroll to [2]
Restore Factory Settings
.
5.
Press [OK].
6.
Remove power to the unit and wait for the
display to turn off.
7.
Apply power to the unit.
Default parameter settings are restored during start-up.
This may take slightly longer than normal.
8.
Alarm 80 is displayed.
9.
Press [Reset] to return to operation mode.
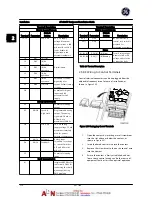
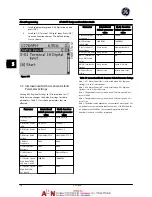
4.3.2 Manual Initialization
1.
Remove power to the unit and wait for the
display to turn off.
2.
Press and hold [Status], [Main Menu], and [OK] at
the same time and apply power to the unit.
Factory default parameter settings are restored during
startup. This may take slightly longer than normal.
Manual initialization does not the following adjustable
frequency drive information.
•
ID-00 Operating Hours
•
ID-03 Power Up's
•
ID-04 Over Temp's
•
ID-05 Over Volt's
User Interface
AF-600 FP Design and Installation Guide
4-4
DET-768A
4
4
Summary of Contents for AF-600 FP Series
Page 1: ...AF 600 FPTM Fan Pump Drive Design and Installation Guide GE ...
Page 17: ...Introduction AF 600 FP Design and Installation Guide 1 10 DET 768A 1 1 ...
Page 39: ...Start Up and Functional Tes AF 600 FP Design and Installation Guide 3 6 DET 768A 3 3 ...
Page 57: ...About Programming AF 600 FP Design and Installation Guide 5 14 DET 768A 5 5 ...
Page 73: ...Application Set up Examples AF 600 FP Design and Installation Guide 6 16 DET 768A 6 6 ...
Page 83: ...Installation Consideration AF 600 FP Design and Installation Guide 7 10 DET 768A 7 7 ...
Page 87: ...Status Messages AF 600 FP Design and Installation Guide 8 4 DET 768A 8 8 ...
Page 97: ...Warnings and Alarms AF 600 FP Design and Installation Guide 9 10 DET 768A 9 9 ...
Page 101: ...Basic Troubleshooting AF 600 FP Design and Installation Guide 10 4 DET 768A 10 0 ...
Page 103: ...Terminal and Applicable Wir AF 600 FP Design and Installation Guide 11 2 DET 768A 11 1 ...