background image

Write the model and serial 
numbers here:

Model # _________________

Serial # _________________

You can find the rating label on the 
side of the air conditioner.

GE is a trademark of the General Electric Company. Manufactured under trademark license.

OWNER’S MANUAL 

& INSTALLATION 

INSTRUCTIONS

AIR CONDITIONER

ROOM

49-7790   09-17   GEA

AHS14
AHS18

SAFETY INFORMATION

  . . . . . . . . .3

USING THE AIR CONDITIONER

Controls . . . . . . . . . . . . . . . . . . . . . . . . . . . . . .4
Remote Control  . . . . . . . . . . . . . . . . . . . . . . .5
Cool Mode . . . . . . . . . . . . . . . . . . . . . . . . . . . .5
Energy Saver Mode . . . . . . . . . . . . . . . . . . . .5
Air Direction . . . . . . . . . . . . . . . . . . . . . . . . . .6

CARE AND CLEANING

Grille and Case . . . . . . . . . . . . . . . . . . . . . . . .7
Air Filter . . . . . . . . . . . . . . . . . . . . . . . . . . . . . .7
Outdoor Coils . . . . . . . . . . . . . . . . . . . . . . . . .7
Install Batteries in Remote . . . . . . . . . . . . . .7

INSTALLATION INSTRUCTIONS

Before you begin . . . . . . . . . . . . . . . . . . . . . .8
Electrical Requirements  . . . . . . . . . . . . . . . .8
Parts Included . . . . . . . . . . . . . . . . . . . . . . . . .9
Window Requirements . . . . . . . . . . . . . . . . 10
Prepare the Air Conditioner . . . . . . . . . . . . 10
Install the Air Conditioner . . . . . . . . . . . . . . 13

TROUBLESHOOTING TIPS

 . . . . . . 16

Normal Operating Sounds  . . . . . . . . . . . . . 16

CONSUMER SUPPORT

Warranty . . . . . . . . . . . . . . . . . . . . . . . . . . . . 17
Consumer Support . . . . . . . . . . . .Back Cover

Summary of Contents for AHS14

Page 1: ...7 GEA AHS14 AHS18 SAFETY INFORMATION 3 USING THE AIR CONDITIONER Controls 4 Remote Control 5 Cool Mode 5 Energy Saver Mode 5 Air Direction 6 CARE AND CLEANING Grille and Case 7 Air Filter 7 Outdoor Coils 7 Install Batteries in Remote 7 INSTALLATION INSTRUCTIONS Before you begin 8 Electrical Requirements 8 Parts Included 9 Window Requirements 10 Prepare the Air Conditioner 10 Install the Air Condit...

Page 2: ...to every GE Appliances product and we think you will too Among other things registration of your appliance ensures that we can deliver important product information and warranty details when you need them Register your GE appliance now online Helpful websites and phone numbers are available in the Consumer Support section of this Owner s Manual You may also mail in the pre printed registration car...

Page 3: ...ntractors and technicians to use tools equipment and safety standards approved for use with this refrigerant DO NOT use equipment certified for R22 refrigerant only WARNING USE OF EXTENSION CORDS RISK OF FIRE Could cause serious injury or death Ŷ 2 127 XVH DQ H WHQVLRQ FRUG ZLWK WKLV LQGRZ LU Conditioner Ŷ 2 127 XVH VXUJH SURWHFWRUV RU PXOWL RXWOHW DGDSWRUV with this Window Air Conditioner HOW TO ...

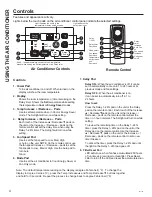
Page 4: ...H QFUHDVH HFUHDVH SDGV RQ WKH UHPRWH FRQWURO ZLOO VHW WKH timer in 1 hour intervals The Set light will turn on while setting 7R UHYLHZ WKH UHPDLQLQJ WLPH RQ WKH HOD KU WLPHU SUHVV WKH HOD KU SDG RQ WKH XQLW RU WKH HOD SDG RQ WKH UHPRWH FRQWURO 8VH WKH QFUHDVH Ÿ HFUHDVH ź SDGV RQ WKH XQLW RU WKH QFUHDVH HFUHDVH SDGV RQ WKH UHPRWH FRQWURO WR VHW D QHZ time if desired 7R FDQFHO WKH WLPHU SUHVV WKH HO...

Page 5: ...ner is off and is then turned on while set to a Cool setting or if turned from a fan setting to a Cool VHWWLQJ LW PD WDNH DSSUR LPDWHO PLQXWHV IRU the compressor to start and cooling to begin Cooling Descriptions For Normal Cooling Select the Cool mode and High or Med fan with a middle set temperature For Maximum Cooling Select the Cool mode and High fan with a lower set temperature For Quieter an...

Page 6: ...ase NOTE Auto Fan Speed cannot be used when in the Fan Only Mode Power Outage Recovery Feature In the case of a power outage or interruption the unit will automatically restart in the settings last used after the SRZHU LV UHVWRUHG I WKH HOD KU IHDWXUH ZDV VHW LW will resume countdown You may need to set a new time if desired Air Direction 8VH WKH OHYHU WR DGMXVW WKH DLU GLUHFWLRQ OHIW DQG ULJKW on...

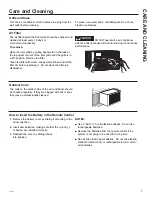
Page 7: ...perate the air conditioner without a filter because dirt and lint will clog it and reduce performance Outdoor Coils The coils on the outdoor side of the air conditioner should be checked regularly If they are clogged with dirt or soot they may be professionally cleaned How to Insert the Battery in the Remote Control 1 Remove the battery cover by sliding it according to the arrow direction 2 QVHUW ...

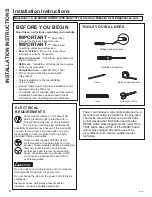
Page 8: ...se is only a 2 prong outlet it is your responsibility to have it replaced with a properly grounded 3 prong wall outlet 6RPH PRGHOV UHTXLUH YROW protected with a time delay fuse or circuit breaker These models should be installed on their own single branch circuit for best performance and to prevent overloading house or apartment wiring circuits which could cause a possible fire hazard from overhea...

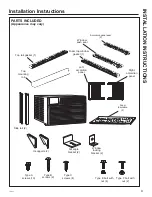
Page 9: ...angle bracket 2 Right accordion panel Foam top window gasket 1 HIW accordion panel Side rail 2 PARTS INCLUDED Appearance may vary Top rail gasket 1 Type E bolt with nut 4 Type A screws 10 7 SH screws 2 Type C screws 4 Type F bolt with nut 2 V supports 2 Window sash seal Accordion panel seal 2 Foam Insulation 2 ...

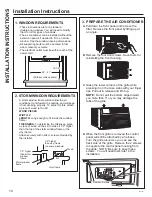
Page 10: ... screws Save them for reinstalling the front housing C Grasp the lower corners of the grille while pressing in on the case sides with your finger tips Pull out to release and lift it up NOTE Do not pull the bottom edge toward RX PRUH WKDQ Ǝ RU RX PD GDPDJH WKH tabs of the grille D When the front grille is removed the control panel will still be attached by a harness Turn the grille around so you c...

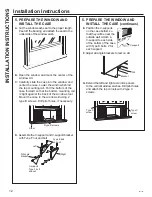
Page 11: ...de each side retainer onto the edge of each according panel The figure shows the orientation of each accordion panel and side retainer assembly relative to the case from a top view of the unit D Slide the left and right accordion panels into the top and bottom mounting rails E WWDFK WKH VLGH UHWDLQHUV WR WKH FDVH XVLQJ type A screws 4 PREPARE THE CASE A Attach the top rail gasket to the bottom of ...

Page 12: ...nt the case to the window sill using 2 W SH VFUHZV ULOO SLORW KROHV LI QHFHVVDU D Assemble the V support and V support bracket with Type F nut and bolt 5 PREPARE THE WINDOW AND INSTALL THE CASE continues E Position the V supports on the case bottom so that they will be near the outside wall Attach a V support to each side of the bottom of the case with Type E bolts 2 for each support F Adjust sill...

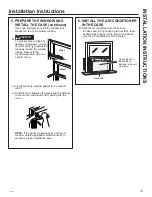
Page 13: ...ut the foam top window gasket to the window width J Stuff the foam between the glass and the window to prevent air and insects from getting into the room NOTE If the gasket supplied does not fit your window obtain appropriate material locally to provide a proper installation seal Wood Vinyl 6 INSTALL THE AIR CONDITIONER IN THE CASE A Slide the air conditioner into the case by the base pan Do not p...

Page 14: ...he filter and the front grille G Plug in the air conditioner Install Screws 7 INSTALL FOAM INSULATION Additional insulation is provided with your window air conditioner to reduce heat leakage into the home reducing overall energy usage A After the air conditioner is installed in the window measure the length of the accordion for both sides B Cut the foam insulation to the measured length of the le...

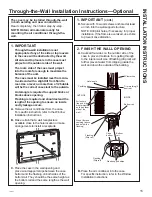
Page 15: ...the hole location or make arrangements to install a receptacle C Place the case in the wall opening and place wood support strips between the case bottom and the flashing on both sides of the bottom rail They should be the same height as the bottom rail and the same length as the wall opening 2 FINISH THE WALL OPENING A Caulk all four sides on the outdoor side of the case to prevent moisture from ...

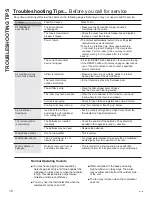
Page 16: ...device is tripped If the RESET button will not stay engaged discontinue use of the air conditioner and contact a qualified service technician Air conditioner does Airflow is restricted Make sure there are no curtains blinds or furniture not cool as it should blocking the front of the air conditioner The temp control may In the Cool mode press the Decrease pad not be set correctly The air filter is...

Page 17: ... charge or you may be required to bring the product to an Authorized GE SSOLDQFHV 6HUYLFH ORFDWLRQ IRU VHUYLFH Q ODVND WKH ZDUUDQW H FOXGHV WKH FRVW RI VKLSSLQJ RU VHUYLFH FDOOV WR RXU home 6RPH VWDWHV GR QRW DOORZ WKH H FOXVLRQ RU OLPLWDWLRQ RI LQFLGHQWDO RU FRQVHTXHQWLDO GDPDJHV 7KLV ZDUUDQW JLYHV you specific legal rights and you may also have other rights which vary from state to state To know...

Page 18: ...DEOH ZKLOH RXU warranty is still in effect You can purchase it on line anytime GE Appliances Services will still be there after your ZDUUDQW H SLUHV Q WKH 86 GEAppliances com ge service and support shop for extended service plans htm RU FDOO GXULQJ QRUPDO EXVLQHVV KRXUV Remote Connectivity For assistance with wireless network connectivity for models with remote enable visit our website at GEApplia...

Page 19: ...ric Company Fabricado bajo licencia de marca MANUAL DEL PROPIETARIO Y INSTRUCCIONES DE INSTALACIÓN ACCONDICIONADORES DE AIRE PARA SALA 49 7790 09 17 GEA AHS14 AHS18 INSTRUCCIONES DE SEGURIDAD 3 USO DEL ACONDICIONADOR DE AIRE Controle 4 CUIDADO Y LIMPIEZA Filtro de aire 7 Bobinas para exteriores 7 INSTRUCCIONES DE INSTALACIÓN 8 SOLUCIONAR PROBLEMAS 116 Sonidos de operación normales 16 GARANTÍA 17 S...

Page 20: ...reemos que usted también Entre otras cosas el registro de su electrodoméstico asegura que podamos entregarle información importante del producto y detalles de la garantía cuando los necesite Registre su electrodoméstico GE ahora a través de Internet Sitios Web y números telefónicos útiles están disponibles en la sección de Soporte para el Consumidor de este Manual del Propietario También puede env...

Page 21: ... lesiones graves o la muerte Ŷ 12 XVH XQ SURORQJDGRU FRQ HVWH FRQGLFLRQDGRU GH LUH GH Ventana Ŷ 12 XVH SURWHFWRUHV FRQWUD SLFRV GH FRUULHQWH QL DGDSWDGRUHV para múltiples tomacorrientes con este Acondicionador de Aire de Ventana CÓMO CONECTAR LA ELECTRICIDAD 1XQFD EDMR QLQJXQD FLUFXQVWDQFLD FRUWH R HOLPLQH HO WHUFHU FDEOH WLHUUD GHO FDEOH GH FRUULHQWH 3DUD VX VHJXULGDG personal este electrodomésti...

Page 22: ...acondicionador de aire está encendido puede ajustarse SDUD TXH VH DSDJXH DXWRPiWLFDPHQWH GHQWUR GH D horas Cómo realizar el ajuste Pulse la tecla Delay 1 24hr Retardo 1 24h en la unidad o Delay pad Retardo del control remoto Cada toque de las teclas AumentoŸ Reducción ź en la unidad o las teclas Aumento Reducción en el control remoto definirá el temporizador en intervalos GH KRUD D OX GH Ajuste se...

Page 23: ...nque y comience el enfriamiento Descripciones de enfriamiento Para enfriamiento normal Seleccione el modo Cool Frío y ventilador High Alto o Med Medio con una temperatura de ajuste media Para enfriamiento máximo Seleccione el modo Cool Frío y ventilador High Alto con una temperatura de ajuste menor Para enfriamiento silencioso y enfriamiento nocturno 6HOHFFLRQH HO PRGR RRO UtR YHQWLODGRU Low Bajo ...

Page 24: ...ador automática no puede utilizarse en el modo Fan only Solo ventilador Pantalla de Control Encendida y Apagada A fin de reducir el brillo durante las horas de sueño la pantalla de control de este acondicionador de aire cuenta con una función de apagado automático donde la pantalla de control se apagará completamente luego de 2 minutos de inactividad Para iluminar la interface del control presione...

Page 25: ...ufe del tomacorriente de la pared antes de limpiar 3DUD OLPSLDU XVH DJXD XQ GHWHUJHQWH VXDYH 1R XVH FORUR R materiales abrasivos Bobinas para exteriores Se deben inspeccionar con frecuencia las bobinas en el lado exterior del acondicionador de aire Si las mismas están obstruidas con suciedad u hollín podrían limpiarse profesionalmente Cómo insertar las pilas en el control remoto 5HWLUH OD FXELHUWD...

Page 26: ...nea usar solamente tiene 2 tomas es su responsabilidad hacer que un técnico lo reemplace por uno de tres tomas con conexión a tierra OJXQRV PRGHORV UHTXLHUHQ YROWLRV de corriente alterna protegidos por un fusible de dilatación de tiempo o un cortacircuitos Estos modelos deberían instalarse en un ramal exclusivo del circuito para un rendimiento más notable y para prevenir sobrecargas en los circuit...

Page 27: ...r de la ventana Panel de acordeón izquierdo 5LHO ODWHUDO 7RS UDLO JDVNHW Sello de la banda de OD YHQWDQD Aislante de Gomaespuma Sello del panel GH DFRUGHyQ Soporte angular SDUD DOIpL DU Trabas para PDUFRV 6RSRUWHV HQ 9 Tipo A tornillos Tipo C WRUQLOORV Perno tipo F con 2 WXHUFDV Perno tipo E con 2 WXHUFDV Tipo B WRUQLOORV PARTES INCLUIDAS Apariencia puede variar ...

Page 28: ...HO XPEUDO SDUD KDFHUOD Ǝ PiV alta que la parte superior del marco de la ventana de tormentas o del marco vinilo Péguelo firmemente con clavos o con tornillos proporcionados por el instalador Ǝ PiV DOWR que el marco de ventana de tormentas Marco de ventana de tormentas Madera 8PEUDO Ǝ PDV DOWR TXH HO PDUFR YLQLOR HQ DOJXQDV YHQWDQDV Marco vinilo FRQ SDQHOHV GH DFRUGHyQ 3 PREPARE EL ACONDICIONADOR D...

Page 29: ...R GHO VHOOR GH DFRUGHyQ GRV EDQGDV FRUWDV GKLHUD XQD EDQGD GH VHOODGR respectivamente del lado izquierdo y del lado derecho de los paneles de acordeón como se muestra E Deslice los paneles de acordeón de izquierda a derecha sobre los rieles de montaje superior e inferior F Adjunte los soportes laterales a la caja usando 6 tornillos tipo A 5 17 5 17 1R WLUH R levante esta zona porque pueden provoca...

Page 30: ...a bloqueo de ventana para otros tipos de ventanas Perfore orificios piloto si fuera necesario 5 PREPARE LA VENTANA E INSTALE LA CAJA D Enlace el soporte en V y la ficha del soporte en V con una tuerca y un tornillo Tipo F E Coloque los soportes en V en la base de la carcasa para que estén cerca de la pared exterior Sujete el soporte en V a cada lado de la parte inferior de la carcasa con pernos ti...

Page 31: ...STALE EL ACONDICIONADOR EN LA CARCASA A Deslice el acondicionador de aire dentro GH OD FDUFDVD GH OD EDQGHMD LQIHULRU 1R haga presión sobre los controles carcasa de poliestireno de la descarga de aire o las serpentinas de aletas Verifique que el acondicionador de aire se encuentre firmemente asentado 1R SUHVLRQH en estas áreas porque puede dañarse la unidad Bandeja inferior 6 INSTALE EL ACONDICION...

Page 32: ...acordeón de ambos lados B Corte el aislante de gomaespuma en la longitud medida del lado izquierdo y derecho del acordeón 127 VHJ UHVH GH PHGLU FDGD DFRUGHyQ ya que la longitud puede ser diferente en cada lado C Retire el adhesivo de la parte trasera del aislante de gomaespuma Adhiera el aislante de gomaespuma en el acordeón derecho e izquierdo y dentro de los marcos 127 7HQJD HO FXLGDGR GH FXEULU...

Page 33: ...na B Asegúrese de que haya un tomacorriente cerca de la ubicación del orificio o efectúe arreglos para instalar un tomacorriente C Coloque la carcasa en la abertura de la pared y coloque guías de soporte de madera entre la parte inferior de la carcasa y el revestimiento de aislación sobre ambos lados del riel inferior Deben ser de la misma altura del riel inferior y de la misma longitud de la aber...

Page 34: ... la calefacción no están abiertos y se encuentran retornando el aire frío Las bobinas de enfriamiento se congelaron 9HU Acondicionador de aire congelándose PiV DGHODQWH El acondicionador de aire se está congelando El hielo bloquea el flujo de aire hacia el acondicionador de aire evitando que se enfríe la habitación En modelos con los botones de control coloque el control de modo en High Fan Ventil...

Page 35: ...ien podría solicitársele que lleve el producto a una centro de servicio de GE Appliances autorizado para realizar la reparación En Alaska la garantía excluye el costo de envío o las visitas de servicio a su casa Algunos estados no permiten la exclusión o las limitaciones de daños incidentales o consecuenciales Esta garantía da derechos legales específicos y usted podría tener otros derechos que va...

Page 36: ...tía aún está vigente La puede adquirir en cualquier momento a través de Internet Los Servicios de GE Appliances aún HVWDUiQ DOOt FXDQGR VX JDUDQWtD FDGXTXH Q 88 GEAppliances com ge service and support shop for extended service plans htm R OODPH DO GXUDQWH HO KRUDULR FRPHUFLDO KDELWXDO Conectividad Remota 3DUD VROLFLWDU DVLVWHQFLD FRQ OD FRQHFWLYLGDG GH UHG LQDOiPEULFD SDUD PRGHORV FRQ DFWLYDFLyQ U...

Reviews: