Summary of Contents for AKD-8

Page 1: ...GEH 5687A Installation Manual I GE AKD 8 Low Voltage Switchgear MODS Installation And Maintenance Instructions Courtesy of NationalSwitchgear com ...

Page 2: ...llout Elements A AKR 75 Fuse Rollout Carriage B AKR 100 Fuse Rollout Carriage 3 8 Compartments for Future Breakers 3 9 Auxiliary Transition Sections 3 10 Bus Area A Busing System B INSUL BAR Bus Insulation System 3 11 Feeder Cable and Busway Compartment 3 12 Ground Bus 3 13 AKD 8 Outdoor Switchgear 39 6 46 6 47 6 48 7 49 7 49 9 49 9 50 11 50 12 51 12 51 12 53 13 53 I 13 13 SECTION V Installing and...

Page 3: ...ance Requirements A General 9 2 Breaker and Instrument Compartments A Breakers A 1 Test for Proper Operation A 2 Checks after Breaker is De energized A 3 Lubrication B Instruments Instrument Transformers and Relays C Breaker Compartment Interiors 9 3 Bus Area 9 4 Cable and Busway Compartment 9 5 Over all Switchgear 9 6 Paint Refinishing 9 7 Circuit Breaker Lifting Mechanism 66 74 74 66 74 74 66 74...

Page 4: ...the switchgear SECTION VII OPERATING THE SWITCHGEAR covers how to operate the breakers and contains information concerning draw out provisions doors and various accessories SECTION VIII ENERGIZING THE SWITCHGEAR outlines the steps to be taken before and during the electrical energization of the equipment NOTE The personnel responsible for installing operating and servicing this equipment should be...

Page 5: ...t 1 General arrangement drawings including front view and floor plan 2 Elementary and connection drawings or wiring routing tables which indicate and identify test and connection points including terminal blocks device studs switch con tact developments and remote connections 3 Summary of switchgear equipment which is a list of all the components furnished with the switchgear including the breaker...

Page 6: ...arge items such as hoist dollies and hoist carriages used with indoor equipment will always be shipped in sepa rate crates or cartons See Fig 2 2 B Inspecting for Damage All equipment leaving the factory is carefully inspected and packed by personnel experienced in the proper handling and packing of electrical equipment Upon receipt of any equip ment immediately perform a visual inspection to asce...

Page 7: ... 45 degrees If this is not possible because of lack of headspace spreader bars must be used Also lift cables with greater load capability may be necessary depending upon the angle between the cables and the crane hook A Lifting The switchgear sections are best handled by lifting with a crane as shown in Fig 2 3 Removable lifting plates are pro vided as standard equipment on the top of each switchg...

Page 8: ...ECTION II Receiving Handling and Storage ft Fig 2 4 Location of lifting plates AKD 8 outdoor enclosure Fig 2 5 Recommended method of lifting AKD 8 outdoor enclosure by crane using cable spreader 8 Courtesy of NationalSwitchgear com ...

Page 9: ... side support timbers must be placed along the sides to prevent any damage that could be caused by the lifting cables In addition a spreader bar must be inserted between each lift cable both front and rear above the switchgear equipment as shown in Fig 2 5 Proceed to lift and place the outdoor switchgear utilizing all the precautions and requirements that apply to lifting the indoor switchgear The...

Page 10: ...rage LIFTING PLATES MUST BE REMOVED WHERE SECTIONS ARE JOINED ROLLER v E o KS FRONT VIEW SIDE VIEW v Fig 2 8 Method of rolling equipment into place WOOD BEAM SIDE VIEW Fig 2 9 Recommended method of jacking AKD 8 outdoor equipments 10 Courtesy of NationalSwitchgear com ...

Page 11: ...he switch gear are then repositioned at the forward end This proce dure should be continued until the switchgear is in its final location 4 When the switchgear is in its final position remove all lug bolts holding the shipping skids to the switchgear line up 5 Place one jack at each corner front and rear of the switchgear Carefully raise the line up evenly and remove the rollers and the shipping s...

Page 12: ...ATERIAL FROM INSIDE THE SWITCHGEAR SECTIONS BEFORE ENER GIZING ANY INTERNAL HEATERS TO PREVENT FIRE REMOVE ANY PLASTIC OR POLYETHYL ENE SHROUDING FROM THE SWITCHGEAR SECTIONS BEFORE ENERGIZING ANY INTER NAL HEATERS B Circuit Breakers If circuit breakers are not to be placed into service at once remove them from their shipping cartons and thoroughly inspect them for damage If the breakers are in sa...

Page 13: ...nd instrumentation It may also be an integral part of a load center unit substation either single ended or double ended 3 1 General This section contains a description of the General Electric AKD 8 Low voltage Switchgear It also describes the func tions of the electrical and mechanical systems Figure 3 1 shows the installation of a typical single ended load center unit substation Fig 3 1 Installat...

Page 14: ...R OR INSTRUMENT COMPARTMENT INSTRUMENT TRAY VERTICAL RISER BUS BARS CABLE TERMINATION AREA 1 BREAKER COMPARTMENT RUN BACK AND CABLE TERMINATION A CABLE COMPARTMENT DOORS VERTICAL CONTROL WIRE GUTTER BREAKER COMPARTMENT u V INSTRUMENT TRAY N B MAIN BUS BARS COMPARTMENT DOORS BREAKER COMPARTMENT RUN BACKS AND CABLE TERMINATION BREAKER COMPARTMENT J1 C INSTRUMENT TRAY ENCLOSED TROUGH CONTROL CIRCUIT ...

Page 15: ...ided with self aligning primary and secondary disconnecting contacts breaker locking mechanism and integral trip programmer The indi vidual sections compartments and devices are described in the following paragraphs LOAD CENTER UNIT SUBSTATION TRANSFORMER PRIMARY SECTION SHIPPING PACKAGE AKD 8 LOW VOLTAGE SECTION SHIPPING PACKAGE SHIPPING PACKAGE TRANSITION SECTION SWITCH UNIT BREAKER SECTIONS q A...

Page 16: ...eter switch pilot lights or annunciator and test switches 3 3 Compartment Area The front enclosure of each section is divided into individual compartments These compartments house either a low voltage power circuit breaker or are used to mount instru ments control components and other ancillary devices WARNING WITH THE STANDARD SLIDE OUT INSTRUMENTATION TRAY IN THE OPEN POSI TION LIVE TERMINALS AR...

Page 17: ... The grille 5 Fig 3 4 on the tray face with the openings 6 in the stationary cover provide an indirect path for the entrance of cooling air An instrument compartment with a recessed swinging instru ment panel Fig 3 5 is available as a standard feature These panels can be used to mount meters and or instruments and other devices associated with the incoming supply circuit Switches used in various c...

Page 18: ...ected position Breaker compartment doors do not have any ventilation slots thus protecting operators from hot ionized gases which may be vented by the breaker during circuit interrup tion Additionally the breaker compartment Fig 3 7 is enclosed by grounded steel barriers on the top sides bot tom and front In the back a flame retardant arc track resis tant glass filled polyester base minimizes the ...

Page 19: ...SECTION III Description Fig 3 7 Circuit breaker compartment 22 inch showing rollout carriage for AKR 30 50 T50 breakers 19 Courtesy of NationalSwitchgear com ...

Page 20: ...vices i e those compartments where the line terminals are the bottom primary stabs The shutters are constructed from glass reinforced polyester insulating material NOTE If a fuse rollout FRO carriage is used with an AKR 75 or AKR 100 circuit breaker whose compartment is equipped with shutters the FRO compartment will also be equipped with shutters Referring to Fig 3 8 the combination of the statio...

Page 21: ...inch wide compartments and are supported on drawout rails 6 Fig 3 8 The AKR 125 circuit breaker is installed in a 38 inch wide compartment and is supported on drawout rails The shutters are not retracted when the breaker is in the Disconnect Position As the circuit breaker is racked from the Disconnect Position to the Test Position the rear of the circuit breaker frame depresses the shutter operat...

Page 22: ...N POSITION The breaker is completely out of its compartment ready for removal from the equip ment The door must be open Note that extra items shown in Figs 3 8 3 9 and 3 10 such as secondary disconnects current transformers position switches and ground sensor secondary disconnects may appear in any compartment or not be included at all depend ing on the equipment specified Primary disconnects are ...

Page 23: ...ent to the withdrawn posi tion is manually performed after opening the compartment door These positions are illustrated and described more fully in Section V of this instruction book CAUTION THE DOOR SHOULD NOT BE OPENED WHEN THE CIRCUIT BREAKER IS CLOSED AND IN THE CONNECTED POSITION ALTHOUGH THE BREAKER COMPARTMENT DOOR MAY BE OPENED IN ANY POSITION IT IS RECOMMENDED THAT THE DOOR ONLY BE OPENED...

Page 24: ...ere frame size Standard 30 000 ampere interrupting and short time capability 480 volts Four high stacking 22 inch wide sections Increased IC and short time rating 42 000 amperes at 480 volts AKR 30H B AKRU 30 Fused Circuit Breaker Fig 3 15 800 ampere frame size 300 through 1600 ampere integral fusing 200 000 ampere interrupting rating Four high stacking 22 inch wide sections Fig 3 14 AKR 30 circui...

Page 25: ...a fuse rollout element FRO 1600 ampere frame size 450 through 2500 ampere integral fusing 200 000 ampere interrupting rating Four high stacking 22 inch wide sections F AKRT 50 Circuit Breaker 2000 ampere frame size Standard 65 000 ampere interrupting and short time capability at 480 volts Four high stacking 22 inch wide sections physical loading A AKR 75 Rollout Carriage Fig 3 17 3000 ampere ratin...

Page 26: ...pments Transition section width to an AKD 5 or 6 equipment is usually twelve inches Power company metering requirements generally require either a 30 inch or 38 inch wide auxiliary section to accom modate the current transformers kilowatt hour meters demand meters etc as required by their individual practices tariff schedules and or regulatory commissions Figure 3 19 is a partial front view of aty...

Page 27: ...SECTION III Description Fig 3 20 Auxiliary transition compartments view of bottom section Fig 3 19 Auxiliary transition section partial front view 27 Courtesy of NationalSwitchgear com ...

Page 28: ...e vertical bus bars are supported at the breaker run ins 2 which are bolted to the molded bases 3 that form the rear wall of the breaker compartment The horizontal bus bars are supported by the power connectors 4 which are bolted copper or welded aluminum to the vertical bus bars All bolted supports and connections are accessible from the rear for maintenance The bus area is fully isolated from th...

Page 29: ...symmetrical is available as an option Aluminum bus bars between sections are bolted and then welded together to provide one continuous aluminum main bus in general when the switchgear equipment has no more than four sections or does not exceed 10 feet in length it will be shipped as one complete lineup In such cases the only field assembly would be to a close coupled transformer if the switchgear ...

Page 30: ...24 that fully insulates and isolates each phase of the main and vertical buses is option ally available for AKD 8 switchgear when specified With the INSUL BAR system there are no live connections accessible in the rear of each section except the cable lugs A vertical barrier 2 Fig 3 25 between the transition section 1 and the first breaker section is furnished where specified Fig 3 25 Transition s...

Page 31: ...the vertical riser bus bars 2 Fig 3 26 is provided by installing phase isolation barriers 3 between the bus bars and by mounting covers 4 over the bus bars The top portion of the vertical bus is shown with the cover removed NOTE Aluminum bus bars would normally be welded at the power connectors to the vertical riser bus bars 5 v Fig 3 27 Insul bar horizontal bus insulation system Fig 3 26 Insul Ba...

Page 32: ...its within the switchgear equipments See Fig 3 29 When furnished the terminal boards 2 Fig 3 29 for such connections are mounted in an enclosed vertical wiring trough mounted on the side of the cable compartment The trough is of steel construction with bolted covers to provide an isolation barrier between the control wiring 1 and the adjacent power cables A neutral bus insulated from ground is pro...

Page 33: ...ousing completely encloses the switchgear and is provided with a walk in front aisle for easy access to all controls and instruments A light with wall switch 2 Fig 3 32 and a 115 volt conve nience outlet 4 are standard devices supplied with outdoor switchgear equipments Also included in the walk in front aisle area are the breaker lifting device 2 Fig 3 31 and storage provision for the hoist opera...

Page 34: ...on against condensation of mois ture that could in combination with air borne contaminants deteriorate insulation or cause corrosion One 250 watt 115 volt ac heater is located on the floor of the bus compartment of each outdoor switchgear section The heaters should be energized at all times to prevent condensation within the switchgear Si a Fig 3 33 Location of space heater 5 X r I Fig 3 32 Outdoo...

Page 35: ...gear equipment will have been predetermined during the specification and or procurement of equipment phases Indoor locations within buildings impose certain requirements which must be met so that the switchgear may operate efficiently with a minimum of maintenance In locating the AKD 8 Switchgear adequate aisle space must be provided at the front and rear of the equipment to ensure proper ventilat...

Page 36: ...ment anchor points If studs or anchor bolts are to be used they should be installed in the foundation as it is poured It is important that the studs or bolts are spaced to agree with dimensions given on the General Electric job drawings The dimensions between anchor bolts for a particular installation are depen dent upon the configuration of equipment ordered The dimensions shown on Fig 4 1 cover ...

Page 37: ...OR CABLES O X 3 FRONT J NOTE BUS COMPARTMENT BARRIER LOCATION WHEN THIS OPTION IS PROVIDED IT REDUCES AVAILABLE SPACE FOR CABLES ABOVE BY 5 INCHES Equipment Depth A Direction of Leads B Below 15 60 or 67 With Fused AKRU 50 Above 24 Below 22 67 or 74 With Fused AKRU 50 Above 31 Below 29 74 Deep Except With AKRU 50 38 Above Fig 4 2 Floor plan and cable entry space indoor AKD 8 37 Courtesy of Nationa...

Page 38: ...he center channel is a structural stabili B PROTECTED AISLE AREA 44 62 INDOOR AKD 8 SWITCHGEAR 1 50 1 50 REAR DOOR CENTER SUPPORT CHANNEL RECESSED SUPPORT CHANNEL FRONT DOOR 3 a FRONT SUPPORT CHANNEL LT fp u A REAR SUPPORT CHANNEL j I SIDE VIEW i 11 00 o T 4 c I LINEUP WIDTH D i I PLAN VIEW AT LEVEL A C D A B DIMENSIONS IN INCHES Sub Base Depth Depth of Indoor Switchgear Depth of Outdoor Switchgea...

Page 39: ... be consulted for anchor ing recommendations for equipments subject to operational and or environmental seismic shock loading NOTE Prior to assembling and installing the switchgear equipment the foundation must be absolutely level and clear of debris to prevent damage to the switchgear equipment Anchor bolts and channel are to be provided by the pur chaser the clamp plates Fig 4 4 are supplied wit...

Page 40: ...l mating sections of the equipment line up including transformer if applicable must be securely fastened together prior to tightening anchor bolts fastening the equipment to the mounting surface pr L A A 19 1 2 t 4 4 RUN BACKS 20 2 REMOVE THE SHIPPING SKIDS The equipment is fas tened to the shipping skids with 3 lag screws through the equipment anchoring holes See Fig 4 6 4 t MAIN BUS 13 4 REAR DO...

Page 41: ...ling the equipment across the shipping splits is furnished with the equipment If a transformer is included in the line up of equipment the transformer flange should be aligned with the opening in the side of the transition compartment and fastened together using the 3 s 16 bolts nuts and washers supplied with switchgear The fastener assembly should be tightened with a torque of 25 30 ft lbs 4 COMP...

Page 42: ...te floor plan drawing and in the electrical drawings supplied with the equipment All grounding of the switchgear should be in accordance with National Electrical Code TO MAINTAIN THE MINIMUM CONTACT RESISTANCE ACROSS BOLTED BUS JOINTS CONTAINING TIN PLATED ALUMINUM CONDUC TORS IT IS RECOMMENDED THAT THE JOINT CONTACT SURFACES BE COATED WITH A FILM OF GE LUBRICATING GREASE 0282A2048P009 A CAN OF TH...

Page 43: ...m bus system it may be achieved provided installa tion personnel have the skill and equipment to perform MIG welding Figures 4 13 and 4 14 illustrate the assembly of the main bus splice plates on a bolted bus system Copper bus systems are normally supplied with flat washers and lockwashers aluminum systems are supplied with belleville washers at aluminum to aluminum or aluminum to copper joints Fi...

Page 44: ...C TORS IT IS RECOMMENDED THAT THE JOINT CONTACT SURFACES BE COATED WITH A FILM OF GE LUBRICATING GREASE 0282A2048P009 A CAN OF THIS GREASE IS SUPPLIED WITH THE EQUIPMENT DO NOT PUT GREASE ON THE BOLT THREADS AS THIS WILL AFFECT THE CLAMPING FORCE EXERTED BY THE BOLT ir i S a Fig 4 14 Plan view of a two bar main bus connection ft f 44 Courtesy of NationalSwitchgear com ...

Page 45: ...7 9 ft lbs 7 CONNECT TRANSFORMER FLANGE If a transformer is included in the equipment line up the flange should be connected to the switchgear opening using the gasket mate rial cement and fastening material supplied with the switch gear equipment 8 JOIN SECTIONS TOGETHER The switchgear equip ment within the outdoor enclosure should be joined to its mating sections in the manner described for indo...

Page 46: ...of the equipment is attached to the embedded channel sills 1 Fig 4 19 by two Vie inch fillet welds 2 It is recommended that two welds each 21 2 inches long min be used for each section to firmly tie the bottom width post 3 to the channel sill b The rear of the equipment may be anchored by one of three procedures The first method is by plug welds 4 Fig 4 19 using the anchor bolt holes in the rear s...

Page 47: ... for tightening the 1 2 13 NC bolts connected the busway stub conductions to the riser bus power connectors is 35 40 ft lbs E Control Wire Connections For external control wiring refer to Fig 4 21 for switchgear cable area dimensions and connect the control wires to the switchgear section as follows 1 When control conduits enter the switchgear from below they should not extend more than one inch a...

Page 48: ...the rear of the cable compartment as required See Fig 3 22 Mechanical cable terminals are normally included with the switchgear compression terminals are supplied when ordered and are mounted at the ends of the breaker run backs in the cable compartment Carefully follow the cable manufacturer s recommendations for installation of cable Install the cables in the proper path to the terminals using t...

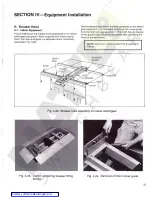
Page 49: ...to install the hoist assembly on the switch gear equipment it is necessary to remove the runner guide from the hoist carriage as shown in Fig 4 24 Do not dispose of this guide since it must be reinstalled after mounting the hoist on the equipment NOTE Maximum recommended lifting capacity is 700 lbs v Fig 4 22 Breaker hoist assembly on indoor switchgear Fig 4 23 Carton containing breaker lifting de...

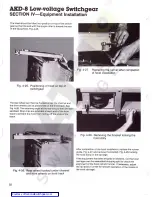
Page 50: ...en be reas sembled Stop clips are provided at each end of the front track to prevent the hoist from rolling off the ends of the track 3 Fig 4 28 Removing the bracket locking the hoist dolly After completion of the hoist installation replace the runner guide Fig 4 27 and remove the bracket Fig 4 28 locking the hoist dolly on the carriage If the equipment has been shipped in sections run the hoist c...

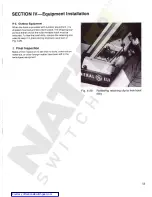
Page 51: ... movable track must be removed To free the hoist dolly remove the retaining clip used to keep it in place during shipment as shown in Fig 4 29 1 I Final Inspection Make a final inspection to see that no tools construction materials or other foreign matter have been left in the switchgear equipment I S s Fig 4 29 Removing retaining clip to free hoist dolly ii I 53 Courtesy of NationalSwitchgear com...

Page 52: ... for foreign mat ter that may have accumulated Clean these areas if nec essary Be sure that a thin film of GE lubricating grease 0282A2043P009 covers the contact areas before putting a breaker in the compartment 2 Check to see that the breakers match their respective compartments Each breaker is assigned a part or mark num ber This number is shown on the breaker sheets of the sum mary the front vi...

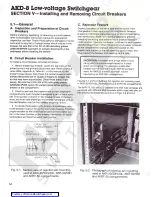
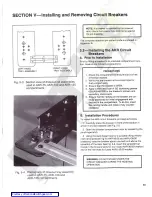
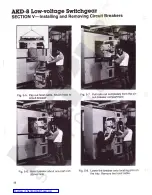
Page 53: ... positioned for initial engagement with the pins in the compartment To do this insert the racking handle and rotate it fully counter clockwise Fig 5 3 Section view of drawout rail assemblies used in AKR 75 AKR 100 and AKR 125 compartments B Installation Procedures To install the AKR circuit breakers proceed as follows 1 Carefully place the breaker in front of the section in which it is to be insta...

Page 54: ...Fig 5 7 Pull rails out completely from the cir cuit breaker compartment Fig 5 8 Lower the breaker onto locating pins on the tray Remove the hoist cable Fig 5 6 Hoist breaker about one half inch above rails 56 Courtesy of NationalSwitchgear com ...

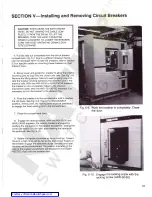
Page 55: ...he AKR 75 100 125 breakers it is necessary to bolt the breaker to the drawout tray h i i M f I m M 6 Push the breaker into the compartment until it reaches the rail stops See Fig 5 9 This is the DISCONNECT position At this point the racking arms must be positioned to engage the fixed racking pins in the compartment ii v 1 Fig 5 9 Push the breaker in completely Close the door 7 Close the compartmen...

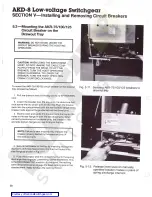
Page 56: ...il the rear bottom flange of the breaker rests against the guides behind the dowel pins 3 Slowly lower and guide the breaker onto the tray so the holes in the rear flange fit over the two dowel pins When correctly positioned on the dowel pins the breaker s rear and side bottom flanges will rest firmly on the tray NOTE Failure to seat properly may indicate the breaker is being barred by the rejecti...

Page 57: ...ker all the way out to its WITH DRAWN position On manually operated breakers this release lever is labeled PUSH TO WITHDRAW 4 Before proceeding visually check the breaker s spring charge and close indicators to verify that the breaker is open and the springs are discharged 5 Remove the two inch hex head screws Fig 5 11 which fasten the breaker to the compartment tray 6 Attach the lifting device to...

Page 58: ... mounting hole per tang each Class L fuse tang has two holes sized for one half inch bolts Appendix G includes a tabulation of the range of fuse sizes available for these breakers including catalog numbers of both General Electric CLF and Gould Shawmut Fuses Class J fuses rated 300 through 600A have one mounting hole per tang The 300 350 and 400A sizes require copper adapter bars as shown in Fig 5...

Page 59: ...TS INBOARD TANG IS POSITIONED BENEATH THE BREAKER STUD THIS TANG IS OFFSET WITH RESPECT TO THE OPPOSITE END FIG 5 17 SO THAT ROTATING THE FUSE DOES NOT ALTER THE POSITION OF THE PRIMARY DISCONNECT NOTE This removal does not disturb the discon nects clamping force adjustment 2 Remove the upper barrier 4 3 Detach the inboard end of the fuse by removing the two Vfc 13 NC bolts A ratchet and socket wi...

Page 60: ...is panel can be opened to allow access to the fuses Fig 5 19 only when the FRO is in the WITHDRAWN position In all other positions an interference plate attached to the right side of the panel prevents it from being opened Operation of the breaker compartment keylock is the same for all models With the breaker open the key can be removed this extends the lock bolt thereby maintaining the breaker i...

Page 61: ...cts on the FRO provide the voltage sig nals across each fuse to the OPEN FUSE LOCKOUT DEVICE on the associated circuit breaker Fig 5 22 Fig 5 21 Key is captured in key interlock until breaker is tripped Fig 5 20 View showing insertion of key in FRO key interlock to release FRO racking mechanism Fig 5 22 View showing Open Fuse Lockout Device on the associated breaker 63 Courtesy of NationalSwitchge...

Page 62: ...the primary power circuit When the breaker is first put into service its control circuit must be thoroughly tested while in this position to make sure that all closing and tripping circuits are complete and func tioning properly The TEST position is not suitable for inspection and mainte nance of the breaker and should therefore be used only for testing breaker operation Refer to the appropriate b...

Page 63: ...rotection are set to operate instanta neously that is without intentional time delay at 115 per cent of the highest value of phase current which is likely to occur as the result of any anticipated motor starting or Complete Instructions for testing the programmer are included welding currents with the test set The publication number is GEK 97367 7 Make certain that field wiring is clear of live bu...

Page 64: ... of the escutcheon The spring must be charged first 1 FOR AKR 30 AND AKR 50 BREAKERS A complete charge is accomplished by either rotating the handle counter clockwise back to the normal position or by using three similar cycles of about 50 degrees each 2 FOR AKR 75 AKR 100 AND AKR 125 BREAKERS These breakers require the handle to be rotated counterclock wise through 120 degrees and then back for f...

Page 65: ...ated by markings which appear on both sides of the breaker escutcheon as it moves through the door cutout 7 3 Front Doors A Operation The front access doors on all general AKD 8 Switchgear are hinged and equipped with a pinch type latch Fig 7 3 To open the door place your thumb and forefinger on the latch and squeeze B Removal and Installation Refer to Fig 7 3 and remove or install the switchgear ...

Page 66: ...mechanism padlock device is available to prevent unauthorized racking of the breaker The rackout mecha nism for AKR 30 AKR 50 AKRU 30 and AKRU 50 circuit breakers may be locked in either the DISCONNECTED TEST or CONNECTED position AKR 75 and AKR 100 circuit break ers may be locked in the DISCONNECTED or TEST position C 2 Padlocking the AKR 30 50 T50 AND AKRU 30 50 Breakers See Fig 7 6 To padlock t...

Page 67: ...icated by markings which appear on both sides of the breaker escutcheon as it moves through the door cutout 7 3 Front Doors A Operation The front access doors on all general AKD 8 Switchgear are hinged and equipped with a pinch type latch Fig 7 3 To open the door place your thumb and forefinger on the latch and squeeze B Removal and Installation Refer to Fig 7 3 and remove or install the switchgea...

Page 68: ... mechanism padlock device is available to prevent unauthorized racking of the breaker The rackout mecha nism for AKR 30 AKR 50 AKRU 30 and AKRU 50 circuit breakers may be locked in either the DISCONNECTED TEST or CONNECTED position AKR 75 and AKR 100 circuit break ers may be locked in the DISCONNECTED or TEST position C 2 Padlocking the AKR 30 50 T50 AND AKRU 30 50 Breakers See Fig 7 6 To padlock ...

Page 69: ...nerally mounted on the stationary primary disconnect studs in the breaker compartment and are readily accessible for inspec tion and replacement In some applications they are located in the bus compartment or in the transition section When current transformers are mounted in device compart ments care must be exercised when installing or removing transformer mounting screws so as not to strip the h...

Page 70: ... 8 2 Take out two 1 4 inch hex head screws on each side of the frame A socket wrench with a 7 is inch driving head with 4 inch extension will be needed WARNING UNLESS THE PROPER PRECAU TIONS ARE TAKEN THE REMOVAL OF A SHUTTER UNIT PRESENTS THE HAZARD OF ELECTRICAL SHOCK AND BURN DO NOT REMOVE THE SHUTTER UNIT UNLESS THE EQUIPMENT HAS BEEN DE ENERGIZED FAILURE TO DO THIS CAN RESULT IN SERIOUS INJUR...

Page 71: ...e is then maneuvered forward past the cam plates on each side then upward and forward over the cam pins NOTE If the compartment contains a position switch Fig 7 10 it must be moved slightly to allow the frame to be taken out To do this remove two 1 4 inch hex head screws which hold the position switch mounting bracket to the right stringer of the compartment It is not necessary to disconnect the w...

Page 72: ...roceed as follows 1 Carefully maneuver the shutter frame into the compart ment first lifting it over the cam pins on each side wall and past the cam plates 2 Tip the upper edge back so it will slip up behind the vertical shield at the top rear of the compartment 3 Position the rear flanges of the shutter frame against the vertical stringers at the rear corners of the compartment WARNING UNLESS THE...

Page 73: ... and other operating mechanisms exercised Electrical insulation resistance tested phase to phase and phase to ground Relays meters and instruments properly connected Electrically operated breakers and operating mecha nisms exercised Ground fault protection system tested Adjustable trips properly set Field wiring secured and free of live bus Grounding connections made All debris scrap wire etc remo...

Page 74: ...y further charging of the closing springs After the prop is set do not apply undue force to the maintenance handle b On AKR 75 and AKR 100 breakers depress the SPRING DISCHARGE lever located under the horizontal support on the front frame The springs should discharge and if the latch is properly reset the breaker will close 2 Electrically operate the breaker several times to check performance of t...

Page 75: ... inspect all devices to see that they are function ing properly Check that all electrical connections are tight Check mounting of the device Under normal conditions the protective relays do not oper ate therefore it is important to check the operation of these devices regularly Refer to Relay Instruction Books for detailed instructions C Breaker Compartment Interiors WARNING DE ENERGIZE EQUIPMENT ...

Page 76: ...in the acrylic enamel with 0282A4534P006 this thinning is only necessary if the paint was received in a five gallon drum Use one part thinner to four parts enamel as a starting point to obtain the correct spraying viscosity When paint is received in less than five gallon quantities the paint has been factory thinned Both the primer and paint should be applied only when the temperature is above 55 ...

Page 77: ... 1 250 000 1 500 000 1 750 000 2 000 000 42 These torque values are for non lubricated threads APPENDIX B Circuit Breaker Rejection Features B 1 General In general drawout breakers of the same type and rating are interchangeable in their equipment compartments drawout breakers of different frame sizes of short circuit ratings are intentionally made non interchangeable To prevent inserting the wron...

Page 78: ...o the above rule Breakers of the same frame size having different short circuit ratings may be interchanged in one direction only Specifically 1 An AKR 30H can be inserted into an AKR 30 compartment 2 An AKR 50H can be inserted into an AKR 50 compartment The rejection hardware prevents the converse of 1 and 2 Figure B 2 shows the the rejection pin bracket combinations employed for the various brea...

Page 79: ...O Fig B 2 Rejection pin pattern code for AKR 30 50 breakers e E type compartments reject standard breakers e Standard compartments accept E type breakers E type rejection is an optional feature available on both A and B type breakers It is achieved by installing an extra pin in the right hand slide rail H location which engages an additional notch in the breaker s rejection bracket See Fig B 2 Som...

Page 80: ...ardware to each breaker and its compartment causing the compart ment to accept the correct breaker type and reject all others 4 K E e 4 4 4 4 H C A 4 4 G D B 0 e 4 4 I 7 L H TRAY ASSEMBLY R H TRAY ASSEMBLY L H Tray Rejection Pin Location R H Tray Rejection Pin Location Circuit Breaker Type CB Volts A C E B D F G H J K o o o o 250Vdc O o o AKR 75 O o o 500Vdc o o Legend Pin O No Pin O 600Vac O o o ...

Page 81: ...out compartment Only a 4000A ampere fuse rollout element may be installed in a 4000 ampere fuse rollout compartment The rejection pin pattern is shown on Fig B 3 Fig B 4 View showing location of rejection pins on drawout tray APPENDIX C Circuit Breaker Ratings Table C 1 General Circuit Breaker Ratings System Nominal Voltage 60 HZ AC Three phase Short Circuit Rating RMS Symmetrical kA Frame Size Am...

Page 82: ... or push button it may also be used in conjunction with protective relays for automatic tripping The shunt trip coil is rated for intermittent duty When ordered factory installed it is supplied with a cutoff switch which automatically removes control power following a breaker trip See Table D 1 The undervoltage trip device protects against harmful drops in line voltage by automatically tripping th...

Page 83: ...used for remote indication of an auto matic trip The lockout feature is available to mechanically lock the breaker open when the device is activated Reset is accomplished through operation of manual trip button or shunt trip device The bell alarm is available without the lockout feature when so specified Table D 3 Auxiliary Switch Position CB Main Contacts A B Contact Contact A A Open Open Closed ...

Page 84: ...n of circuit interruption under short circuit conditions Nevertheless modern circuit breaker mechanisms are capa ble of many operations under full load operation and in rush Table F 1 Repetitive Duty and Normal Maintenance Number of Operations Rated Continuous Current Switching A C D E F G H and J Number of Operations No Load Closing and Opening A B C D E F and G Number of Operations In Rush Curre...

Page 85: ...ous current rating of the circuit breaker at voltages up to the rated maximum voltage and at 85 of the power factor or higher I When closing currents up to 600 and opening currents up to 100 80 power factor or higher of the continu ous current rating of the circuit breaker at voltages up to the rated maximum voltage When closing currents up to 600 and opening currents up to 600 50 power factor or ...

Page 86: ...Notes V J 86 Courtesy of NationalSwitchgear com ...

Page 87: ...Notes 87 Courtesy of NationalSwitchgear com ...

Page 88: ...n o GE Electrical Distribution Control General Electric Company 41 Woodford Ave Plainville CT 06062 1996 General Electric Company GEH 6687A 0696 BLA V Courtesy of NationalSwitchgear com ...

Reviews: